# Seesaw - How Parents and Students Submit Work in Seesaw

This chapter provides instructions for parents or students for sharing student work samples on Seesaw.

*\*If you prefer a video format, this [Seesaw for HCOS video](https://canva.link/84nl3uzbs53gm71) provides an overview of how to **sign in to your account** using your home learning codes, how to **add your other children**, how to **switch between classes** (Foundations and CC/CC+) and how to **share learning.***

<p class="callout info">If a student is adding work samples, the parent should review and supervise until the student understands what to share with their support teacher. </p>

### Getting Started 

- Open your Seesaw Journal in the **Seesaw Class App** or by accessing [app.seesaw.me. ](https://app.seesaw.me/#/login)If you have logged in before, your family class should open without needing to log in again.

#### Step One:

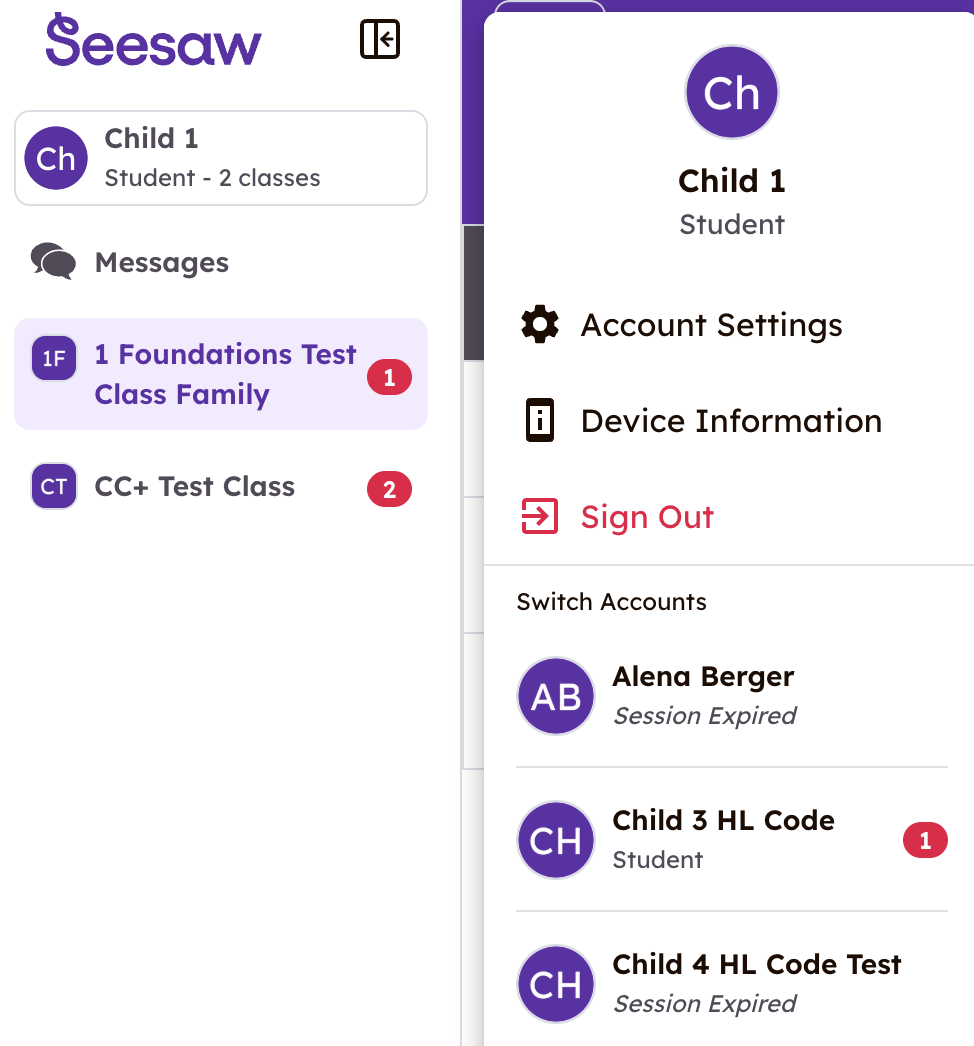
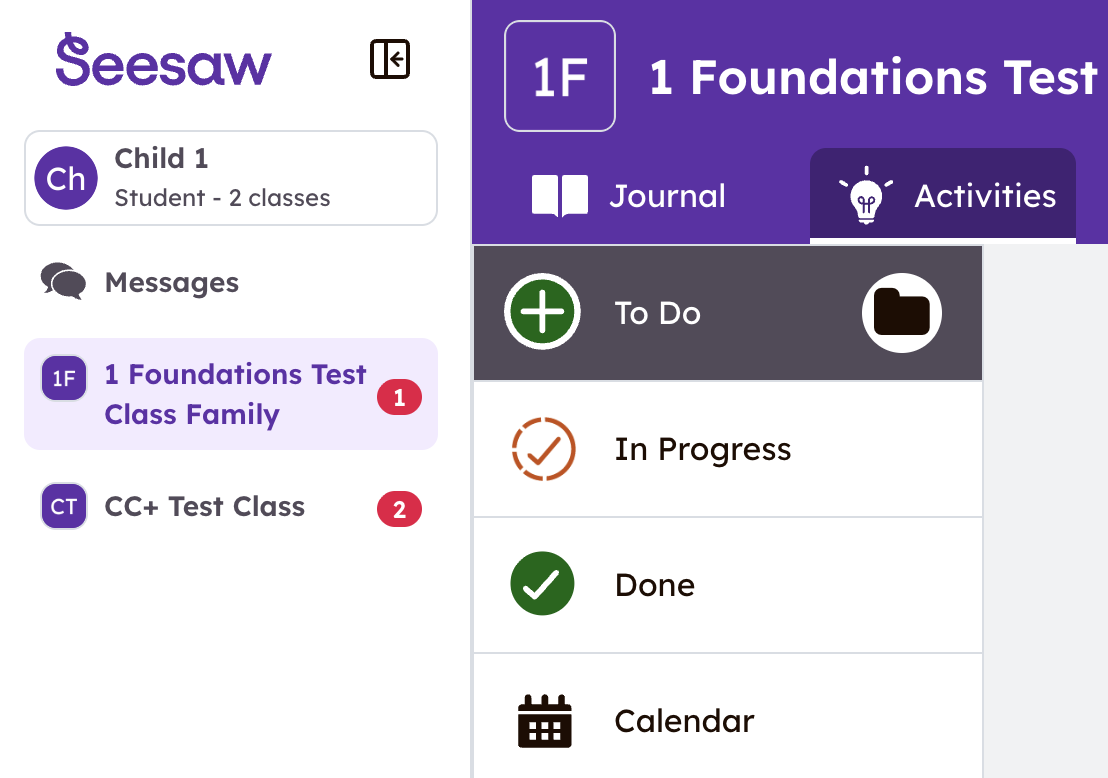
<table border="1" id="bkmrk-the-app-will-open-to" style="border-collapse: collapse; width: 100%; height: 58.8282px; border-width: 1px; border-color: rgb(0, 0, 0);"><colgroup><col style="width: 50%;"></col><col style="width: 50%;"></col></colgroup><tbody><tr style="height: 29.4141px; background-color: rgb(194, 224, 244);"><td style="height: 29.4141px; border-color: rgb(0, 0, 0);">The app will open to the activity tab for the last class you were logged into.

- **Tip:** If your child is in CC/CC+, make sure you are in the Foundations Class, not the CC/CC+ class, when you post.
- When you **click your child's name** (top-left corner), you can see the other classes they are enrolled in.

</td><td style="height: 29.4141px; border-color: rgb(0, 0, 0);">Click the student name again to see the other children in your family. </td></tr><tr style="height: 29.4141px;"><td style="height: 29.4141px; border-color: rgb(0, 0, 0);">[![image.png](https://sophie.onlineschool.ca/uploads/images/gallery/2026-09/scaled-1680-/RvHimage.png)](https://sophie.onlineschool.ca/uploads/images/gallery/2026-09/RvHimage.png)

[![image.png](https://sophie.onlineschool.ca/uploads/images/gallery/2026-09/scaled-1680-/Jwtimage.png)](https://sophie.onlineschool.ca/uploads/images/gallery/2026-09/Jwtimage.png)
</td><td style="height: 29.4141px; border-color: rgb(0, 0, 0);">[![image.png](https://sophie.onlineschool.ca/uploads/images/gallery/2026-09/scaled-1680-/Y6Timage.png)](https://sophie.onlineschool.ca/uploads/images/gallery/2026-09/Y6Timage.png)

</td></tr></tbody></table>

#### Step Two:

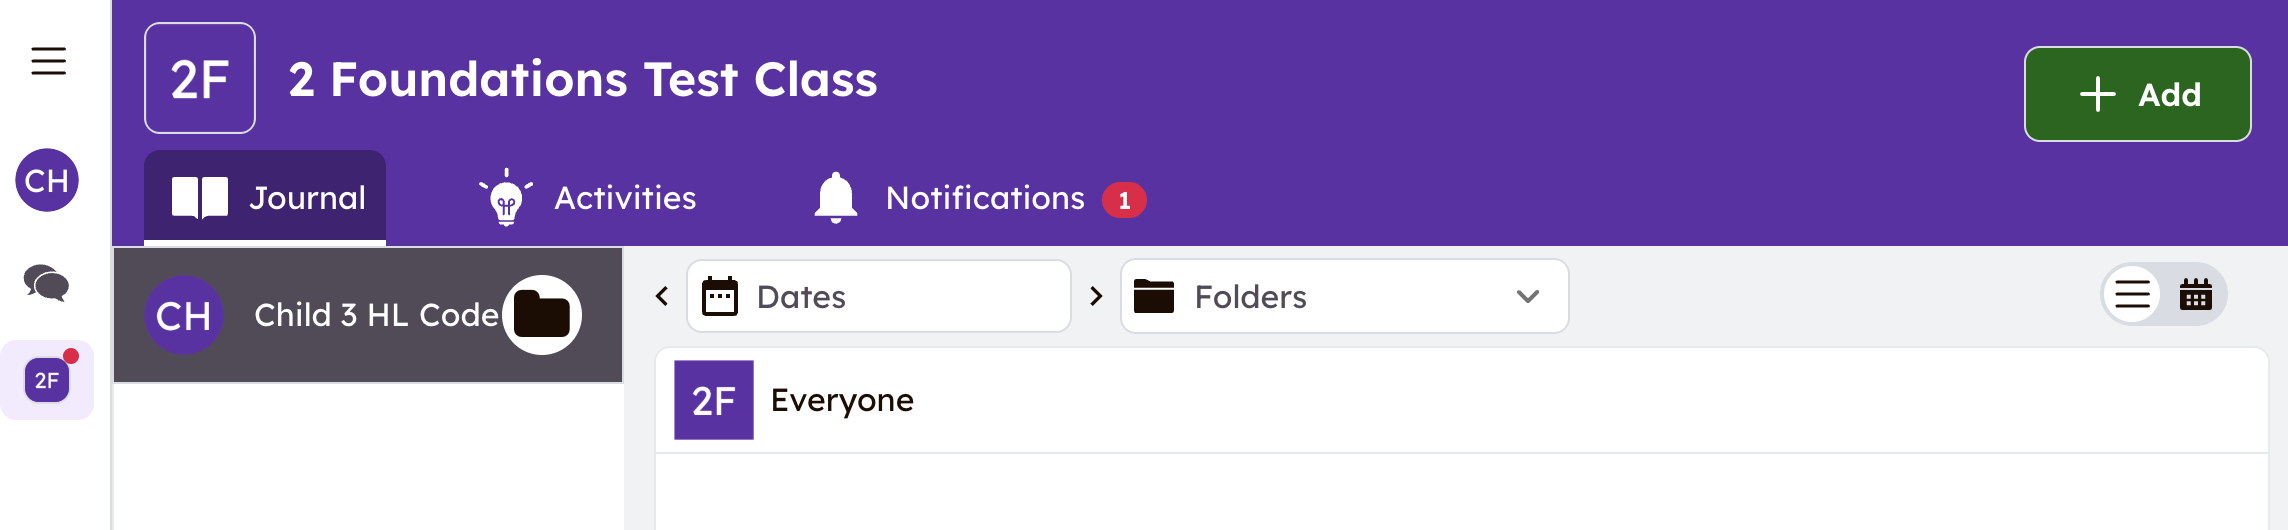
<table border="1" id="bkmrk-to-post-a-sample%2C-cl" style="border-collapse: collapse; width: 100%; border-width: 1px; border-color: rgb(0, 0, 0);"><colgroup><col style="width: 99.881%;"></col></colgroup><tbody><tr style="border-color: rgb(0, 0, 0); background-color: rgb(194, 224, 244);"><td style="border-color: rgb(0, 0, 0);">- To post a sample, click on the **Journal** tab. On the page that opens, you'll see any posts that were tagged for that child.
- Click the green + button to add a post.

</td></tr><tr><td style="border-color: rgb(0, 0, 0);">[![image.png](https://sophie.onlineschool.ca/uploads/images/gallery/2026-09/scaled-1680-/v7limage.png)](https://sophie.onlineschool.ca/uploads/images/gallery/2026-09/v7limage.png)

</td></tr></tbody></table>

#### Step Three:

<table border="1" id="bkmrk-on-the-page-that-ope" style="border-collapse: collapse; width: 99.7619%; height: 410.729px; border-width: 1px; border-color: rgb(0, 0, 0);"><colgroup><col style="width: 100%;"></col></colgroup><tbody><tr style="background-color: rgb(194, 224, 244); height: 124.268px;"><td style="height: 124.268px; border-color: rgb(0, 0, 0);">On the page that opens:

- **Select a creative too**l that best fits the work to be uploaded:
    
    
    - Use the **'upload'** feature to add photos from their phone camera roll, computer, or Google Drive.
    - Take a **photo or video** right in the app.
    - Click the **pencil** to make a drawing, write notes, etc.
    - Use the "**note"** pad for a written post.
    - Click the **"link"** button to share a link (e.g., to a video, other document, etc.)

- Follow the prompts for the Creative Tool you are using to upload the samples.

</td></tr><tr style="height: 347.461px;"><td style="padding-left: 120px; height: 347.461px; border-color: rgb(0, 0, 0);"><span id="bkmrk--5" style="font-weight: normal;"><span style="font-size: 11pt; font-family: Poppins, sans-serif; color: rgb(0, 0, 0); background-color: transparent; font-weight: 400; font-style: normal; font-variant: normal; white-space-collapse: preserve;"><span style="border-width: initial; border-style: none; display: inline-block; overflow: hidden; width: 624px; height: 401px;">![](https://sophie.onlineschool.ca/uploads/images/gallery/2025-10/embedded-image-ebdj5nl9.png)</span></span></span></td></tr></tbody></table>


#### Step Four:

<table border="1" id="bkmrk-you-can-edit-the-pos" style="border-collapse: collapse; width: 100%; height: 353.692px; border-width: 1px; border-color: rgb(0, 0, 0);"><colgroup><col style="width: 50.0372%;"></col><col style="width: 50.0372%;"></col></colgroup><tbody><tr style="height: 67.2266px; background-color: rgb(194, 224, 244);"><td style="height: 67.2266px; border-color: rgb(0, 0, 0);">You can **edit the post** by adding voice recordings, drawings, text labels, or captions by clicking the icons to the left of your screen.

</td><td style="height: 67.2266px; border-color: rgb(0, 0, 0);">You can also click the **quotation mark button** at the bottom left of the page to record a voice message or upload an audio file to accompany the work sample.

</td></tr><tr style="height: 286.465px;"><td style="height: 286.465px; border-color: rgb(0, 0, 0);"><span id="bkmrk--7" style="font-weight: normal;"><span style="font-size: 11pt; font-family: Poppins, sans-serif; color: rgb(0, 0, 0); background-color: transparent; font-weight: 400; font-style: normal; font-variant: normal; white-space-collapse: preserve;"><span style="border-width: initial; border-style: none; display: inline-block; overflow: hidden; width: 120px; height: 330px;">![](https://sophie.onlineschool.ca/uploads/images/gallery/2025-10/embedded-image-nmtwlxuq.png)</span></span></span></td><td style="height: 286.465px; border-color: rgb(0, 0, 0);">[![image.png](https://sophie.onlineschool.ca/uploads/images/gallery/2026-09/scaled-1680-/ghuimage.png)](https://sophie.onlineschool.ca/uploads/images/gallery/2026-09/ghuimage.png)

</td></tr></tbody></table>


##### Step Five:

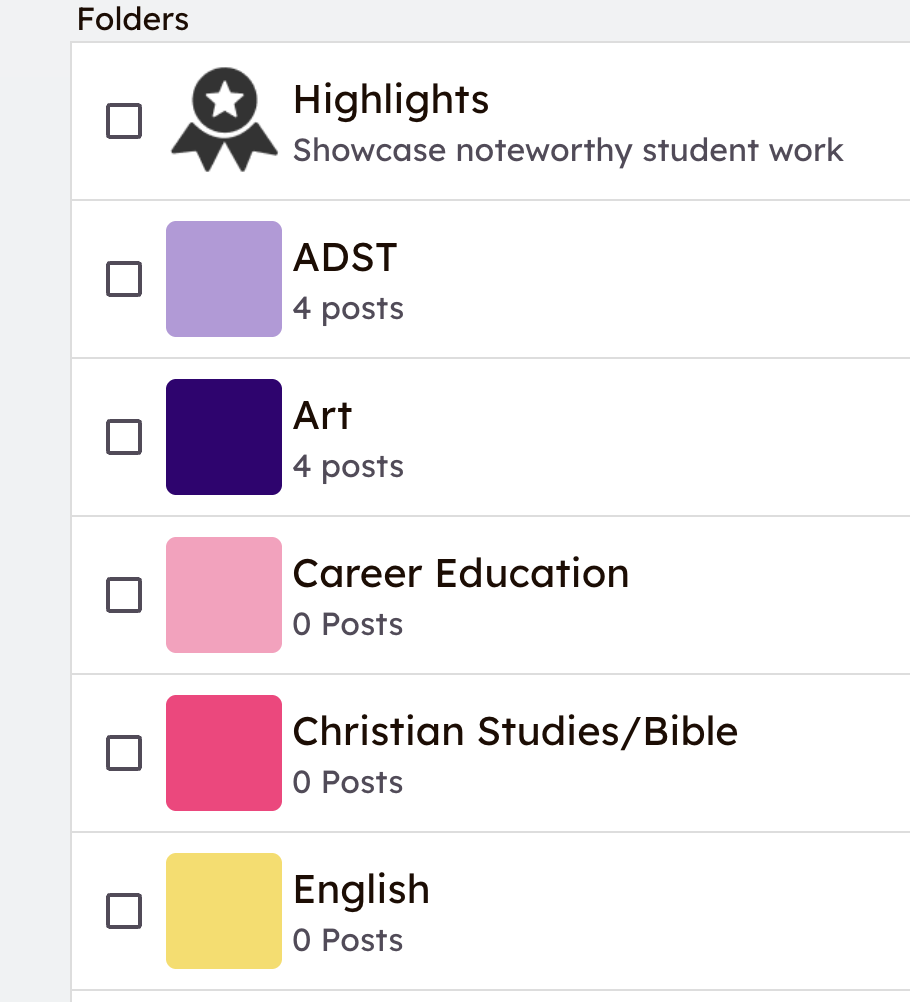
<table border="1" id="bkmrk-tap-the-green-%27check" style="border-collapse: collapse; width: 100%;"><colgroup><col style="width: 50%;"></col><col style="width: 50%;"></col></colgroup><tbody><tr style="background-color: rgb(194, 224, 244);"><td><span style="font-size: 11pt; font-family: Poppins, sans-serif; color: rgb(0, 0, 0); background-color: transparent; font-weight: 400; font-style: normal; font-variant: normal; white-space-collapse: preserve;">Tap the **green 'check mark'** at the top right to complete your post</span></td><td>**Optional:** select a folder or folders to tag your work sample. It will appear in your journal with subject tags. </td></tr><tr><td><span style="font-weight: normal;"><span style="font-size: 11pt; font-family: Poppins, sans-serif; color: rgb(0, 0, 0); background-color: transparent; font-weight: 400; font-style: normal; font-variant: normal; white-space-collapse: preserve;"><span id="bkmrk--10" style="font-weight: normal;"><span style="font-size: 11pt; font-family: Poppins, sans-serif; background-color: transparent; font-weight: 400; font-style: normal; font-variant: normal;"><span style="border-width: initial; border-style: none; display: inline-block; overflow: hidden; width: 63px; height: 49px;">![](https://sophie.onlineschool.ca/uploads/images/gallery/2025-10/embedded-image-xfv0maqu.png)</span></span></span></span></span></td><td>[![image.png](https://sophie.onlineschool.ca/uploads/images/gallery/2026-09/scaled-1680-/QuKimage.png)](https://sophie.onlineschool.ca/uploads/images/gallery/2026-09/QuKimage.png)

</td></tr></tbody></table>

##### Step Six:

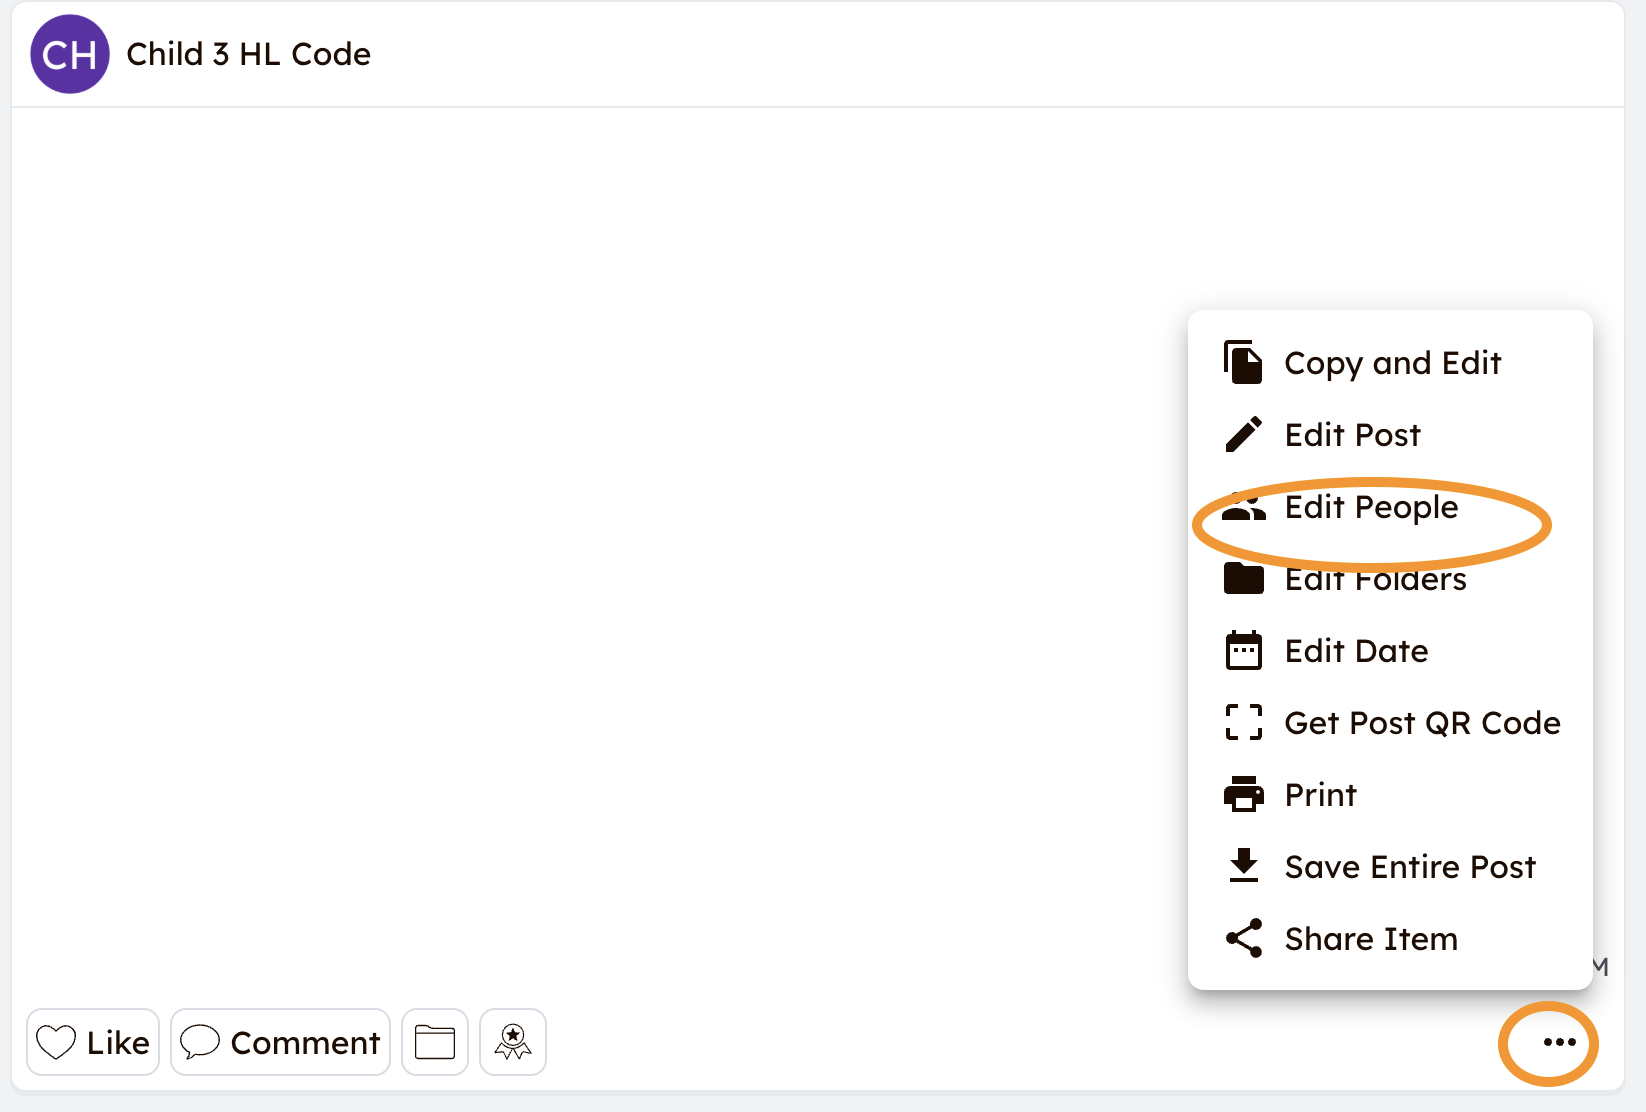
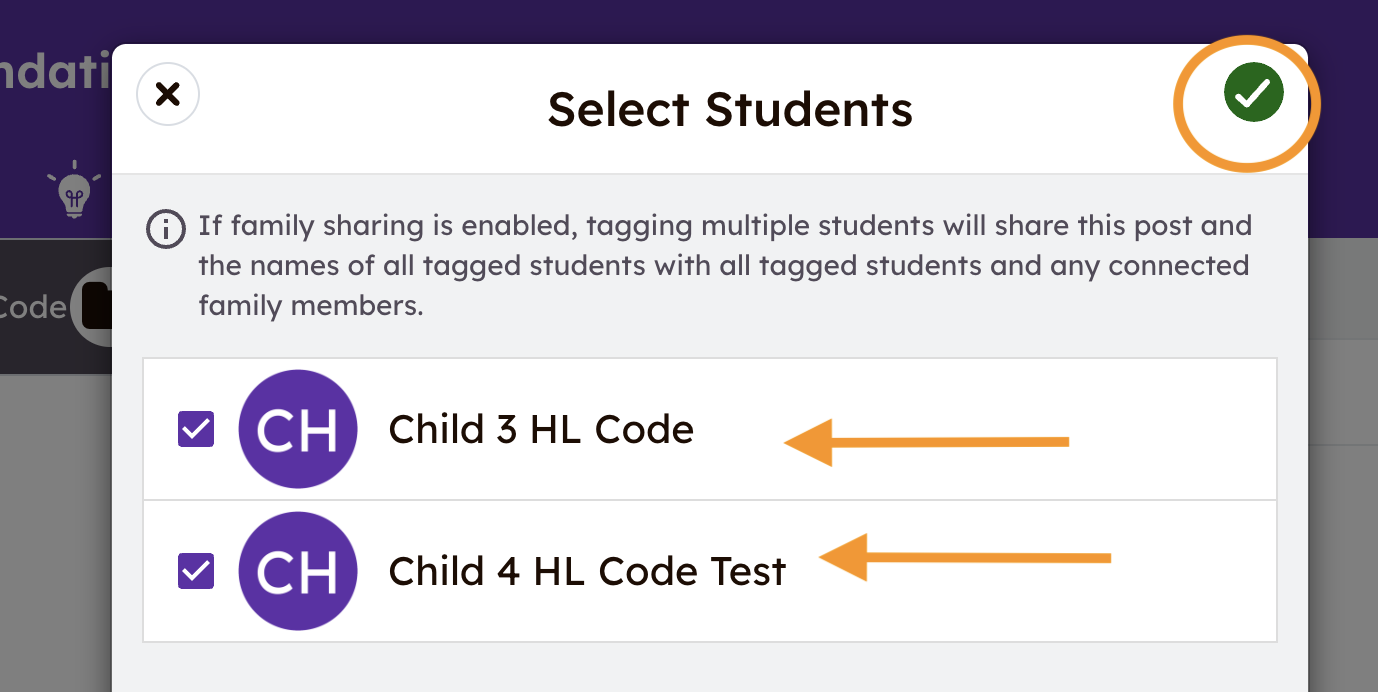
<table border="1" id="bkmrk-once-it%27s-posted%2C-cl" style="border-collapse: collapse; width: 100%; border-width: 1px; border-color: rgb(0, 0, 0);"><colgroup><col style="width: 50%;"></col><col style="width: 50%;"></col></colgroup><tbody><tr style="background-color: rgb(194, 224, 244); border-color: rgb(0, 0, 0);"><td style="border-color: rgb(0, 0, 0);">Once it's posted, click the t**hree dots in the bottom-right** corner of the post, then select "edit people" to add other students to that sample. </td><td style="border-color: rgb(0, 0, 0);">In the window that opens, **select the students** the post applies to, and click the **green checkmark** to add it to each portfolio. </td></tr><tr><td style="border-color: rgb(0, 0, 0);">[![image.png](https://sophie.onlineschool.ca/uploads/images/gallery/2026-09/scaled-1680-/vBTimage.png)](https://sophie.onlineschool.ca/uploads/images/gallery/2026-09/vBTimage.png)

</td><td style="border-color: rgb(0, 0, 0);">[![image.png](https://sophie.onlineschool.ca/uploads/images/gallery/2026-09/scaled-1680-/eicimage.png)](https://sophie.onlineschool.ca/uploads/images/gallery/2026-09/eicimage.png)

</td></tr></tbody></table>


##### Step Seven:

- To add a comment or additional details about the post, click the 'Comment' box under the posted work sample and write your comment. You can also add a voice comment by clicking the microphone. If the comment applies to all students, simply add that to the note.

<span style="color: rgb(34, 34, 34); font-family: Poppins, sans-serif; font-size: 2.333em; font-weight: 400;">Additional Support</span>

[How to use Multipage](https://help.seesaw.me/hc/en-us/articles/360033052712-How-to-use-Multipage) to post up to 20 pages

[How to add multiple photos to a post](https://help.seesaw.me/hc/en-us/articles/115004047626-How-to-add-multiple-photos-to-a-post)