# Seesaw Support

This chapter has step-by-step instructions for parents for basic Seesaw setup details.

# New Page


# Seesaw - How To Submit Work for Foundations K-9 and Inclusive Education Parents

### Steps for Sharing Student Work Samples

##### Step One:

- Open your 'Seesaw Journal' in the 'Seesaw Class App' or by accessing [app.seesaw.me](http://app.seesaw.me). If you have logged in before, your family class should open without needing to log in again.
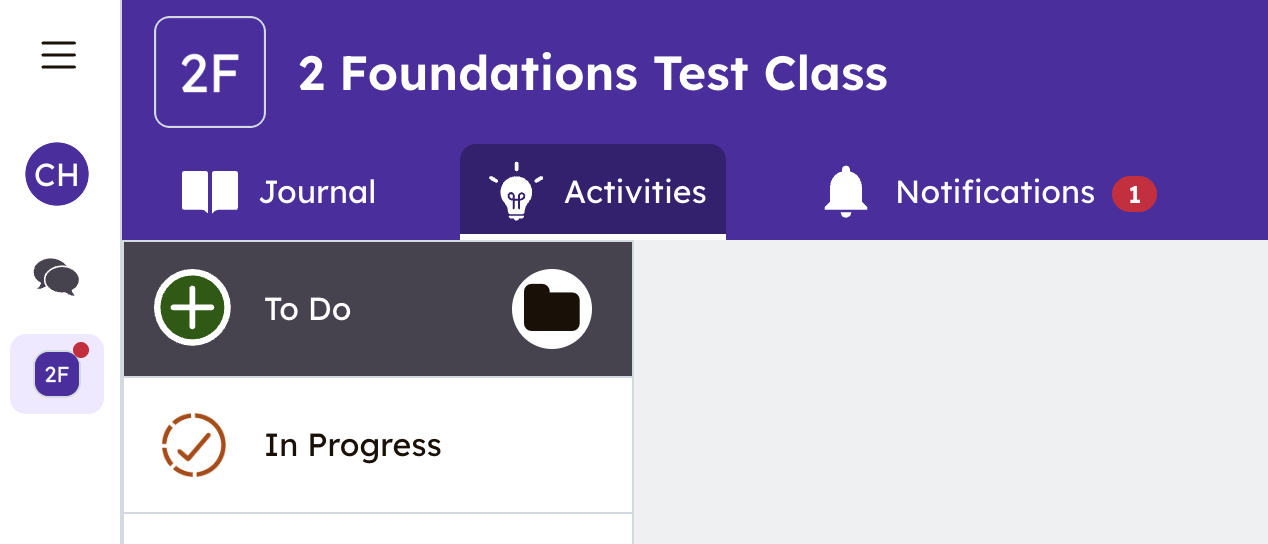
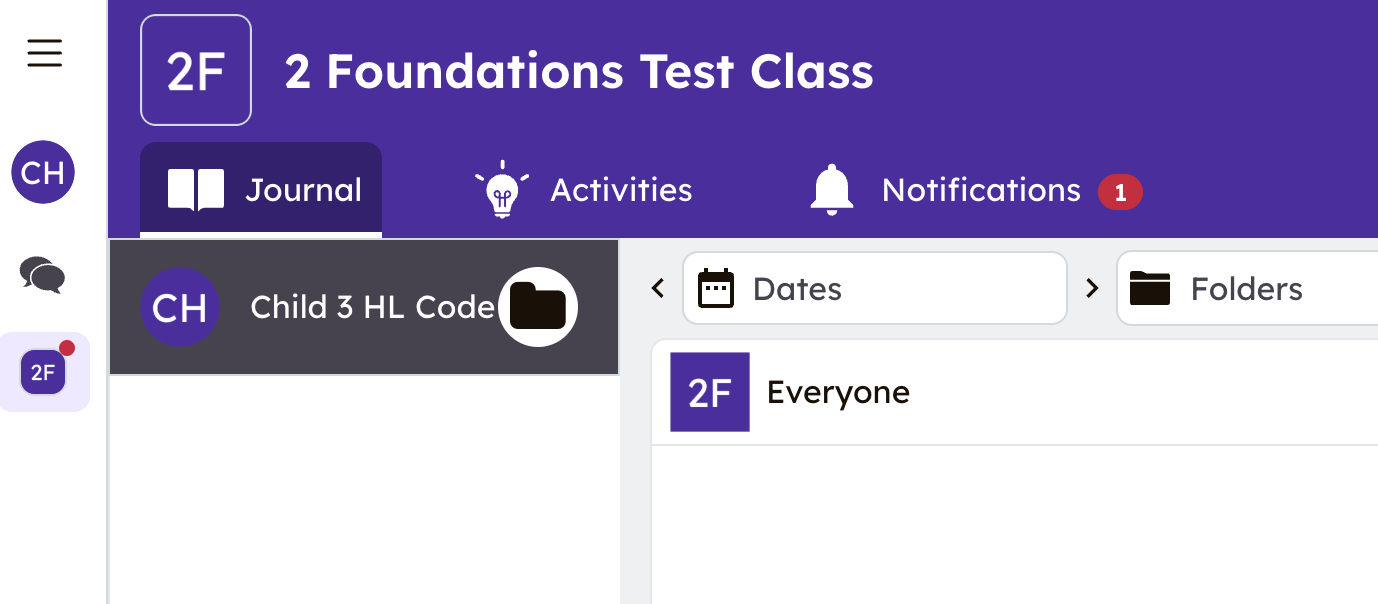
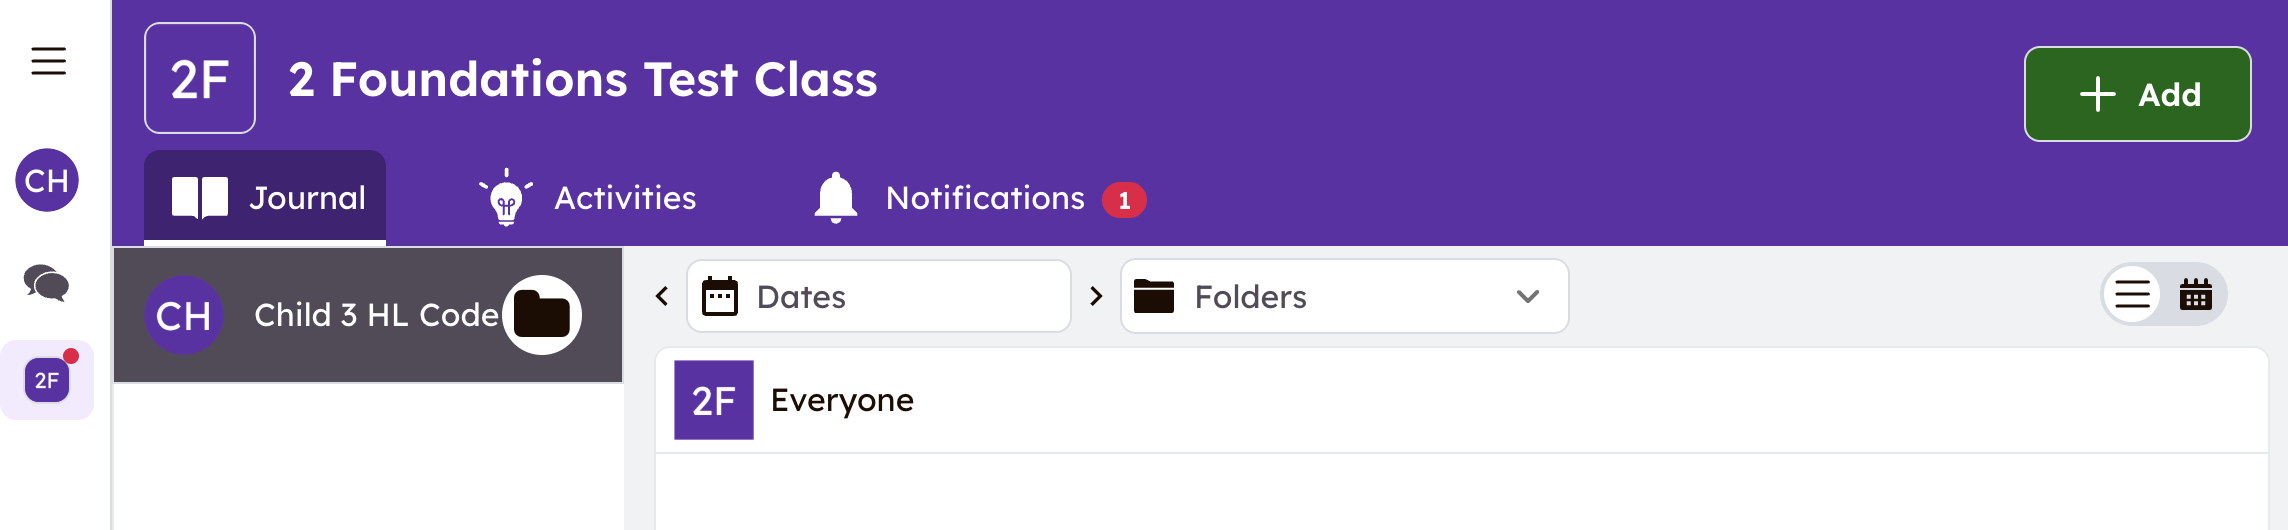
- The page will open to the **activity tab** for one of your children's accounts. Click on the **journal** tab to open the journal and post a sample. 
    - **Note**: The app will open to the last class you were logged into. If your child is in CC/CC+, make sure you are in the **Foundations Class**, not the CC/CC+ class, when you post.
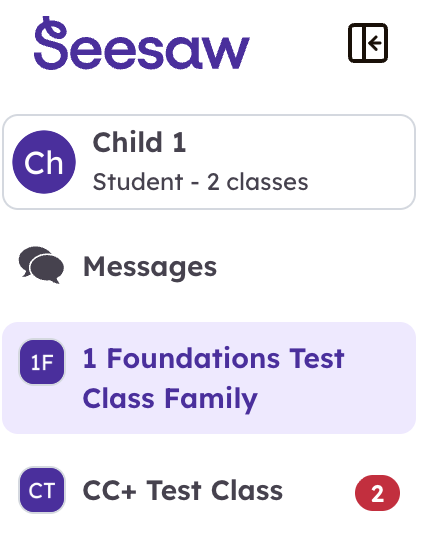
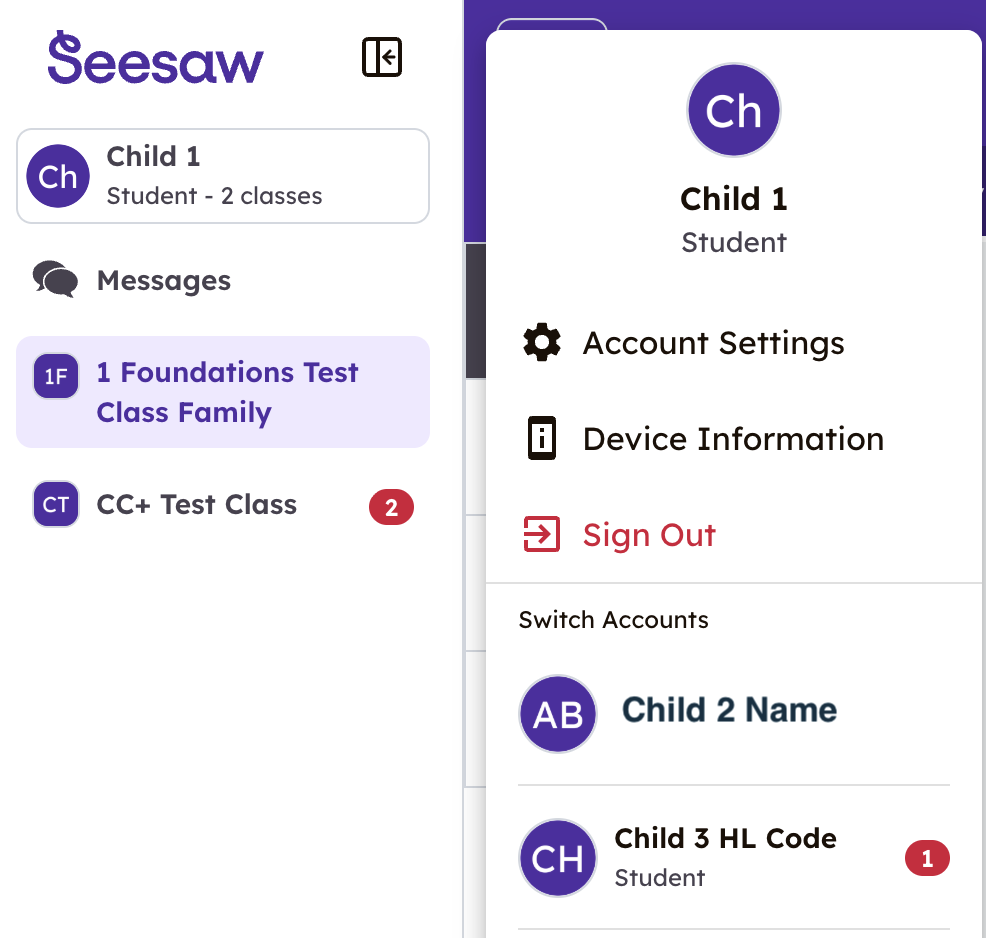
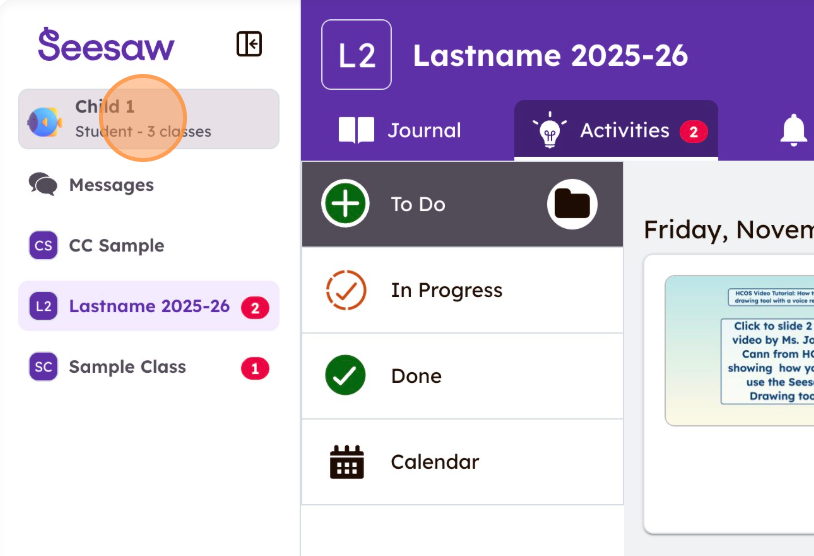
    - When you **click your child's name** (top-left corner), you can see and switch classes.

<table border="1" id="bkmrk-%C2%A0-opens-to-%22activiti" style="border-collapse: collapse; width: 99.998%; border-width: 1px; border-color: rgb(0, 0, 0);"><colgroup><col style="width: 50%;"></col><col style="width: 50%;"></col></colgroup><thead><tr style="background-color: rgb(194, 224, 244); border-color: rgb(0, 0, 0);"><td class="align-center" style="border-color: rgb(0, 0, 0);">**Opens to "Activities" Tab**

</td><td class="align-center" style="border-color: rgb(0, 0, 0);">**Click on the "Journal" tab to share a post**

</td></tr><tr><td style="border-color: rgb(0, 0, 0);">[![image.png](https://sophie.onlineschool.ca/uploads/images/gallery/2026-09/scaled-1680-/ph0image.png)](https://sophie.onlineschool.ca/uploads/images/gallery/2026-09/ph0image.png)

</td><td style="border-color: rgb(0, 0, 0);">[![image.png](https://sophie.onlineschool.ca/uploads/images/gallery/2026-09/scaled-1680-/QHjimage.png)](https://sophie.onlineschool.ca/uploads/images/gallery/2026-09/QHjimage.png)

</td></tr></thead></table>

##### Step Two:

<table border="1" id="bkmrk-click-the-green-%E2%80%98%2Bad" style="border-collapse: collapse; width: 100%; border-width: 1px; border-color: rgb(0, 0, 0);"><colgroup><col style="width: 99.881%;"></col></colgroup><tbody><tr style="background-color: rgb(194, 224, 244);"><td style="border-color: rgb(0, 0, 0);">**Click the green ‘+Add’ button (top right corner) to add work samples.**

</td></tr><tr><td style="border-color: rgb(0, 0, 0);">[![image.png](https://sophie.onlineschool.ca/uploads/images/gallery/2026-09/scaled-1680-/Y5Eimage.png)](https://sophie.onlineschool.ca/uploads/images/gallery/2026-09/Y5Eimage.png)

</td></tr></tbody></table>

##### Step Three:

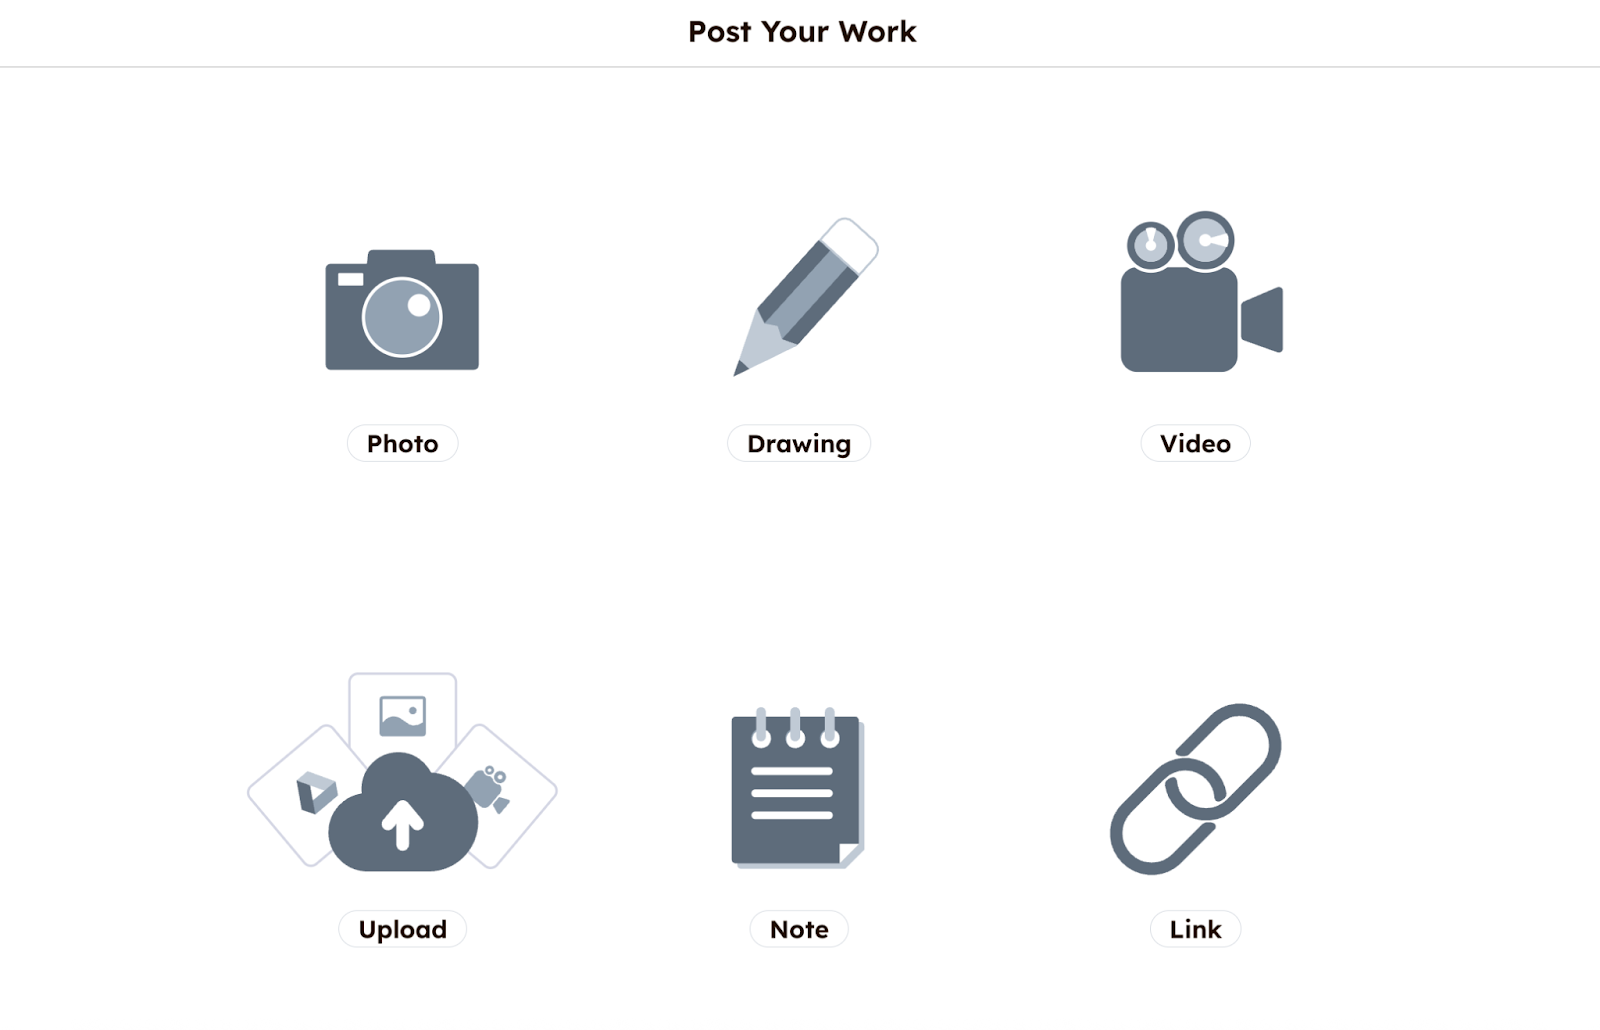
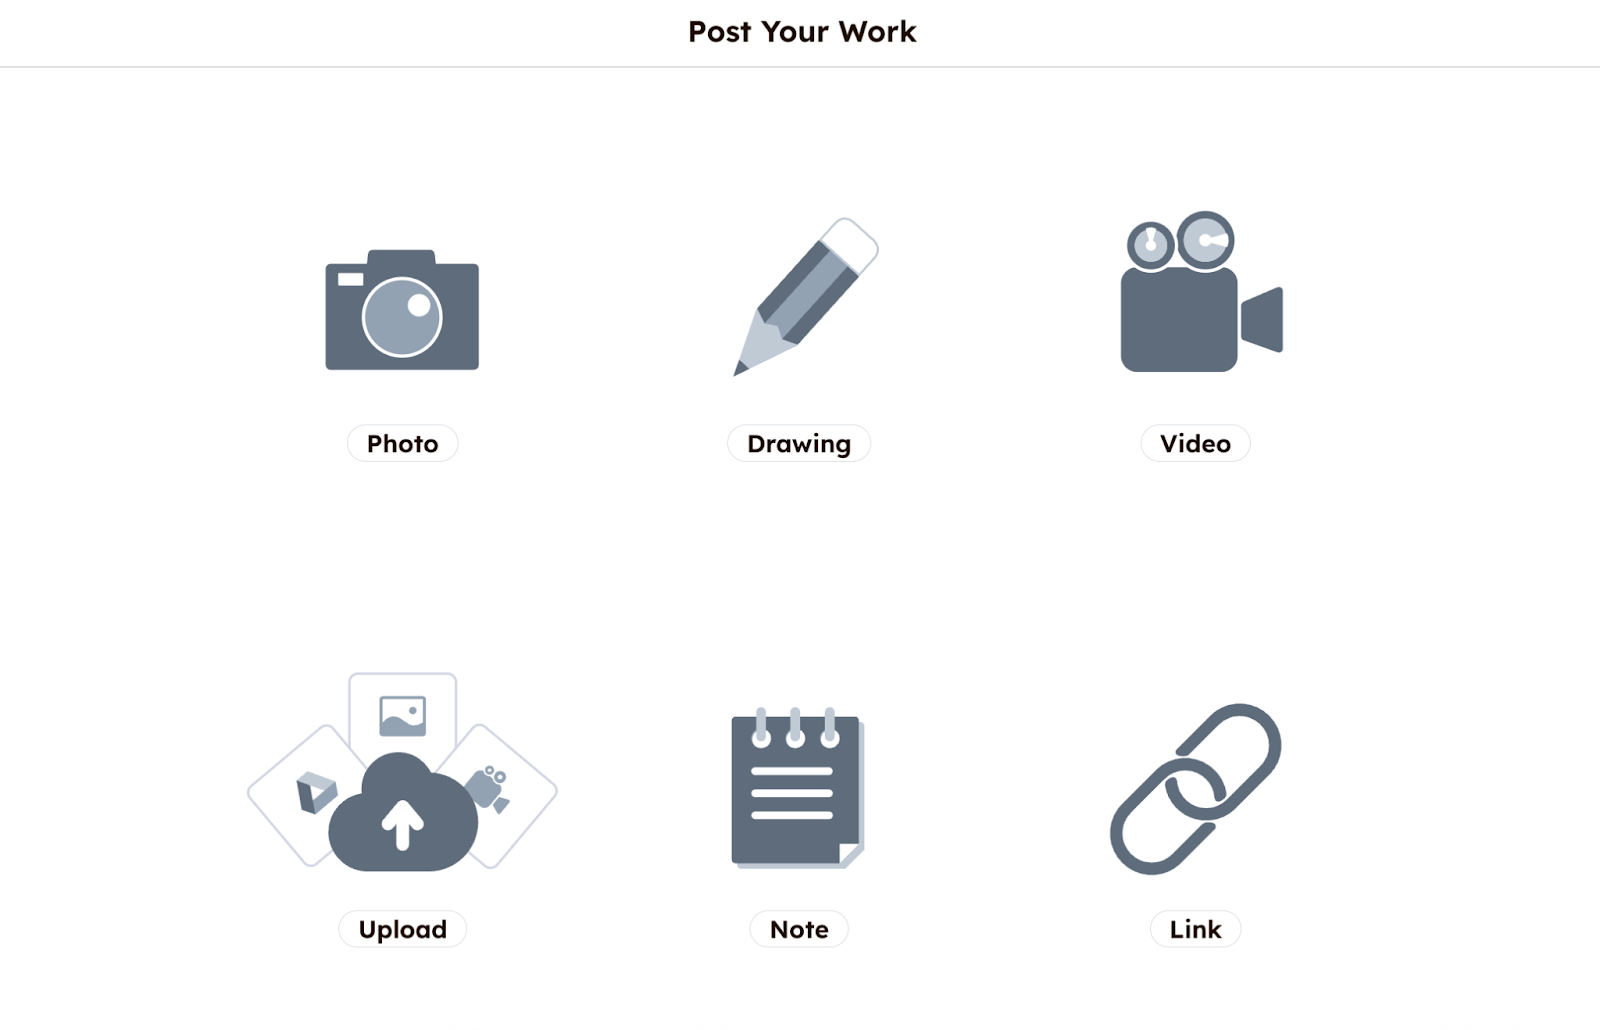
<table border="1" id="bkmrk-%C2%A0-a-new-window-will-" style="border-collapse: collapse; width: 97.9762%; border-width: 1px; border-color: rgb(0, 0, 0); height: 444.135px;"><colgroup><col style="width: 100%;"></col></colgroup><tbody><tr style="background-color: rgb(194, 224, 244); height: 125.674px;"><td style="border-color: rgb(0, 0, 0); height: 125.674px;">- A new window will open showing **Seesaw’s 'Creative Tools**' for posting work.
- Select **a creative tool** that best fits the work to be uploaded: take a photo of your work, upload a photo from your camera or computer, add a video, or link, or create your own work on a blank canvas or note page.

</td></tr><tr><td style="border-color: rgb(0, 0, 0);">[![image.png](https://sophie.onlineschool.ca/uploads/images/gallery/2026-09/scaled-1680-/ji4image.png)](https://sophie.onlineschool.ca/uploads/images/gallery/2026-09/ji4image.png)

</td></tr></tbody></table>


<p class="callout info">Many parents use the 'upload' feature to upload photos from their phone, computer, or Google Drive. Students can also take a photo or video using the built-in camera in the Seesaw App!</p>


##### Step Four:

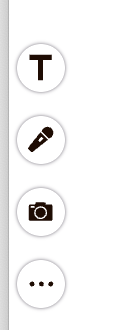
<table border="1" id="bkmrk-%C2%A0-you-can-edit-the-p" style="border-collapse: collapse; width: 100%; border-width: 1px; border-color: rgb(0, 0, 0);"><colgroup><col style="width: 50%;"></col><col style="width: 50%;"></col></colgroup><tbody><tr style="background-color: rgb(194, 224, 244);"><td style="border-color: rgb(0, 0, 0);">**You can edit the post by adding voice recordings, drawings, text labels, or captions by clicking the icons ton the left side of the screen.**

</td><td style="border-color: rgb(0, 0, 0);">**<span id="bkmrk-or-click-the-at-the--1"><span style="font-size: 11pt; font-family: Poppins, sans-serif; color: rgb(0, 0, 0); background-color: transparent; font-style: normal; font-variant: normal; white-space-collapse: preserve;">You can also click this button <span style="font-size: 11pt; background-color: transparent;">at the bottom left to </span></span></span>**

**<span id="bkmrk-record-a-voice-messa"><span style="font-size: 11pt; font-family: Poppins, sans-serif; color: rgb(0, 0, 0); background-color: transparent; font-style: normal; font-variant: normal; white-space-collapse: preserve;"><span style="font-size: 11pt; background-color: transparent;">record a voice message or upload an audio file to accompany your work sample.</span> </span></span>**

</td></tr><tr><td style="border-color: rgb(0, 0, 0);">[![image.png](https://sophie.onlineschool.ca/uploads/images/gallery/2026-09/scaled-1680-/Appimage.png)](https://sophie.onlineschool.ca/uploads/images/gallery/2026-09/Appimage.png)

</td><td style="border-color: rgb(0, 0, 0);">[![image.png](https://sophie.onlineschool.ca/uploads/images/gallery/2026-09/scaled-1680-/mh6image.png)](https://sophie.onlineschool.ca/uploads/images/gallery/2026-09/mh6image.png)</td></tr></tbody></table>

##### Step Five: 

<table border="1" id="bkmrk-%C2%A0-tap-the-green-%27che" style="border-collapse: collapse; width: 100%; border-width: 1px; border-color: rgb(0, 0, 0);"><colgroup><col style="width: 50%;"></col><col style="width: 50%;"></col></colgroup><tbody><tr style="background-color: rgb(194, 224, 244);"><td class="align-center" style="border-color: rgb(0, 0, 0);">**Tap the green 'check mark' at the top right to complete your post.**

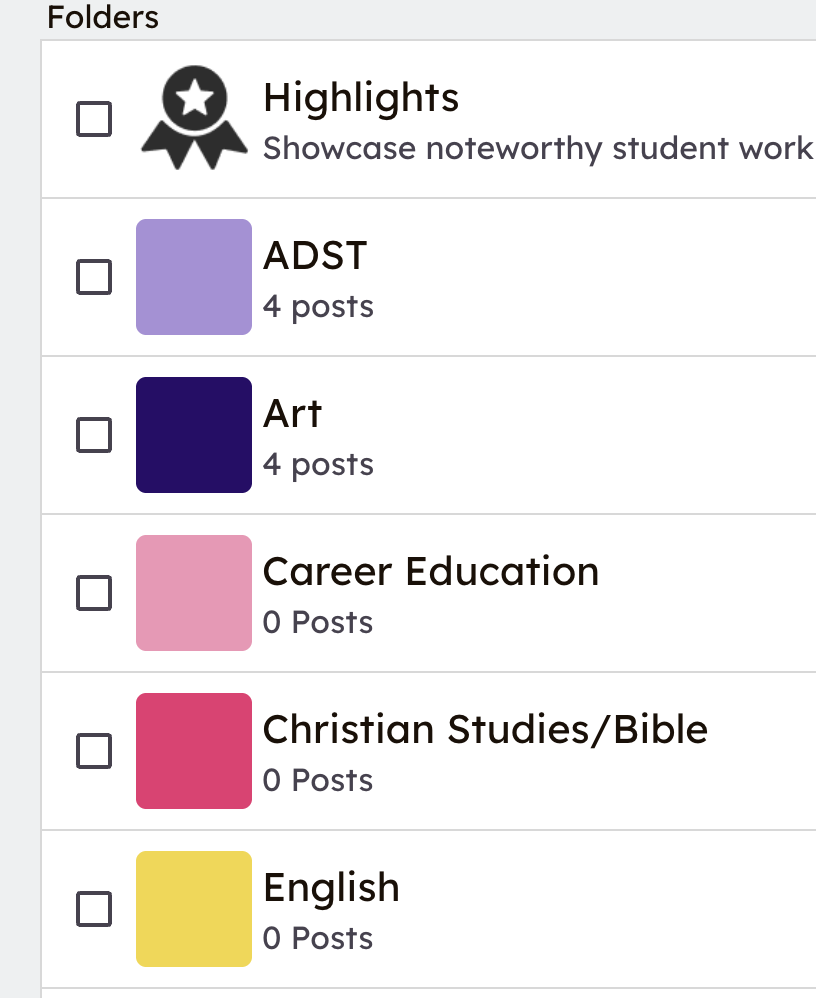
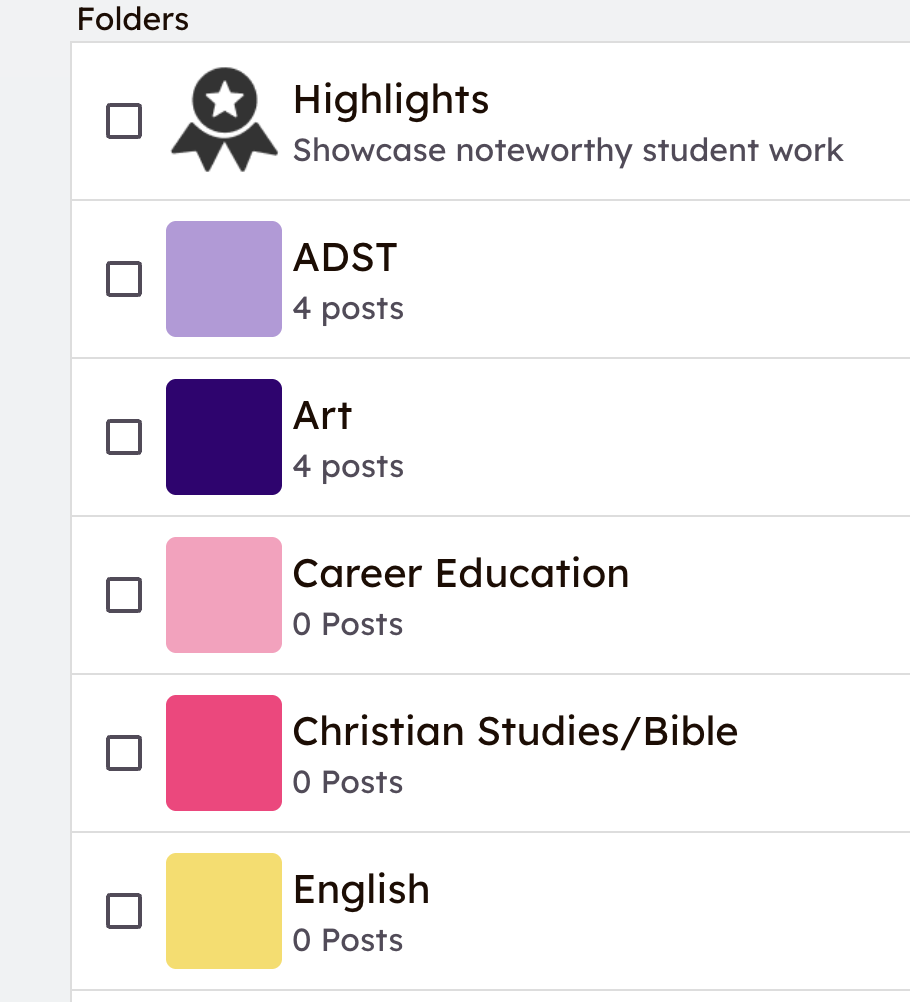
</td><td class="align-center" style="border-color: rgb(0, 0, 0);">**Optional: If your teacher has enabled folders, you can tag one or more subject folders for the post.**

</td></tr><tr><td style="border-color: rgb(0, 0, 0);">[![image.png](https://sophie.onlineschool.ca/uploads/images/gallery/2026-09/scaled-1680-/zipimage.png)](https://sophie.onlineschool.ca/uploads/images/gallery/2026-09/zipimage.png)

</td><td style="border-color: rgb(0, 0, 0);">[![image.png](https://sophie.onlineschool.ca/uploads/images/gallery/2026-09/scaled-1680-/qmeimage.png)](https://sophie.onlineschool.ca/uploads/images/gallery/2026-09/qmeimage.png)

</td></tr></tbody></table>

##### Step Six:

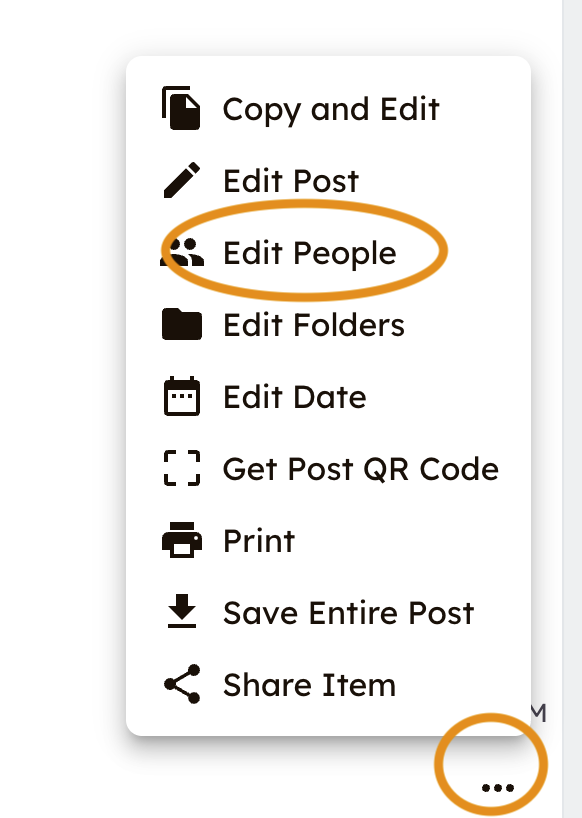
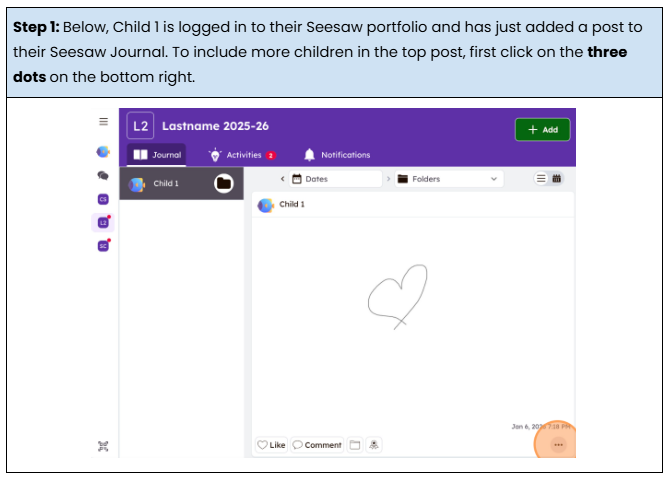
- Once the journal activity is posted, you can tag other children in your family.:

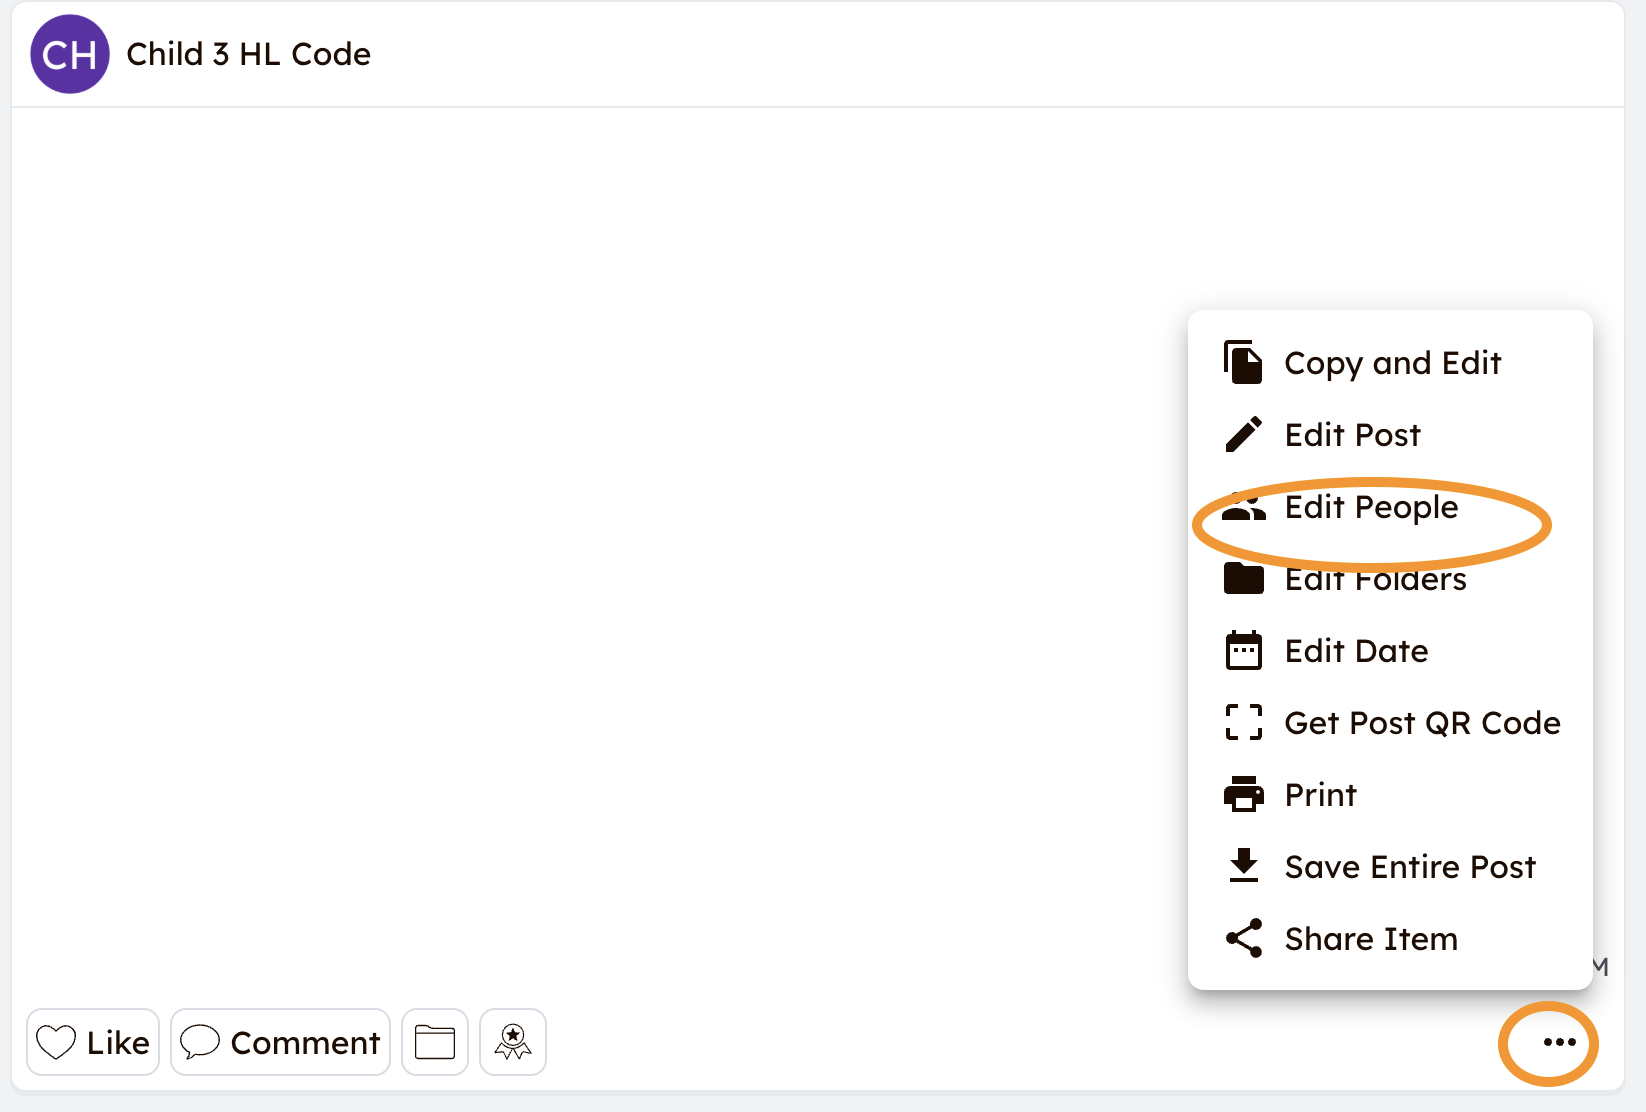
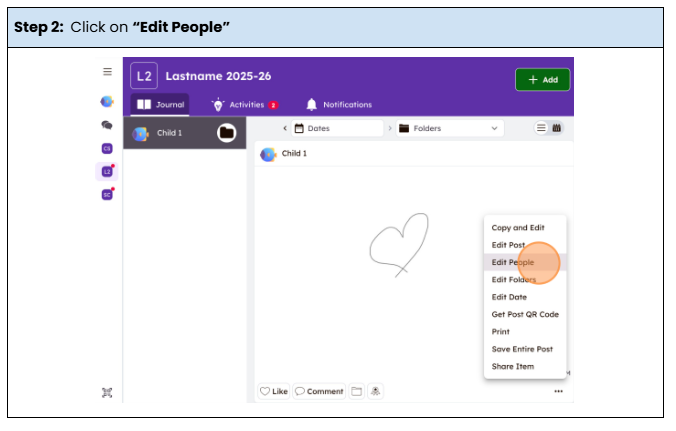
<table border="1" id="bkmrk-%C2%A0-in-the-bottom-righ" style="border-collapse: collapse; width: 100%; height: 117.656px; border-width: 1px; border-color: rgb(0, 0, 0);"><colgroup><col style="width: 50%;"></col><col style="width: 50%;"></col></colgroup><tbody><tr style="height: 29.4141px; background-color: rgb(194, 224, 244);"><td class="align-left" style="height: 29.4141px; border-color: rgb(0, 0, 0);">**In the bottom-right corner of the post, click the 3 dots, then click "edit people".**

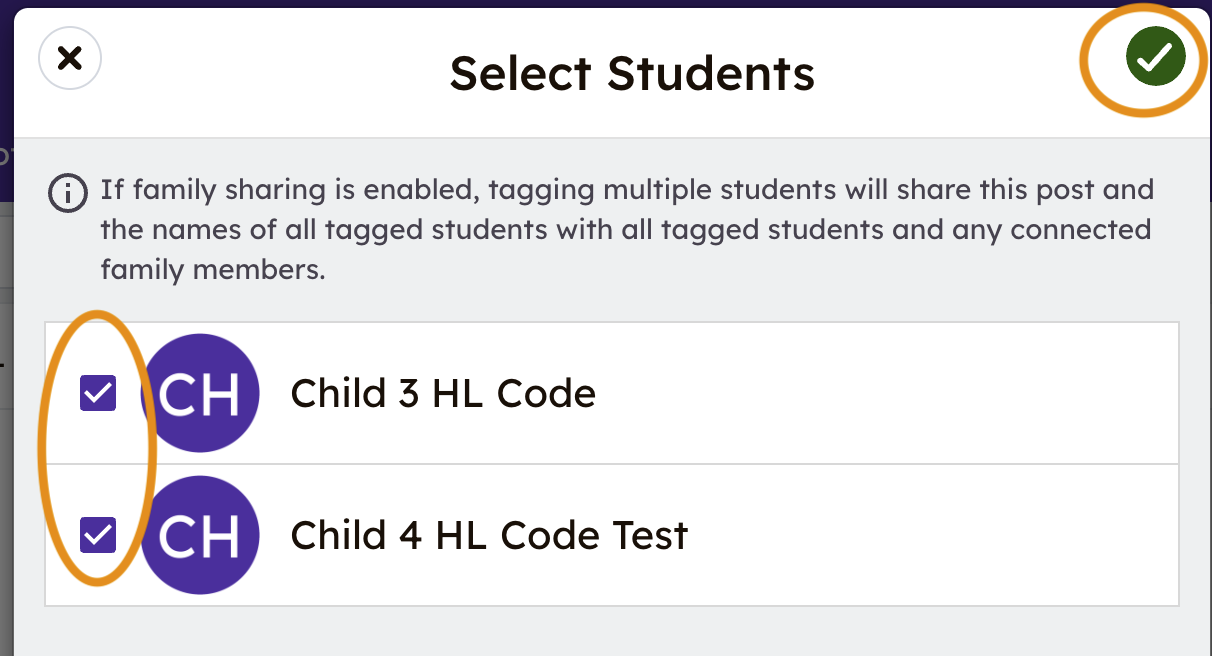
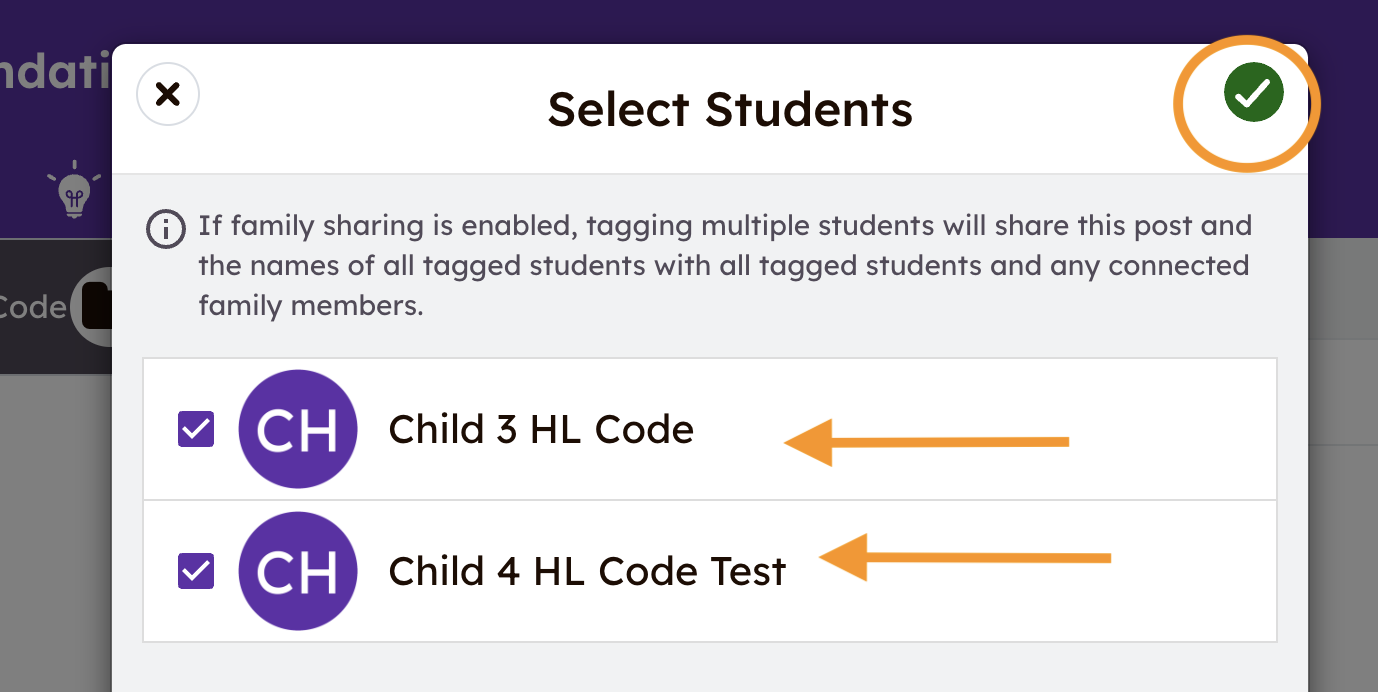
</td><td class="align-left" style="height: 29.4141px; border-color: rgb(0, 0, 0);">**Select the students in your family to include in the post, then click the green checkmark to add to portfolios.**

**The work sample will now appear in all your children's portfolios.**

</td></tr><tr style="height: 29.4141px; border-color: rgb(0, 0, 0);"><td style="height: 29.4141px; border-color: rgb(0, 0, 0);">[![image.png](https://sophie.onlineschool.ca/uploads/images/gallery/2026-09/scaled-1680-/qnvimage.png)](https://sophie.onlineschool.ca/uploads/images/gallery/2026-09/qnvimage.png)

</td><td style="height: 29.4141px; border-color: rgb(0, 0, 0);">[![image.png](https://sophie.onlineschool.ca/uploads/images/gallery/2026-09/scaled-1680-/HgDimage.png)](https://sophie.onlineschool.ca/uploads/images/gallery/2026-09/HgDimage.png)

</td></tr></tbody></table>


##### Step Seven:

You can add more details after a sample is posted by clicking **the 'Comment' box** under the posted work sample.

<p class="callout info">If multiple children worked on a sample and the comment applies to all of them, comment under one child’s name and indicate the comment applies to all of them. To add something unique to another child, add a comment and note which child it is meant for. </p>

##### Optional: 

You can easily switch to another class (e.g., CC+) or another one of your children's portfolios:

<table border="1" id="bkmrk-%C2%A0-click-on-the-child" style="border-collapse: collapse; width: 100%; border-width: 1px; border-color: rgb(0, 0, 0);"><colgroup><col style="width: 50.0372%;"></col><col style="width: 50.0372%;"></col></colgroup><tbody><tr style="background-color: rgb(194, 224, 244);"><td style="border-color: rgb(0, 0, 0);">**Click on the child's name to see other classes they are enrolled in.**

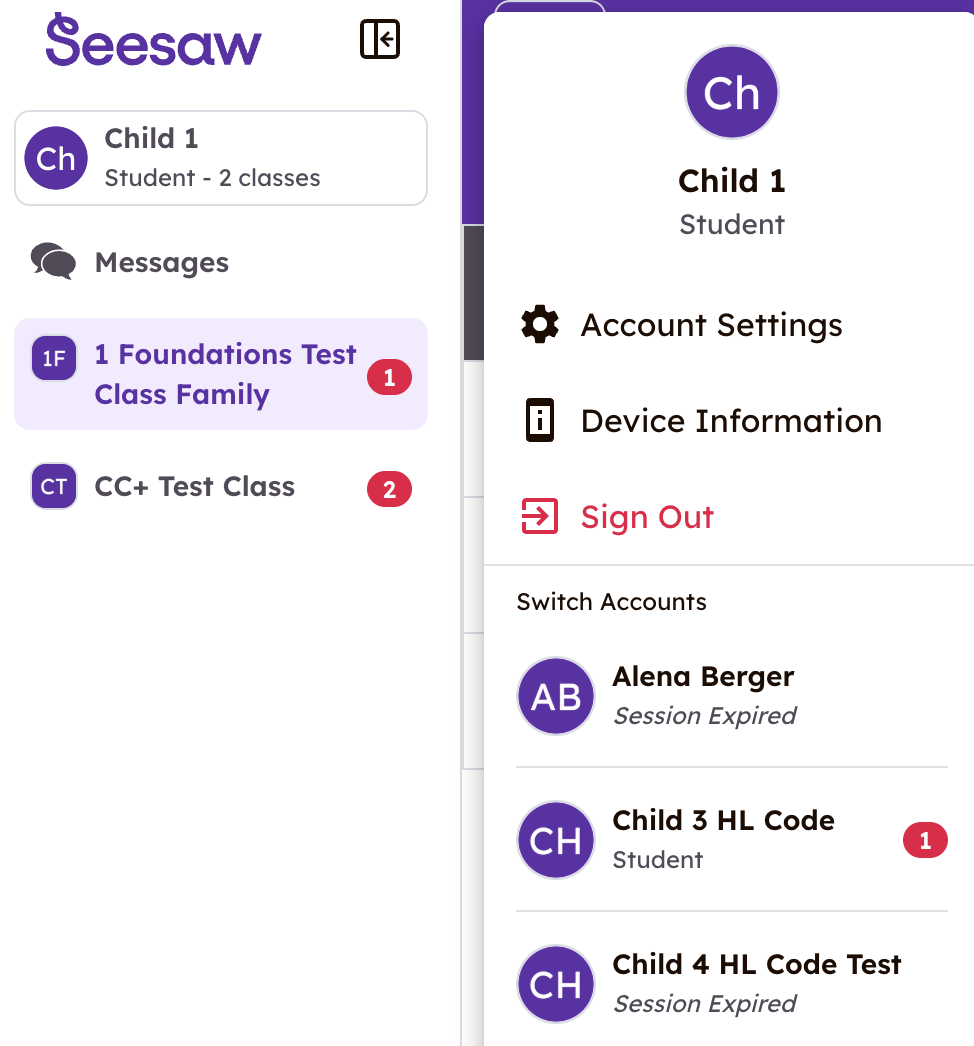
</td><td style="border-color: rgb(0, 0, 0);">**Click again to see the other children in your family and to switch to a different account.**

</td></tr><tr><td style="border-color: rgb(0, 0, 0);">[![image.png](https://sophie.onlineschool.ca/uploads/images/gallery/2026-09/scaled-1680-/ZSOimage.png)](https://sophie.onlineschool.ca/uploads/images/gallery/2026-09/ZSOimage.png)

</td><td style="border-color: rgb(0, 0, 0);">[![image.png](https://sophie.onlineschool.ca/uploads/images/gallery/2026-09/scaled-1680-/IMFimage.png)](https://sophie.onlineschool.ca/uploads/images/gallery/2026-09/IMFimage.png)

</td></tr></tbody></table>

##### **Additional Support:** 

[How to use Mulipage](https://help.seesaw.me/hc/en-us/articles/360033052712-How-to-use-Multipage) to post up to 20 pages

[How to add multiple photos to a post. ](https://help.seesaw.me/hc/en-us/articles/115004047626-How-to-add-multiple-photos-to-a-post)

<span id="bkmrk--18" style="font-weight: normal;"></span>

# Seesaw - How Parents and Students Submit Work in Seesaw

This chapter provides instructions for parents or students for sharing student work samples on Seesaw.

*\*If you prefer a video format, this [Seesaw for HCOS video](https://canva.link/84nl3uzbs53gm71) provides an overview of how to **sign in to your account** using your home learning codes, how to **add your other children**, how to **switch between classes** (Foundations and CC/CC+) and how to **share learning.***

<p class="callout info">If a student is adding work samples, the parent should review and supervise until the student understands what to share with their support teacher. </p>

### Getting Started 

- Open your Seesaw Journal in the **Seesaw Class App** or by accessing [app.seesaw.me. ](https://app.seesaw.me/#/login)If you have logged in before, your family class should open without needing to log in again.

#### Step One:

<table border="1" id="bkmrk-the-app-will-open-to" style="border-collapse: collapse; width: 100%; height: 58.8282px; border-width: 1px; border-color: rgb(0, 0, 0);"><colgroup><col style="width: 50%;"></col><col style="width: 50%;"></col></colgroup><tbody><tr style="height: 29.4141px; background-color: rgb(194, 224, 244);"><td style="height: 29.4141px; border-color: rgb(0, 0, 0);">The app will open to the activity tab for the last class you were logged into.

- **Tip:** If your child is in CC/CC+, make sure you are in the Foundations Class, not the CC/CC+ class, when you post.
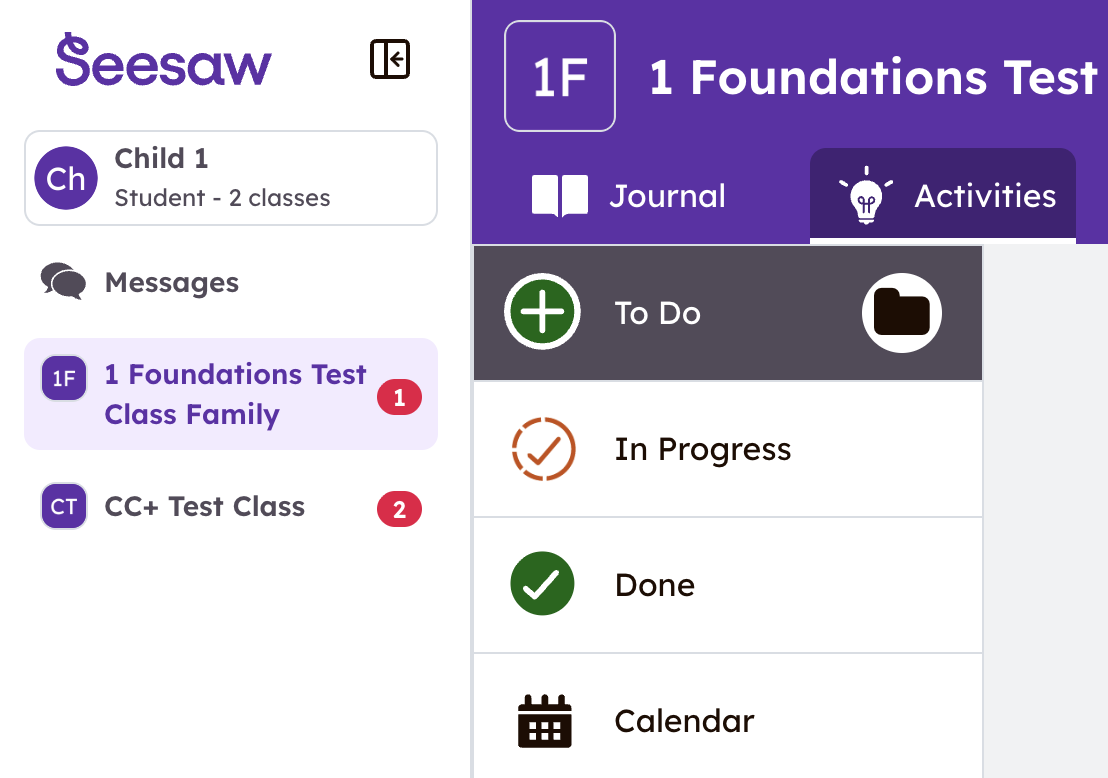
- When you **click your child's name** (top-left corner), you can see the other classes they are enrolled in.

</td><td style="height: 29.4141px; border-color: rgb(0, 0, 0);">Click the student name again to see the other children in your family. </td></tr><tr style="height: 29.4141px;"><td style="height: 29.4141px; border-color: rgb(0, 0, 0);">[![image.png](https://sophie.onlineschool.ca/uploads/images/gallery/2026-09/scaled-1680-/RvHimage.png)](https://sophie.onlineschool.ca/uploads/images/gallery/2026-09/RvHimage.png)

[![image.png](https://sophie.onlineschool.ca/uploads/images/gallery/2026-09/scaled-1680-/Jwtimage.png)](https://sophie.onlineschool.ca/uploads/images/gallery/2026-09/Jwtimage.png)
</td><td style="height: 29.4141px; border-color: rgb(0, 0, 0);">[![image.png](https://sophie.onlineschool.ca/uploads/images/gallery/2026-09/scaled-1680-/Y6Timage.png)](https://sophie.onlineschool.ca/uploads/images/gallery/2026-09/Y6Timage.png)

</td></tr></tbody></table>

#### Step Two:

<table border="1" id="bkmrk-to-post-a-sample%2C-cl" style="border-collapse: collapse; width: 100%; border-width: 1px; border-color: rgb(0, 0, 0);"><colgroup><col style="width: 99.881%;"></col></colgroup><tbody><tr style="border-color: rgb(0, 0, 0); background-color: rgb(194, 224, 244);"><td style="border-color: rgb(0, 0, 0);">- To post a sample, click on the **Journal** tab. On the page that opens, you'll see any posts that were tagged for that child.
- Click the green + button to add a post.

</td></tr><tr><td style="border-color: rgb(0, 0, 0);">[![image.png](https://sophie.onlineschool.ca/uploads/images/gallery/2026-09/scaled-1680-/v7limage.png)](https://sophie.onlineschool.ca/uploads/images/gallery/2026-09/v7limage.png)

</td></tr></tbody></table>

#### Step Three:

<table border="1" id="bkmrk-on-the-page-that-ope" style="border-collapse: collapse; width: 99.7619%; height: 410.729px; border-width: 1px; border-color: rgb(0, 0, 0);"><colgroup><col style="width: 100%;"></col></colgroup><tbody><tr style="background-color: rgb(194, 224, 244); height: 124.268px;"><td style="height: 124.268px; border-color: rgb(0, 0, 0);">On the page that opens:

- **Select a creative too**l that best fits the work to be uploaded:
    
    
    - Use the **'upload'** feature to add photos from their phone camera roll, computer, or Google Drive.
    - Take a **photo or video** right in the app.
    - Click the **pencil** to make a drawing, write notes, etc.
    - Use the "**note"** pad for a written post.
    - Click the **"link"** button to share a link (e.g., to a video, other document, etc.)

- Follow the prompts for the Creative Tool you are using to upload the samples.

</td></tr><tr style="height: 347.461px;"><td style="padding-left: 120px; height: 347.461px; border-color: rgb(0, 0, 0);"><span id="bkmrk--5" style="font-weight: normal;"><span style="font-size: 11pt; font-family: Poppins, sans-serif; color: rgb(0, 0, 0); background-color: transparent; font-weight: 400; font-style: normal; font-variant: normal; white-space-collapse: preserve;"><span style="border-width: initial; border-style: none; display: inline-block; overflow: hidden; width: 624px; height: 401px;">![](https://sophie.onlineschool.ca/uploads/images/gallery/2025-10/embedded-image-ebdj5nl9.png)</span></span></span></td></tr></tbody></table>


#### Step Four:

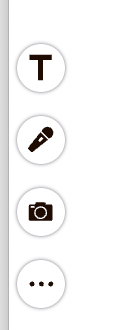
<table border="1" id="bkmrk-you-can-edit-the-pos" style="border-collapse: collapse; width: 100%; height: 353.692px; border-width: 1px; border-color: rgb(0, 0, 0);"><colgroup><col style="width: 50.0372%;"></col><col style="width: 50.0372%;"></col></colgroup><tbody><tr style="height: 67.2266px; background-color: rgb(194, 224, 244);"><td style="height: 67.2266px; border-color: rgb(0, 0, 0);">You can **edit the post** by adding voice recordings, drawings, text labels, or captions by clicking the icons to the left of your screen.

</td><td style="height: 67.2266px; border-color: rgb(0, 0, 0);">You can also click the **quotation mark button** at the bottom left of the page to record a voice message or upload an audio file to accompany the work sample.

</td></tr><tr style="height: 286.465px;"><td style="height: 286.465px; border-color: rgb(0, 0, 0);"><span id="bkmrk--7" style="font-weight: normal;"><span style="font-size: 11pt; font-family: Poppins, sans-serif; color: rgb(0, 0, 0); background-color: transparent; font-weight: 400; font-style: normal; font-variant: normal; white-space-collapse: preserve;"><span style="border-width: initial; border-style: none; display: inline-block; overflow: hidden; width: 120px; height: 330px;">![](https://sophie.onlineschool.ca/uploads/images/gallery/2025-10/embedded-image-nmtwlxuq.png)</span></span></span></td><td style="height: 286.465px; border-color: rgb(0, 0, 0);">[![image.png](https://sophie.onlineschool.ca/uploads/images/gallery/2026-09/scaled-1680-/ghuimage.png)](https://sophie.onlineschool.ca/uploads/images/gallery/2026-09/ghuimage.png)

</td></tr></tbody></table>


##### Step Five:

<table border="1" id="bkmrk-tap-the-green-%27check" style="border-collapse: collapse; width: 100%;"><colgroup><col style="width: 50%;"></col><col style="width: 50%;"></col></colgroup><tbody><tr style="background-color: rgb(194, 224, 244);"><td><span style="font-size: 11pt; font-family: Poppins, sans-serif; color: rgb(0, 0, 0); background-color: transparent; font-weight: 400; font-style: normal; font-variant: normal; white-space-collapse: preserve;">Tap the **green 'check mark'** at the top right to complete your post</span></td><td>**Optional:** select a folder or folders to tag your work sample. It will appear in your journal with subject tags. </td></tr><tr><td><span style="font-weight: normal;"><span style="font-size: 11pt; font-family: Poppins, sans-serif; color: rgb(0, 0, 0); background-color: transparent; font-weight: 400; font-style: normal; font-variant: normal; white-space-collapse: preserve;"><span id="bkmrk--10" style="font-weight: normal;"><span style="font-size: 11pt; font-family: Poppins, sans-serif; background-color: transparent; font-weight: 400; font-style: normal; font-variant: normal;"><span style="border-width: initial; border-style: none; display: inline-block; overflow: hidden; width: 63px; height: 49px;">![](https://sophie.onlineschool.ca/uploads/images/gallery/2025-10/embedded-image-xfv0maqu.png)</span></span></span></span></span></td><td>[![image.png](https://sophie.onlineschool.ca/uploads/images/gallery/2026-09/scaled-1680-/QuKimage.png)](https://sophie.onlineschool.ca/uploads/images/gallery/2026-09/QuKimage.png)

</td></tr></tbody></table>

##### Step Six:

<table border="1" id="bkmrk-once-it%27s-posted%2C-cl" style="border-collapse: collapse; width: 100%; border-width: 1px; border-color: rgb(0, 0, 0);"><colgroup><col style="width: 50%;"></col><col style="width: 50%;"></col></colgroup><tbody><tr style="background-color: rgb(194, 224, 244); border-color: rgb(0, 0, 0);"><td style="border-color: rgb(0, 0, 0);">Once it's posted, click the t**hree dots in the bottom-right** corner of the post, then select "edit people" to add other students to that sample. </td><td style="border-color: rgb(0, 0, 0);">In the window that opens, **select the students** the post applies to, and click the **green checkmark** to add it to each portfolio. </td></tr><tr><td style="border-color: rgb(0, 0, 0);">[![image.png](https://sophie.onlineschool.ca/uploads/images/gallery/2026-09/scaled-1680-/vBTimage.png)](https://sophie.onlineschool.ca/uploads/images/gallery/2026-09/vBTimage.png)

</td><td style="border-color: rgb(0, 0, 0);">[![image.png](https://sophie.onlineschool.ca/uploads/images/gallery/2026-09/scaled-1680-/eicimage.png)](https://sophie.onlineschool.ca/uploads/images/gallery/2026-09/eicimage.png)

</td></tr></tbody></table>


##### Step Seven:

- To add a comment or additional details about the post, click the 'Comment' box under the posted work sample and write your comment. You can also add a voice comment by clicking the microphone. If the comment applies to all students, simply add that to the note.

<span style="color: rgb(34, 34, 34); font-family: Poppins, sans-serif; font-size: 2.333em; font-weight: 400;">Additional Support</span>

[How to use Multipage](https://help.seesaw.me/hc/en-us/articles/360033052712-How-to-use-Multipage) to post up to 20 pages

[How to add multiple photos to a post](https://help.seesaw.me/hc/en-us/articles/115004047626-How-to-add-multiple-photos-to-a-post)

# Seesaw - Student Login to Seesaw Portfolios

##### <span id="bkmrk-how-to-log-in-to-see-1">How to Log in to Seesaw Portfolios Using Your Home Learning Code: </span>

*\*If you prefer a video format, this [Seesaw for HCOS video](https://canva.link/84nl3uzbs53gm71) provides an overview of how to **sign in to your account** using your home learning codes, how to **add your other children**, how to **switch between classes** (Foundations and CC/CC+) and how to **share learning.***

For consistency between our programs, all students will receive a 'Home Learning Code' unique to them so they can access their Family Class and their CC or CC+ Seesaw portfolios with one simple login. Foundations teachers will share home learning codes for "Family Classes," and if your child participates in CC or CC+, they will be able to see their CC or CC+ class using the same login code. *\*Note: CC classes will be set up in September, once classes begin.*

<p class="callout info">Families will be set up as a class, and parents will still be able to view all the children in their family and tag any or all of them when they share family learning samples. Families will be able to see their child's CC class portfolio from the same login, but will not be able to view other students’ work. </p>

Your support teacher will email you a link to a PDF with step-by-step instructions. You can also follow the written instructions below for more detailed instructions.

##### Logging Into Your Child's Portfolio:

<div align="left" dir="ltr" id="bkmrk-step-1%3A-%C2%A0you-can-con"><table style="height: 402px; width: 97.8571%;"><colgroup><col style="width: 51.8146%;" width="328"></col><col style="width: 48.1876%;" width="328"></col></colgroup><tbody><tr><td colspan="2" style="background-color: rgb(211, 239, 255);">**Step 1:** You can connect and log in to your child's portfolio in the following ways:

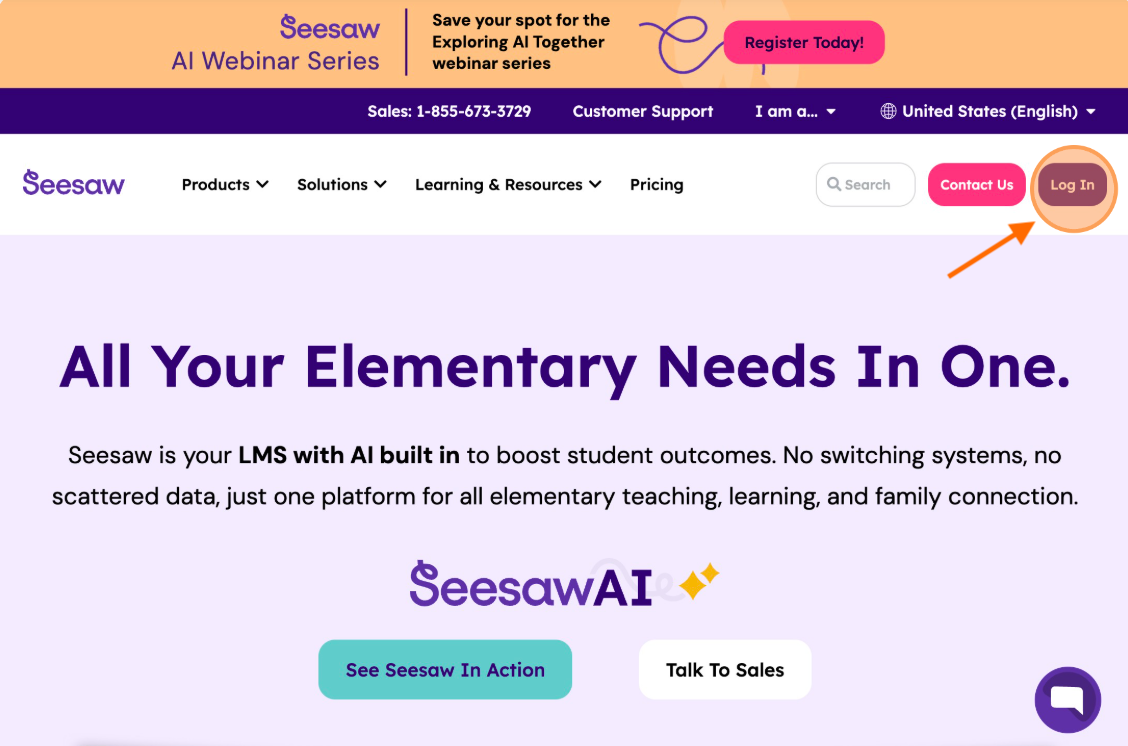
- On a desktop, laptop or Chromebook, via the free Seesaw App at [app.seesaw.me](http://app.seesaw.me) and clicking on “Log in” on the top right.
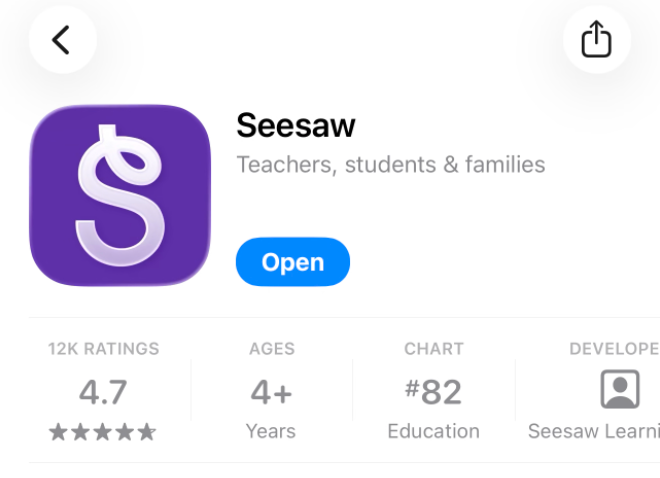
- On your mobile device via the **Seesaw app**.

</td></tr><tr><td>Desktop

![](https://sophie.onlineschool.ca/uploads/images/gallery/2026-01/embedded-image-howczxsl.png)

</td><td>Mobile Device

![](https://sophie.onlineschool.ca/uploads/images/gallery/2026-01/embedded-image-q2ufo9k3.png)

</td></tr></tbody></table>

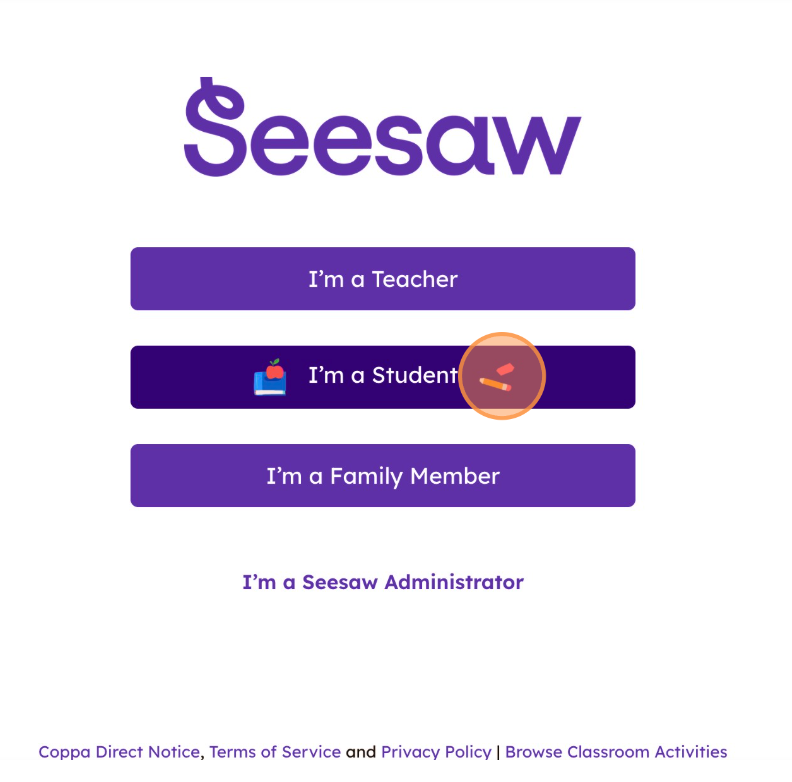
</div><div align="left" dir="ltr" id="bkmrk-step-2%3A-%C2%A0click-on-%E2%80%9Ci"><table style="width: 99.5238%; height: 314px;"><colgroup><col style="width: 50%;" width="328"></col><col style="width: 50%;" width="328"></col></colgroup><tbody><tr><td colspan="2" style="background-color: rgb(211, 239, 255);">**Step 2:** Click on **“I’m a Student”**

</td></tr><tr><td colspan="2">![](https://sophie.onlineschool.ca/uploads/images/gallery/2026-01/embedded-image-pw9g1hnn.png)

</td></tr></tbody></table>

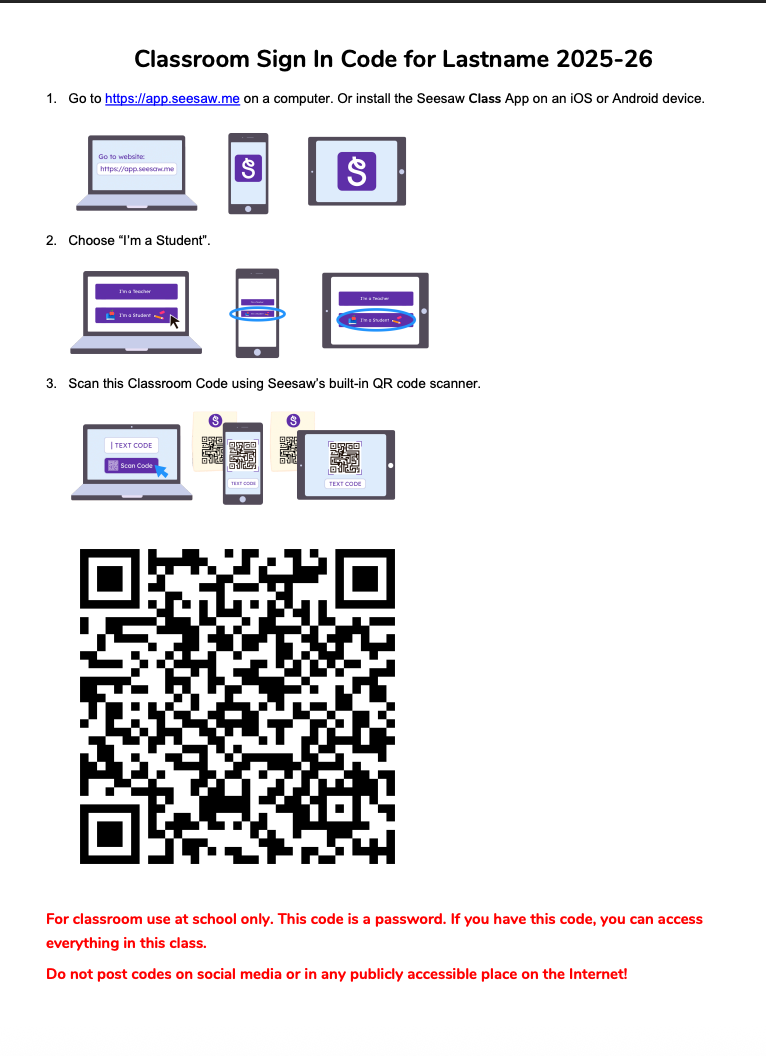
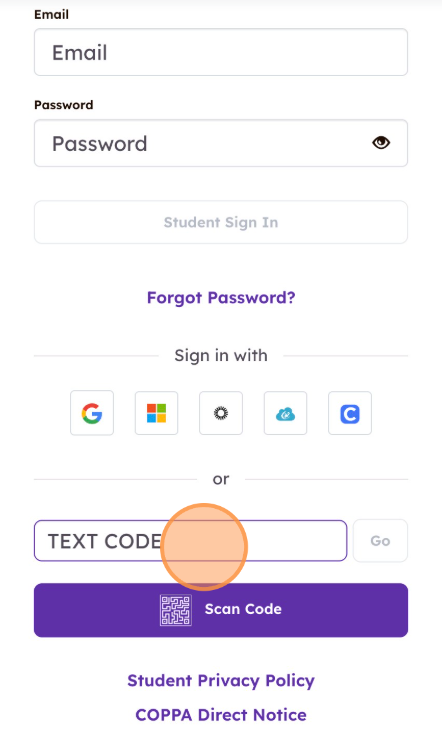
</div><div align="left" dir="ltr" id="bkmrk-step-3%3A-%C2%A0enter-the-t"><table><colgroup><col style="width: 328px;" width="328"></col></colgroup><tbody><tr><td colspan="2" style="background-color: rgb(211, 239, 255);">**Step 3:** Using the PDF sent by your teacher, enter the text code if you are logging in from a desktop, or click the purple "scan code" button and then scan the QR code in the Seesaw App, then click “Go”. The image below (left) shows a sample of the PDF you would have received from your teacher. The image below (right) shows where to enter the text code or scan the code.

</td></tr><tr><td>![](https://sophie.onlineschool.ca/uploads/images/gallery/2026-01/embedded-image-alyx4kil.png)

</td><td>![](https://sophie.onlineschool.ca/uploads/images/gallery/2026-01/embedded-image-xhv7ahle.png)

</td></tr></tbody></table>

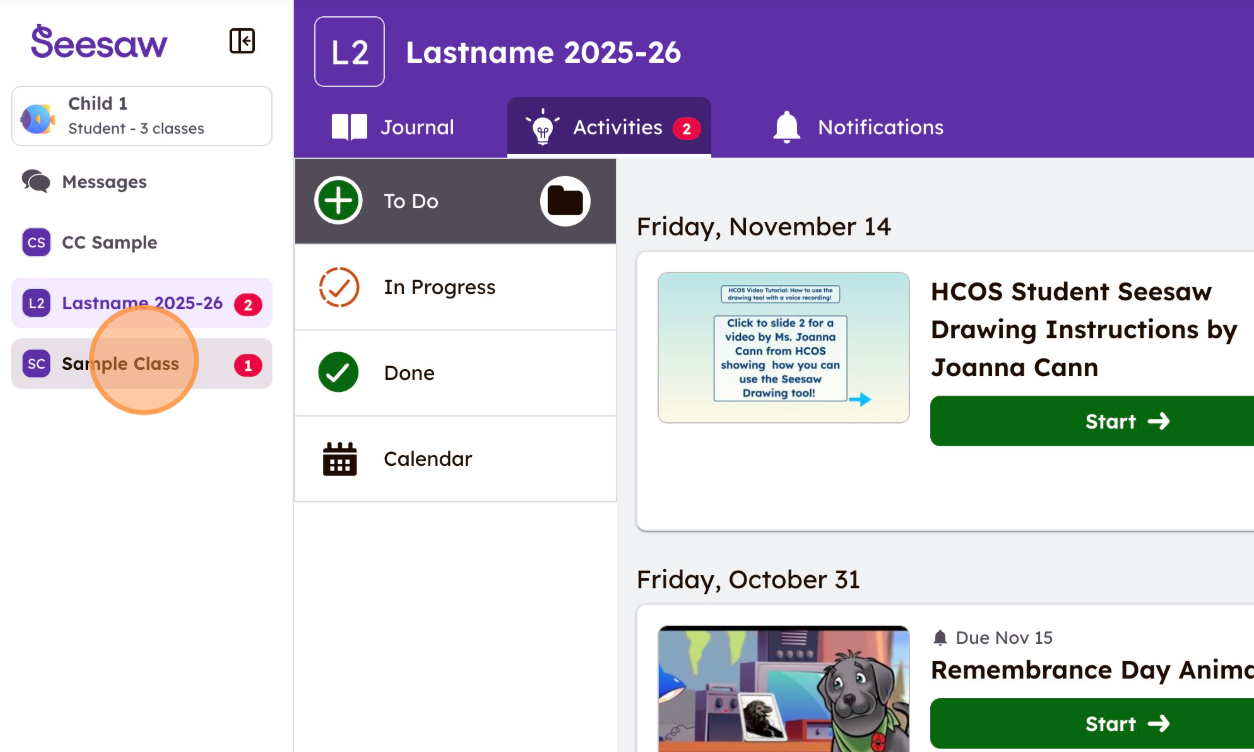
</div><div align="left" dir="ltr" id="bkmrk-step-4%3A-%C2%A0you-are-now"><table style="height: 311px; width: 100%;"><colgroup><col style="width: 100%;" width="328"></col></colgroup><tbody><tr><td colspan="2" style="background-color: rgb(211, 239, 255);">**Step 4:** You are now in your class! Other Seesaw classes your child is part of will appear on the left side of your screen. After this initial setup, you should not need to sign in again unless you sign yourself out.

</td></tr><tr><td colspan="2">![](https://sophie.onlineschool.ca/uploads/images/gallery/2026-01/embedded-image-kwyxlnkw.png)

</td></tr></tbody></table>

</div>##### Adding Additional Children: 

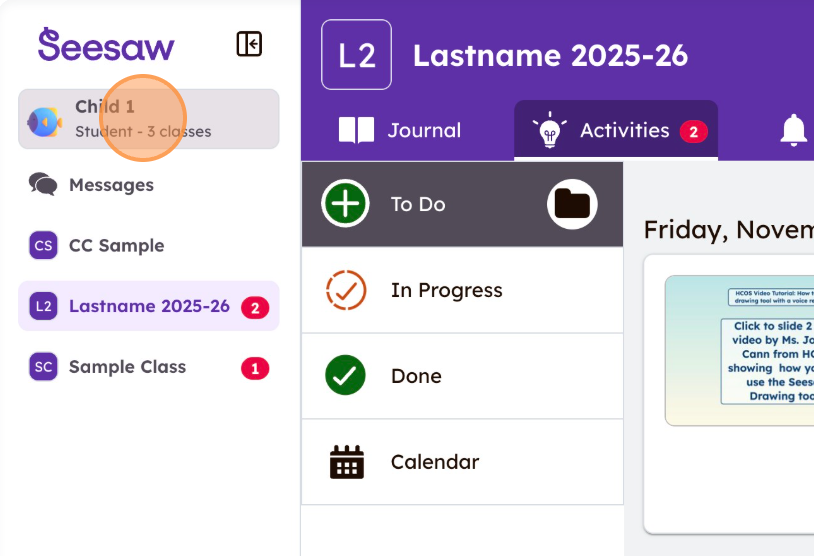
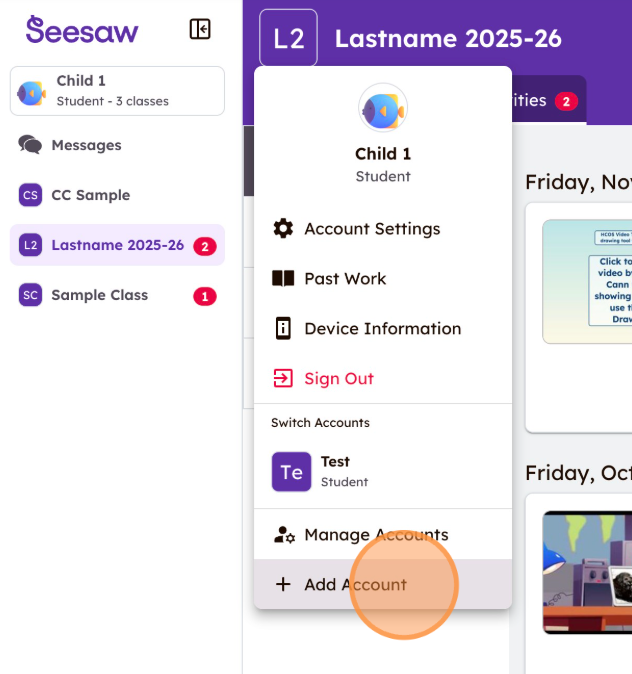
<div align="left" dir="ltr" id="bkmrk-step-5%3A-if-you-need-"><table><colgroup><col style="width: 328px;" width="328"></col></colgroup><tbody><tr><td colspan="2" style="background-color: rgb(211, 239, 255);">**Step 5:** It's simple for families to add their own children's accounts! After you are in your child's account, click your child’s name in the top-left (Step A below), then select **“Add Account”** (Step B below), which will take you back to Step 2 above.

</td></tr><tr><td>Step A

  
![](https://sophie.onlineschool.ca/uploads/images/gallery/2026-01/embedded-image-aoatf33y.png)

</td><td>Step B

  
![](https://sophie.onlineschool.ca/uploads/images/gallery/2026-01/embedded-image-zqehbtvr.png)

</td></tr></tbody></table>

</div>##### Notes for Foundations Families:

- **Journal Page: Your initial login takes you to the "**Activities" tab**. Simply click the **"Journal" tab** to post samples for your foundations teacher!
- **Toggling:** As a parent, you will only see one child at a time on the page, but by clicking your child's name (see above), you can easily toggle between your children and between the other classes they are in. To learn how to toggle between accounts, go [here](https://sophie.onlineschool.ca/books/information-for-families/page/accessing-multiple-seesaw-accounts).
- **Sharing Family Learning:** Although you will be posting from one of your children's accounts, you can easily tag the other children in your family to share family learning! Click this link for [step-by-step directions.](https://sophie.onlineschool.ca/books/information-for-families/page/seesaw-how-to-edit-people-on-a-post)

# Accessing Multiple Seesaw Accounts

#### How to Toggle Between Multiple Seesaw Accounts 

It is easy to access multiple Seesaw classes on the same device without repeatedly signing out and back in to accounts.

Watch the video [<span data-rich-links="{"fple-t":"Toggling between multiple Seesaw accounts.mp4","fple-u":"https://drive.google.com/file/d/1qIiVX6YsSrBKEpGCsrOt9hDH-5rX4a7U/view?usp=sharing","fple-mt":"video/mp4","type":"first-party-link"}">Toggling between multiple Seesaw accounts.mp4</span>](https://drive.google.com/file/d/1qIiVX6YsSrBKEpGCsrOt9hDH-5rX4a7U/view?usp=sharing) and/or follow the instructions below to see how easy it is to toggle between accounts.

<p class="callout info">NOTE: This is device-specific. You will need to repeat these steps if you're using Seesaw on multiple devices.</p>

<div align="left" dir="ltr" id="bkmrk-step-1%3A-to-add-stude"><table style="height: 344px; width: 97.2619%;"><colgroup><col style="width: 40.1469%;" width="328"></col><col style="width: 40.1469%;" width="328"></col></colgroup><tbody><tr><td colspan="2" style="background-color: rgb(211, 239, 255);">**Step 1:** To add student accounts to Seesaw, follow [these steps.](https://sophie.onlineschool.ca/books/information-for-families/page/seesaw-student-login-to-seesaw-portfolios) To toggle between the Seesaw accounts already added to your device, click on your child’s name at the top left.

</td></tr><tr><td colspan="2">![](https://sophie.onlineschool.ca/uploads/images/gallery/2026-01/embedded-image-ss5wmdmy.png)

</td></tr></tbody></table>

</div><div align="left" dir="ltr" id="bkmrk-step-2%3A-%C2%A0scroll-down"><table style="height: 497px; width: 97.0238%;"><colgroup><col style="width: 40.2454%;" width="328"></col><col style="width: 40.2454%;" width="328"></col></colgroup><tbody><tr><td colspan="2" style="background-color: rgb(211, 239, 255);">**Step 2:** Scroll down to the section titled “Switch Accounts” and click on the account you want to switch to. In this case, we want to switch to the account belonging to “Child 2.”

</td></tr><tr><td colspan="2">![](https://sophie.onlineschool.ca/uploads/images/gallery/2026-01/embedded-image-llu6qoef.png)

</td></tr></tbody></table>

</div>

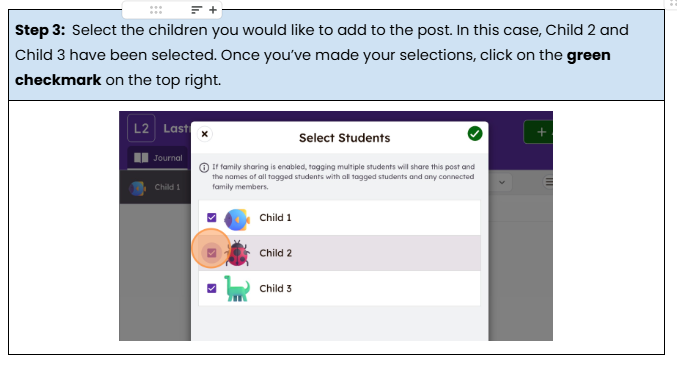
# Seesaw - How to Edit People on a Post

These steps are for families using a Home Learning code with their Support Teacher or Case Manager.

If you are using a Home Learning code rather than a Class code to log into your Seesaw portfolio, you will need to toggle to access each child’s Seesaw classes and will not be able to see all your children listed in one class. However, as long as your other children are part of the same class, you are still able to tag multiple children on posts without having to toggle between accounts.

Watch the video [<span data-rich-links="{"fple-t":"Edit People on a Post.mp4","fple-u":"https://drive.google.com/file/d/1MFy7o-CC6VymYWbBwhLv8CqGA1iDpwJi/view?usp=sharing","fple-mt":"video/mp4","type":"first-party-link"}">Edit People on a Post.mp4</span>](https://drive.google.com/file/d/1MFy7o-CC6VymYWbBwhLv8CqGA1iDpwJi/view?usp=sharing) and/or follow the instructions below to see how easy it is to add all your children to a post from one child’s Seesaw account.

<p class="callout info">NOTE: This will not work for CC/CC+ portfolios.</p>

[![image.png](https://sophie.onlineschool.ca/uploads/images/gallery/2026-01/scaled-1680-/VAKimage.png)](https://sophie.onlineschool.ca/uploads/images/gallery/2026-01/VAKimage.png)

[![image.png](https://sophie.onlineschool.ca/uploads/images/gallery/2026-01/scaled-1680-/3BVimage.png)](https://sophie.onlineschool.ca/uploads/images/gallery/2026-01/3BVimage.png)
[![image.png](https://sophie.onlineschool.ca/uploads/images/gallery/2026-01/scaled-1680-/oyLimage.png)](https://sophie.onlineschool.ca/uploads/images/gallery/2026-01/oyLimage.png)
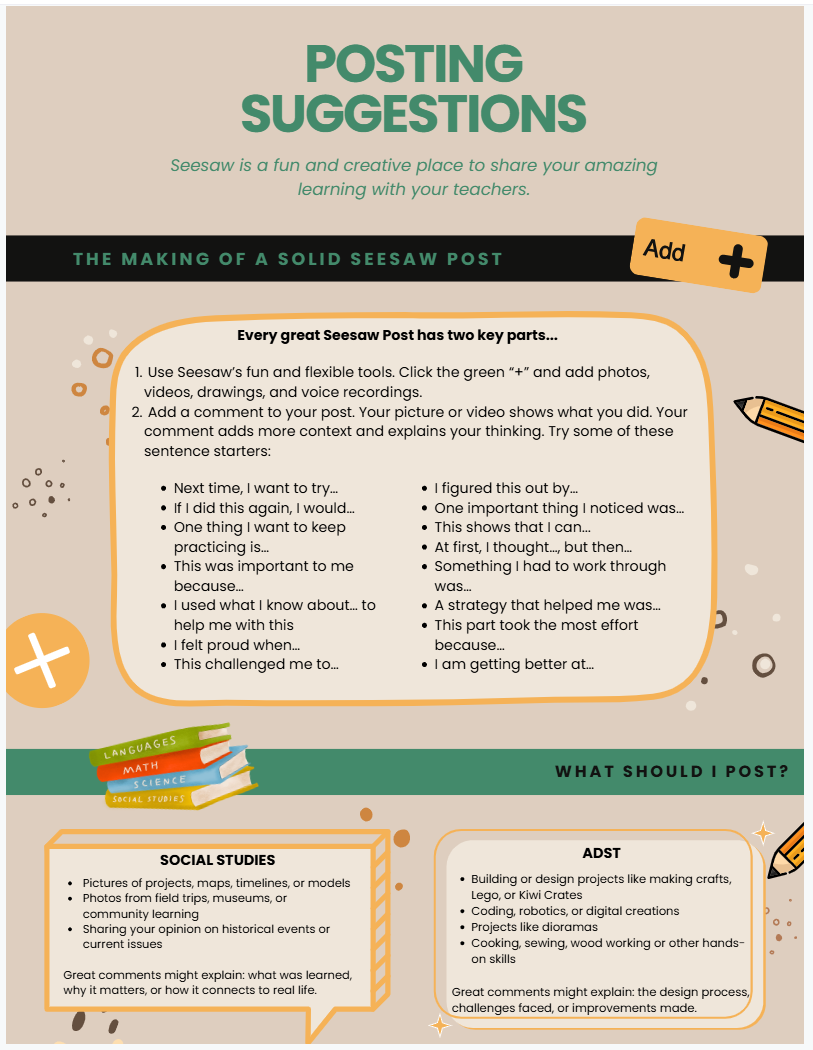
# Seesaw - Making a Good Seesaw Post

[![image.png](https://sophie.onlineschool.ca/uploads/images/gallery/2026-02/scaled-1680-/5Weimage.png)](https://sophie.onlineschool.ca/uploads/images/gallery/2026-02/5Weimage.png)
[![image.png](https://sophie.onlineschool.ca/uploads/images/gallery/2026-02/scaled-1680-/dUzimage.png)](https://sophie.onlineschool.ca/uploads/images/gallery/2026-02/dUzimage.png)
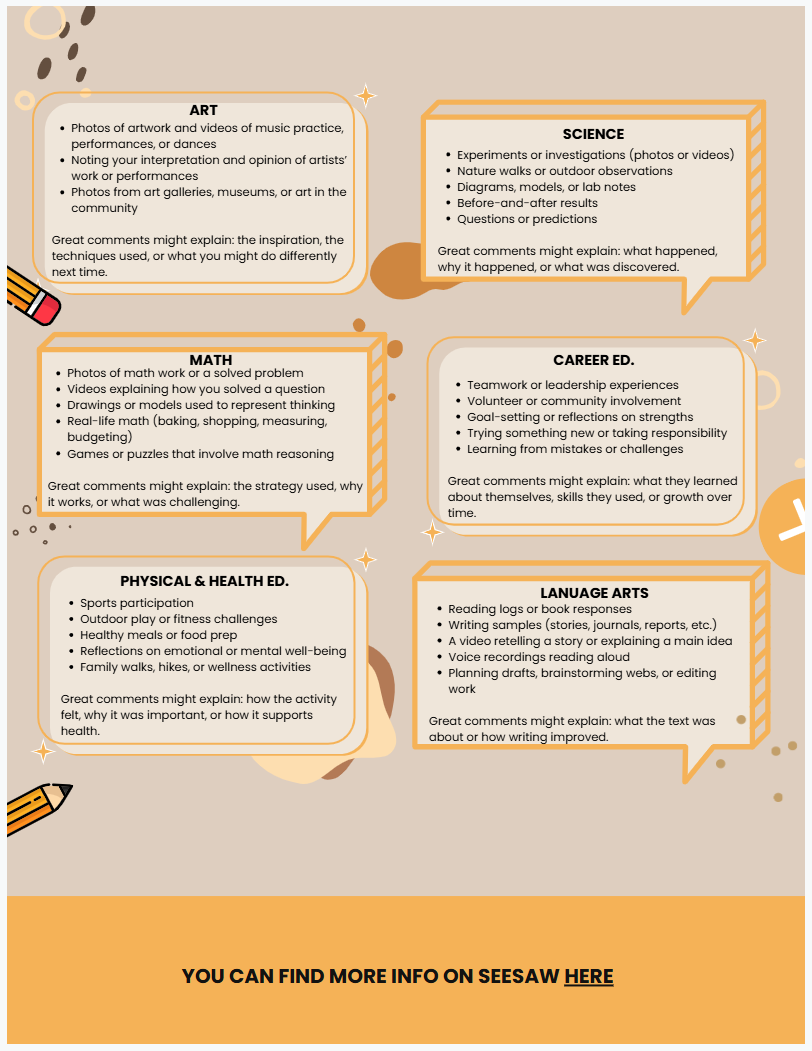
YOU CAN FIND MORE INFO ON SEESAW HERE AT [SEESAW SUPPORT FOR FAMILIES](https://sophie.onlineschool.ca/books/information-for-families/chapter/seesaw-support)