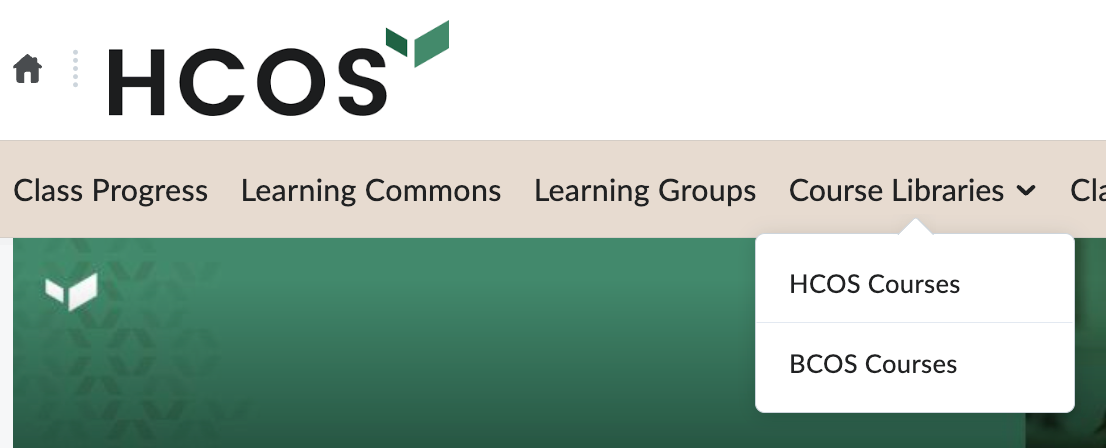
Brightspace
Student and Parent Brightspace resources
- Brightspace Troubleshooting
- Accessing Your Gradebook
- Creating and Updating Your Brightspace Pacing & Progress Tool
- Integrity Advocate - Student Experience
- Logging Into Brightspace and Accessing Course Pages
- Message, Subscription and Update Alerts
- Navigating the Course Homepage
- Navigating the Landing Page in Brightspace
- Parent and Guardian Access to Brightspace
- Parent Town Hall Q&A
- Student Brightspace Access
- Setting Up your Brightspace Profile
- Setting up a Student Brightspace Account
- Viewing Student Feedback in Brightspace and StudyForge
- Parent Guide: Supporting your child in Online Classes
Brightspace Troubleshooting
Logging into Brightspace
-
It is best to do this while logged into a Flex Academy or HCOS Google account, either in a browser (laptop, MacBook) or from a dedicated school user profile (Chromebook)
-
Students will receive an email from Encom requesting a password reset.
-
If a student hasn’t received a reset email, contact a school administrator.
-
In the reset email, students click the password reset link, and it will bring them to a place where they can choose a new Encom password.
-
Then, take note of the user name (usually it’s in the format of FirstnameLastname)
-
There will be a link after the password reset that they can click to get to Brightspace where they can log in with their Encom username and newly created password
The Brightspace login website is https://hcos.onlinelearningbc.com/d2l/login
-
Students should bookmark the BS login page and save their login information so that they don’t need to remember it all.
-
If a student gets an error on logging into Brightspace (e.g., invalid username or password error), they can shut their browser, re-open it and try logging in again carefully with their login info. Even one mistyped letter will result in a failed login.
Brightspace Errors
If a student discovers that they are missing a Flex Blended course or an HCOS online course, please let your teacher know as soon as possible so that we can you into the course or fix any issues.
If a student discovers that something is broken in one of their Brightspace courses, email your teacher with the link to the page that is broken. If you are in class, clearly explain what is happening or show your teacher. It sometimes takes a little while to fix problems like that, so see if you can move on and circle back.
Teachers might need to remove conditions they’ve set up that don’t allow students to skip the (broken) lesson. Make sure to ask your teacher about this for any broken lessons.
One of the more common errors is not using a supported browser. Please only use Firefox or Chrome to access Brightspace. Other Browsers are not guaranteed to work.
Troubleshooting Lesson Errors in Brightspace (StudyForge Content)
-
Only use Brightspace with the most current version of Google Chrome or Firefox
-
Do a HARD refresh on the page (Hold down Ctrl and click the Reload button)
-
Log out, close your browser and log in again
-
Clear your browser’s cache
How to Clear your Browser’s Cache
A great way to see if it is a caching issue is to open an “incognito window” or “private browsing window” which will always start from scratch with cache and browser sessions, and try logging in from there. If the problem persists, move on to the next step.
-
If none of that works, email your instructor a picture or screenshot that shows
-
the lesson or question ID
-
If there is an error message, show that as well
-
The link to the page
When reporting a Brightspace error, please share the student’s first and last name, and any other information that can’t be found in the picture.
Sending Files to your Teachers
Some Brightspace assignments ask you to submit PDFs. There are a few ways you can do this.
- If you are working in Google Docs, here are instructions for saving your doc as a PDF (this also works for sheets and presentations).
- If you are sending in work that you have completed on paper, you can use a scanning app such as Adobe Scan app for iPhone & Android.
- If you use an Android phone or tablet, the Google Drive app will let you scan documents to PDF and upload them to your Google Drive. Here are the instructions.
- If you are using an iPhone or iPad, you can scan to PDF using the notes app.
- If you are using a Chromebook, you can use Google Drive and the Chromebook's camera app to scan documents.
If students still run into trouble after working through the steps on this page, please submit a detailed ticket to tickets@onlineschool.ca
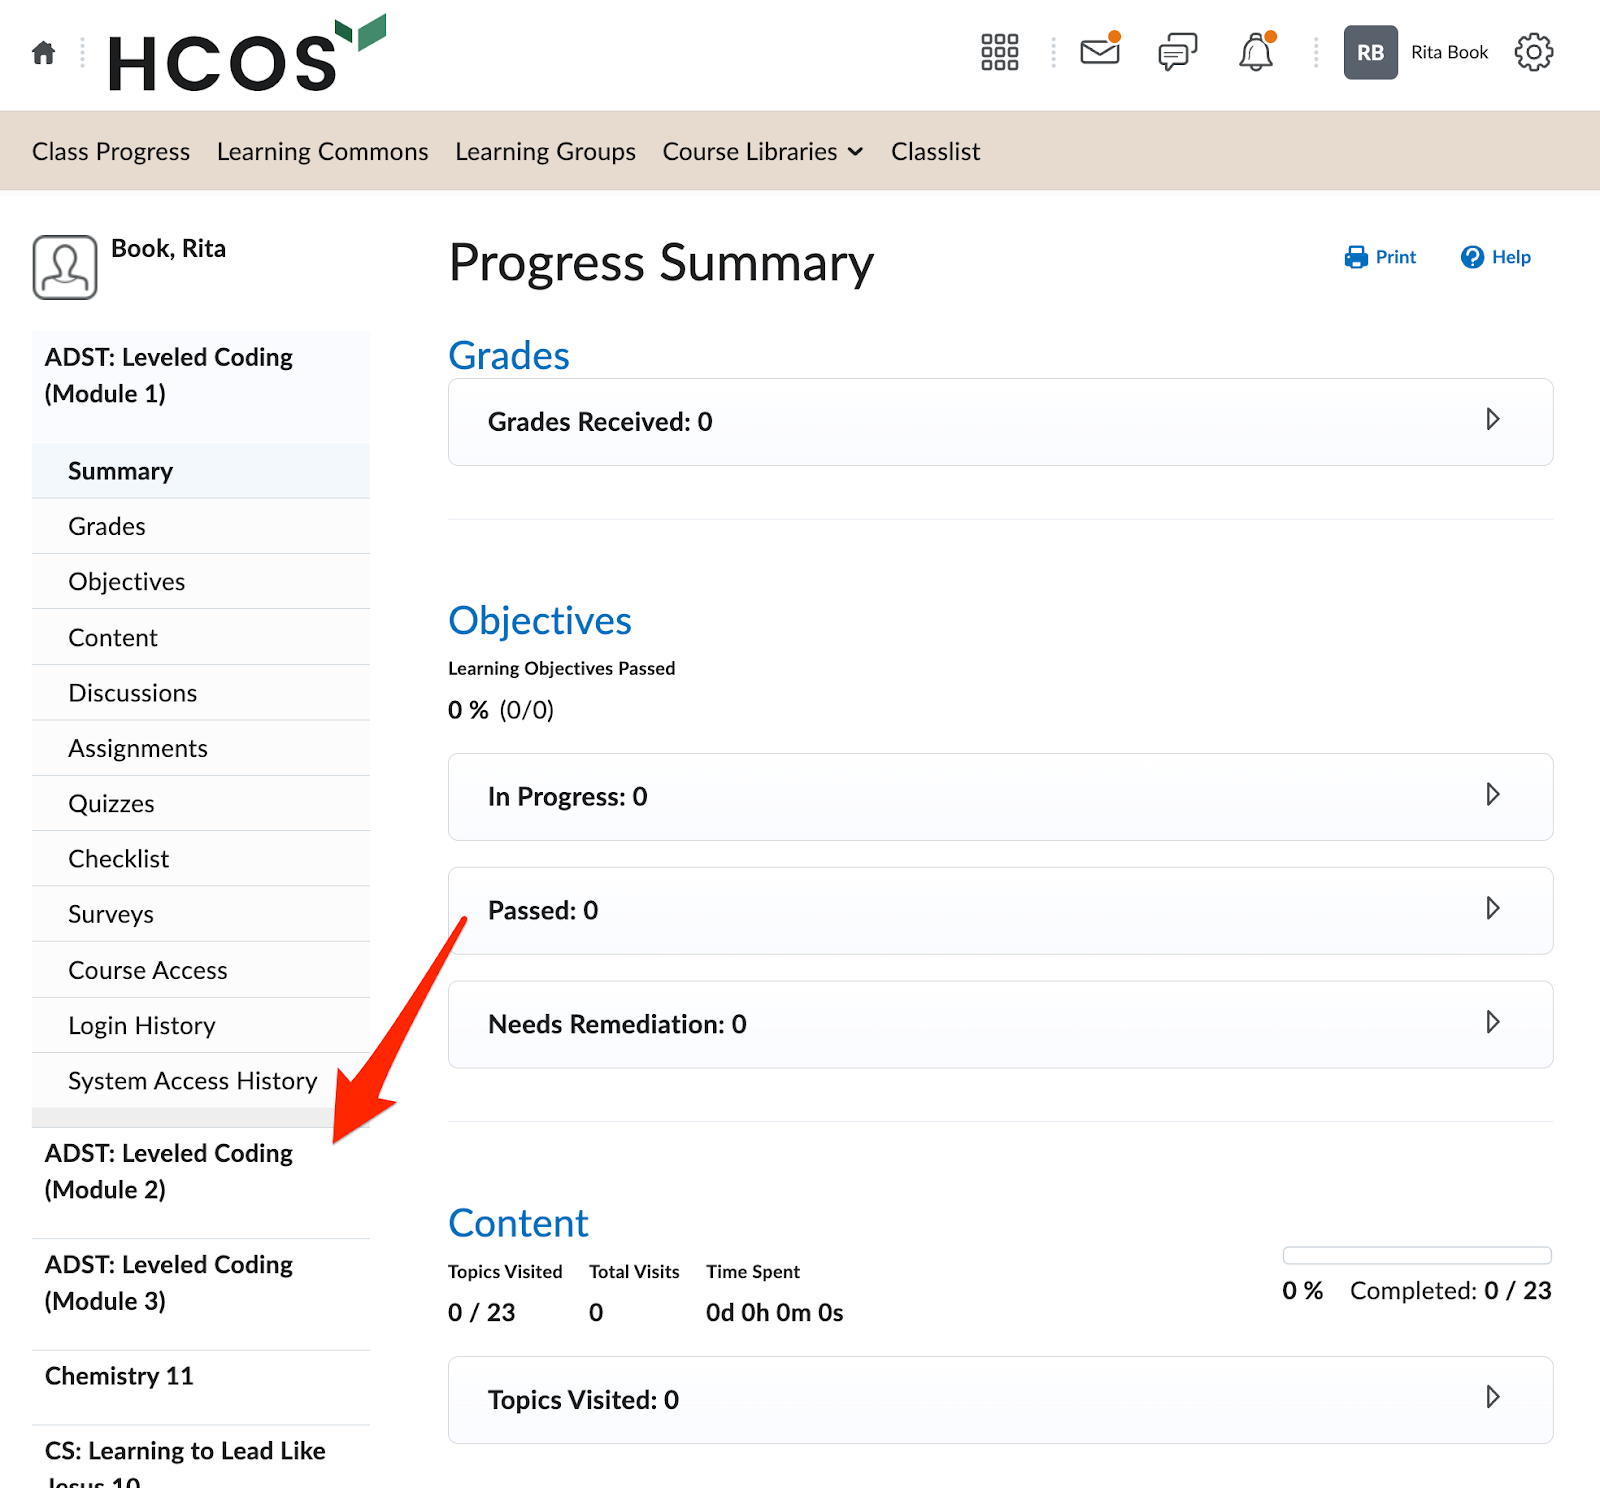
Accessing Your Gradebook
To access your gradebook for a specific course in Brightspace:
- Begin by logging into Brightspace with your username and password.
- Navigate to the course through the 'My Courses' widget on the homepage and click on the course.

- At the top of the course homepage, in the tan navigation bar, click grades.

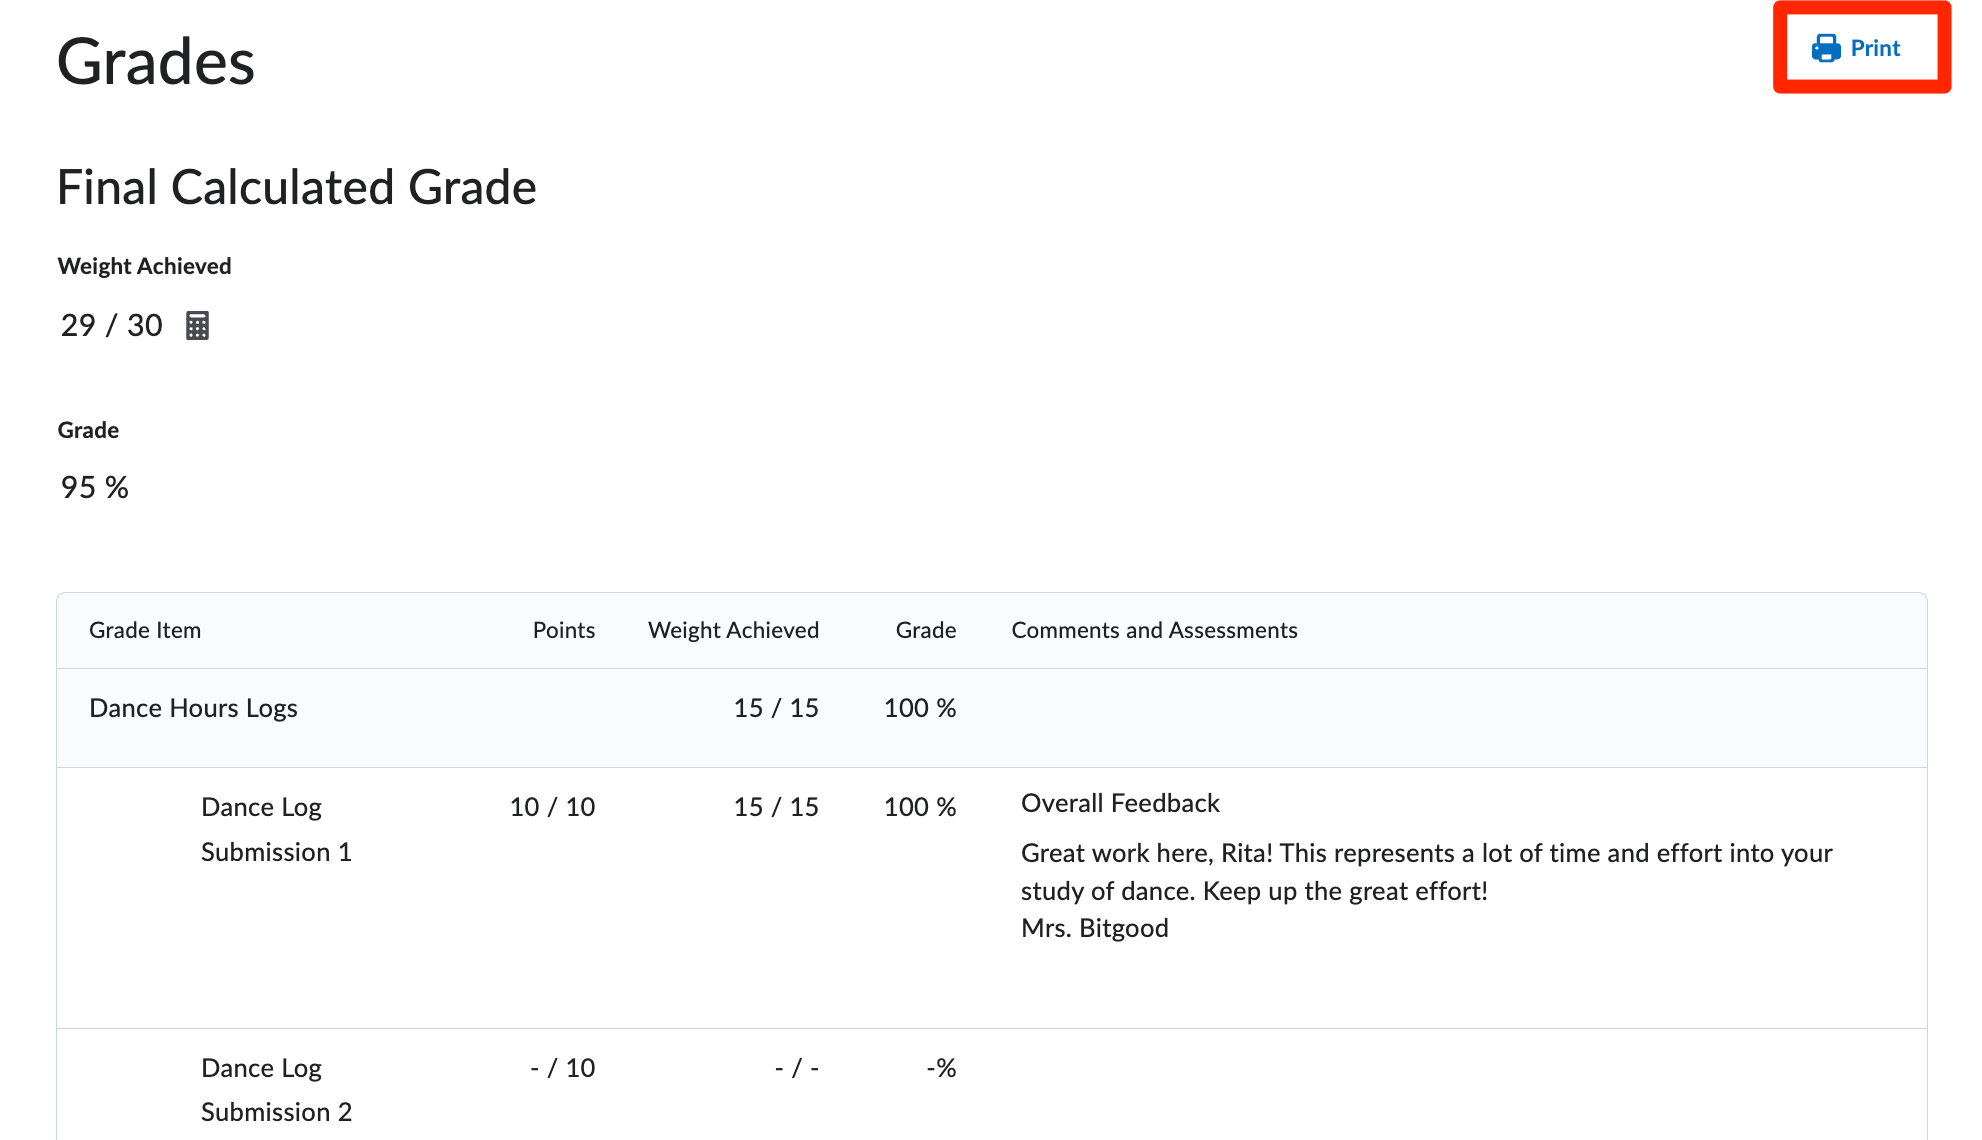
- You will be taken to your grade report for the course.
Here you can see your overall grade, comments and individual assessment item results. You can also print this page for reference using the blue 'Print' button in the top right hand corner.

Creating and Updating Your Brightspace Pacing & Progress Tool
Follow these five steps to create a Pacing & Progress Tool Schedule for each of your courses.
Step 1: Begin by logging into Brightspace.
Step 2: Select the course that you wish to build a schedule for.
If your teacher has not yet built a pacing guide for your course, you will be unable to create your schedule. Please contact your teacher for more information.
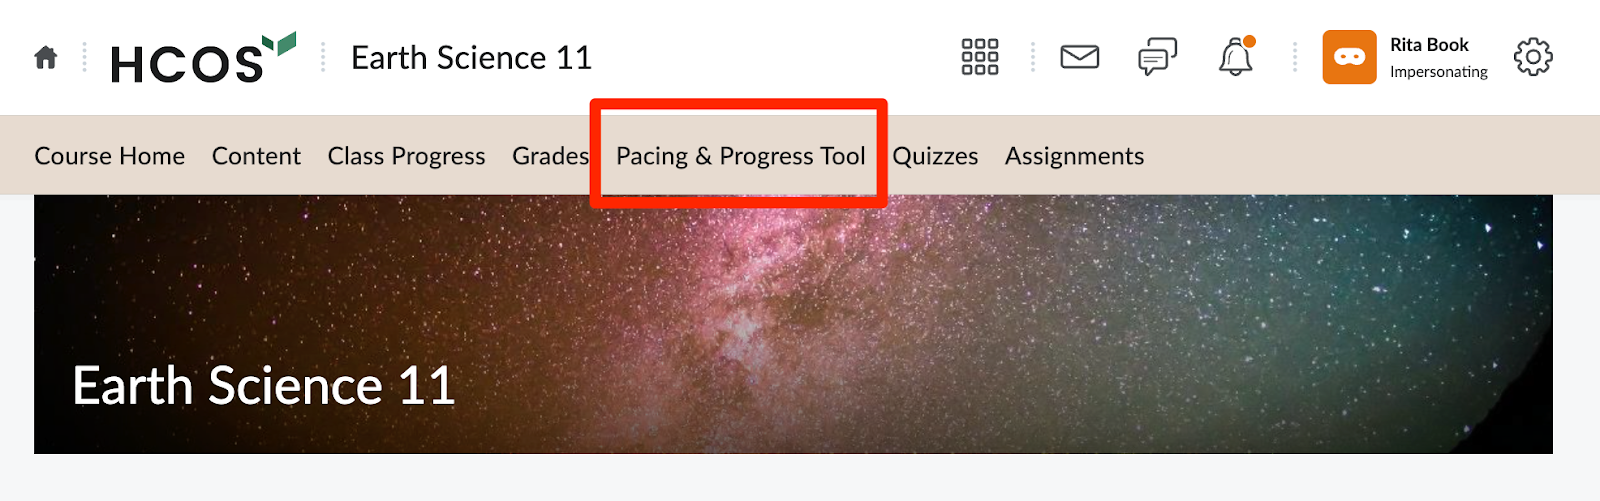
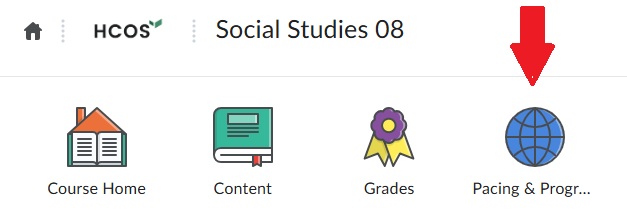
Step 3: Click Pacing & Progress Tool in the Navigation Bar. It will appear differently, depending on if you are in a Middle School course or a Grad course:
Middle School

Grad
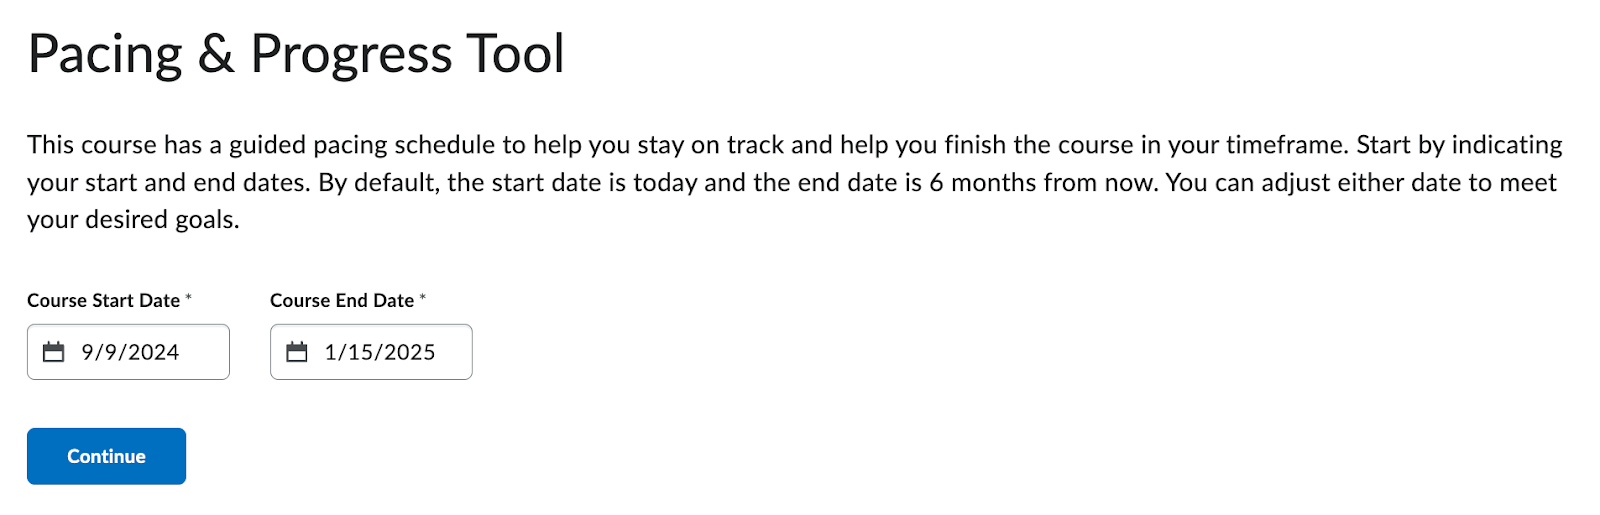
Step 4: You will be taken to the Pacing & Progress Tool landing page. To begin, you need to select your start date and completion date.
Here are some suggested dates; however, you can choose any start and end date:
You may create your schedule with any start and finish date, as long as the duration does not exceed 365 days.
Step 5: Once you’ve chosen your dates, click the blue Continue button.
Your Course End Date can be edited after this initial selection; however, the Course Start Date cannot be changed. Please ensure that you choose a date that best reflects your starting goals.
You will be asked to confirm you are ready to proceed. If your dates are correct, click Create Schedule. You will be taken to a page that outlines your course schedule!
Updating Your Schedule
There is flexibility built into the scheduler tool, as it is designed to assist you in your planning and support you in your course progress.
There may be times throughout the year where you need to adjust a date on a specific assignment, or your final course end date.
Course End Date
To adjust your final course end date, click the pencil icon to the right of the Course End Date at the top of your schedule.
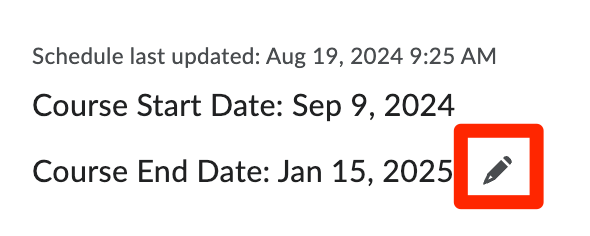
Here you will be able to select a different course end date. Please remember that you will not be able to select a date that is more than 365 days from your start date. Once you have chosen your new date, click Save at the bottom of the window. The tool will now repopulate your Suggested Due Dates for assignments based on your new Course End Date.
Specific Assignment Dates
You can adjust your assignment due dates to fit your schedule in two different ways:
Option 1: Individually
Click the pencil icon next to the Suggested Due Date of the assignment you wish to move.

You will then be prompted to select a new date for when you plan to complete the assignment. Click Save at the bottom of the window. Your scheduler will adjust to the new dates, including your progress wheel.
Due dates created by teachers in specific courses (e.g., CC+ courses, synchronous classes) should not be changed in the scheduler. In the case where a scheduler's due date and assignment due date disagree, the due date set by the instructor takes priority.
Option 2: Bulk Edit
Are you going away for Christmas holidays or maybe Spring Break? Consider bulk editing your due dates during that time frame.
First, select the items you wish to change by clicking the checkbox to the left of the items.
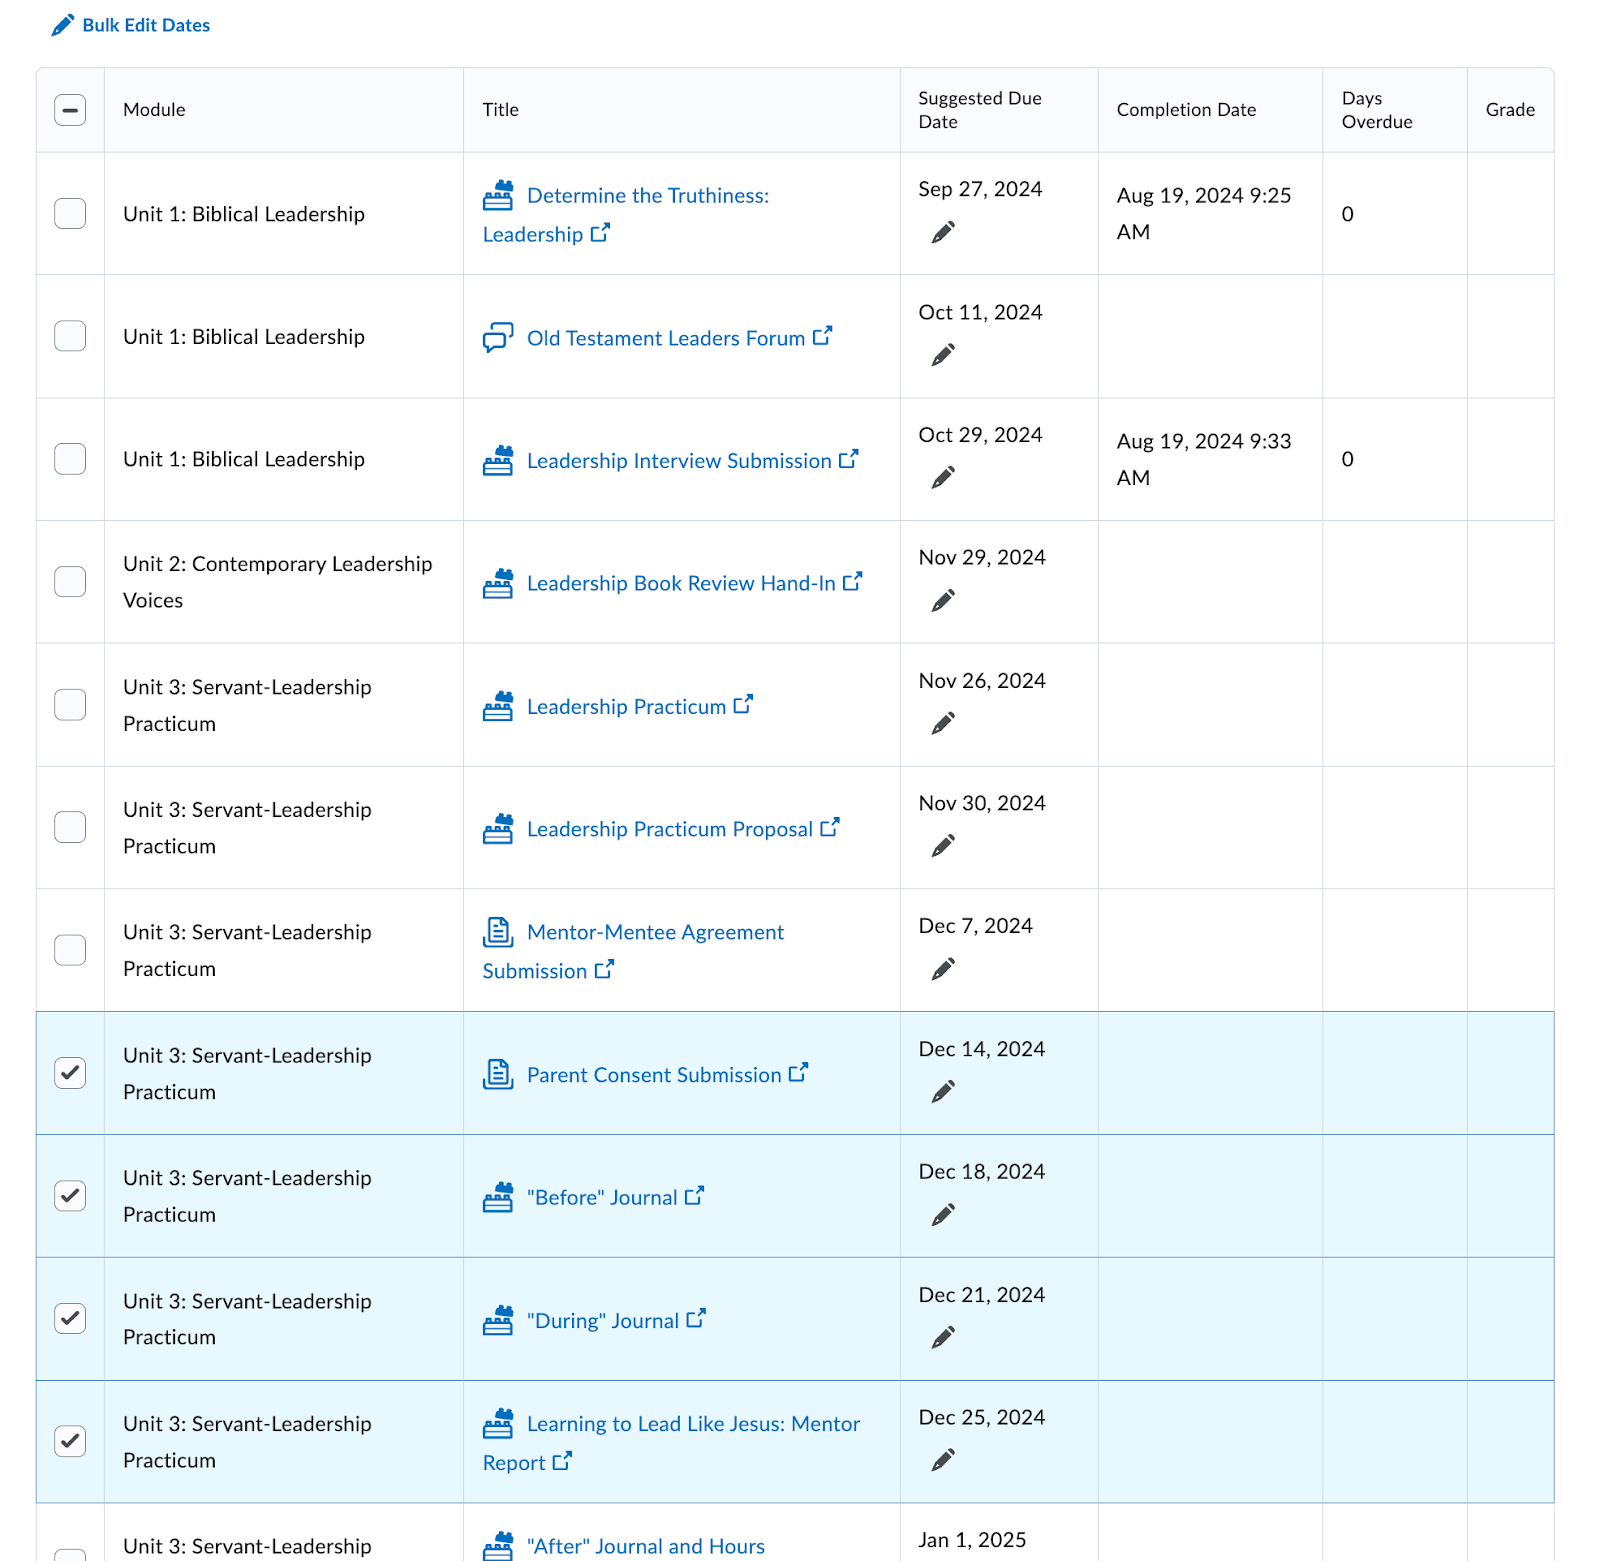
Next, click the Bulk Edit Dates located at the top left of the scheduler items.
You will be taken to a window where you can edit all of the Suggested Due Dates for those items. Change the dates accordingly and click the blue Save button at the bottom of the window. If you have chosen a date outside your Course End Date, it will populate as an error and flagged for change.

Once all new dates are saved, click Close to then be redirected to your schedule.
Integrity Advocate - Student Experience
Some courses will require students to be proctored for exams using Integrity Advocate.
There are two modes that students will experience, Demo Mode and Proctored Mode.
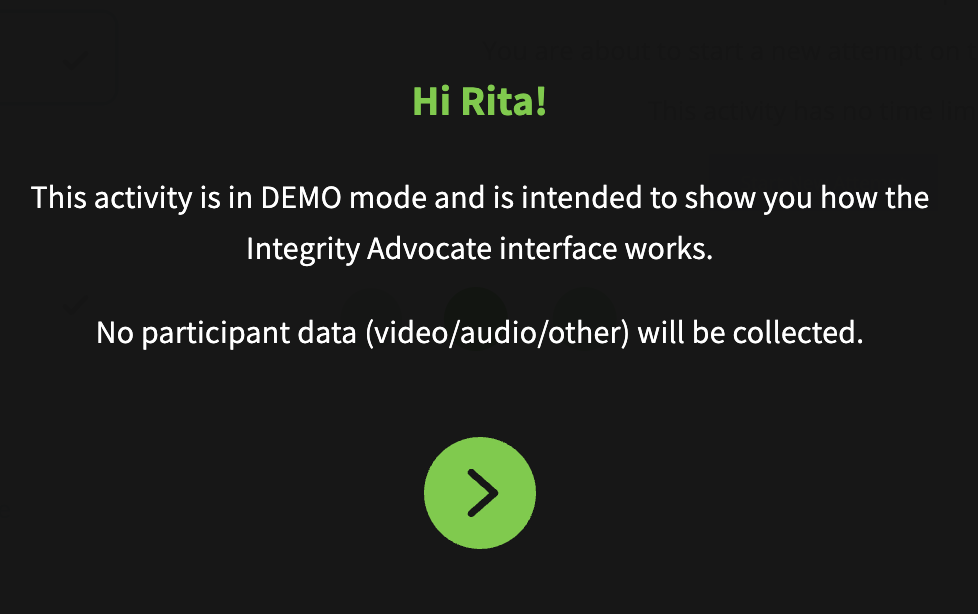
Demo Mode
Teachers may set up quizzes or tests using the demo mode of Integrity Advocate. This gives students the chance to experience and walk through the different steps of launching an exam within Integrity Advocate ahead of a high-stakes test. The process is the same as outlined below with the exception that the first screen shows demo mode.
Proctored Mode
When your teacher has requested that a specific test be proctored, you will click on the link within your course and Integrity Advocate will appear:
Please note, tests proctored by IA must be taken in either a Chrome or Edge browser. Other browsers will not work.
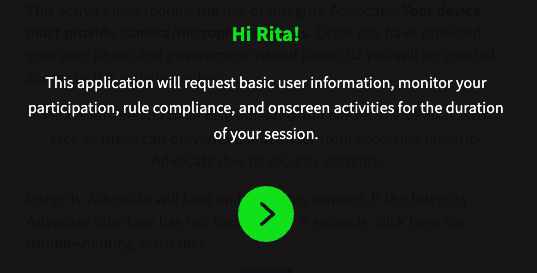
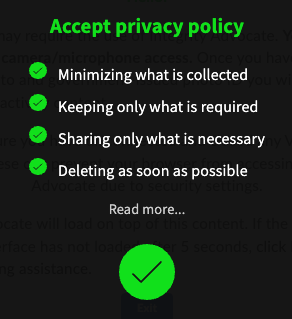
Click the green arrow, and accept the privacy policy.
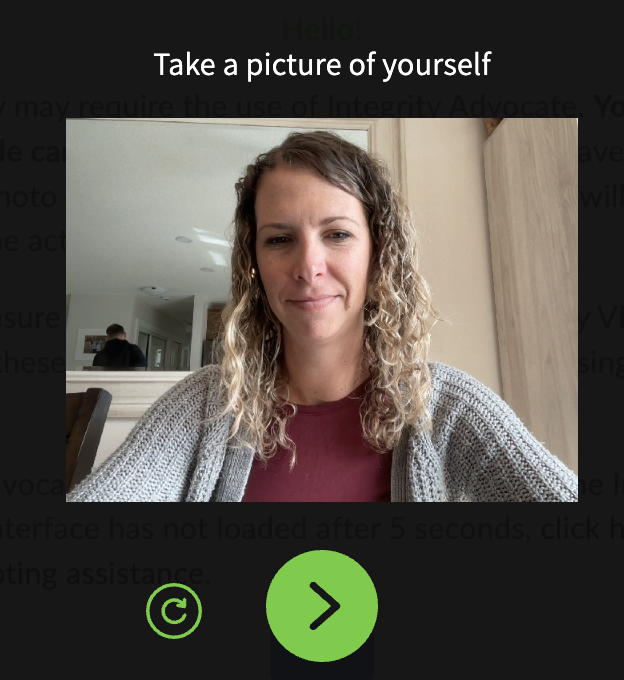
You will then be requested to take a picture of yourself.
You will then be requested to take a picture of your Photo ID. Acceptable IDs are:
- Drivers License
- Government Issued ID
- School Issued ID card
You are given the option to 'Mask Information on your ID Card'. Feel free to block out personal information such as address, and date of birth. Please do not block our your picture.
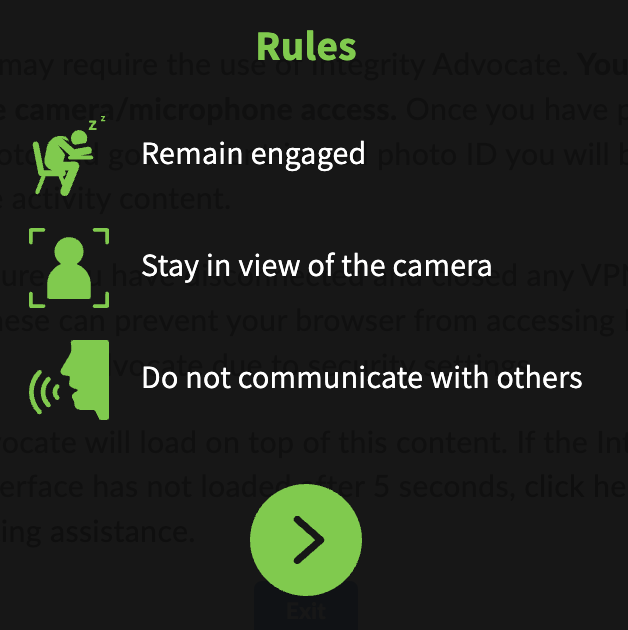
Once the picture has been submitted, the rules for your exam are then displayed.
You are then able to take your exam. You will notice on your window a recording of yourself as you proceed through the test.
There are two ways to end the Integrity Advocate Session:
1) If you are taking a quiz that is in Brightspace, clicking the Submit Quiz will end the Integrity Advocate session.
2) If you are taking a quiz that is in StudyForge or on another content item in the course, the session will end when you navigate away from the window for longer than 10 minutes. If you close the browser (window or tab) when you have finished your assessment that is the simplest way to ensure the session is closed.
A few things to note:
- If you leave the view of your camera, you may hear a voice through your speakers directing you to come back into the frame. This can be startling if you are not aware it may happen.
- Integrity Advocate is monitoring you through your webcam and microphone to ensure you are following the rules of the test.
- Artificial Intelligence will flag any rule violations during your test.
- If flags are made, a human review from Integrity Advocate reviews those flags to determine if they are appropriate.
- For example, if you sneezed and it temporarily took you out of the view of the webcam, this would be deemed appropriate and the flag would be removed.
- Following the scans, your teacher receives a report about 5 minutes following the completion of your exam, that states either the session was clear or that there are flags that need to be addressed. If there are concerns that need to be addressed, your teacher will contact you to set up a meeting.
Additionally, Mr. Johnston has create a video that walks you through the process:
Logging Into Brightspace and Accessing Course Pages
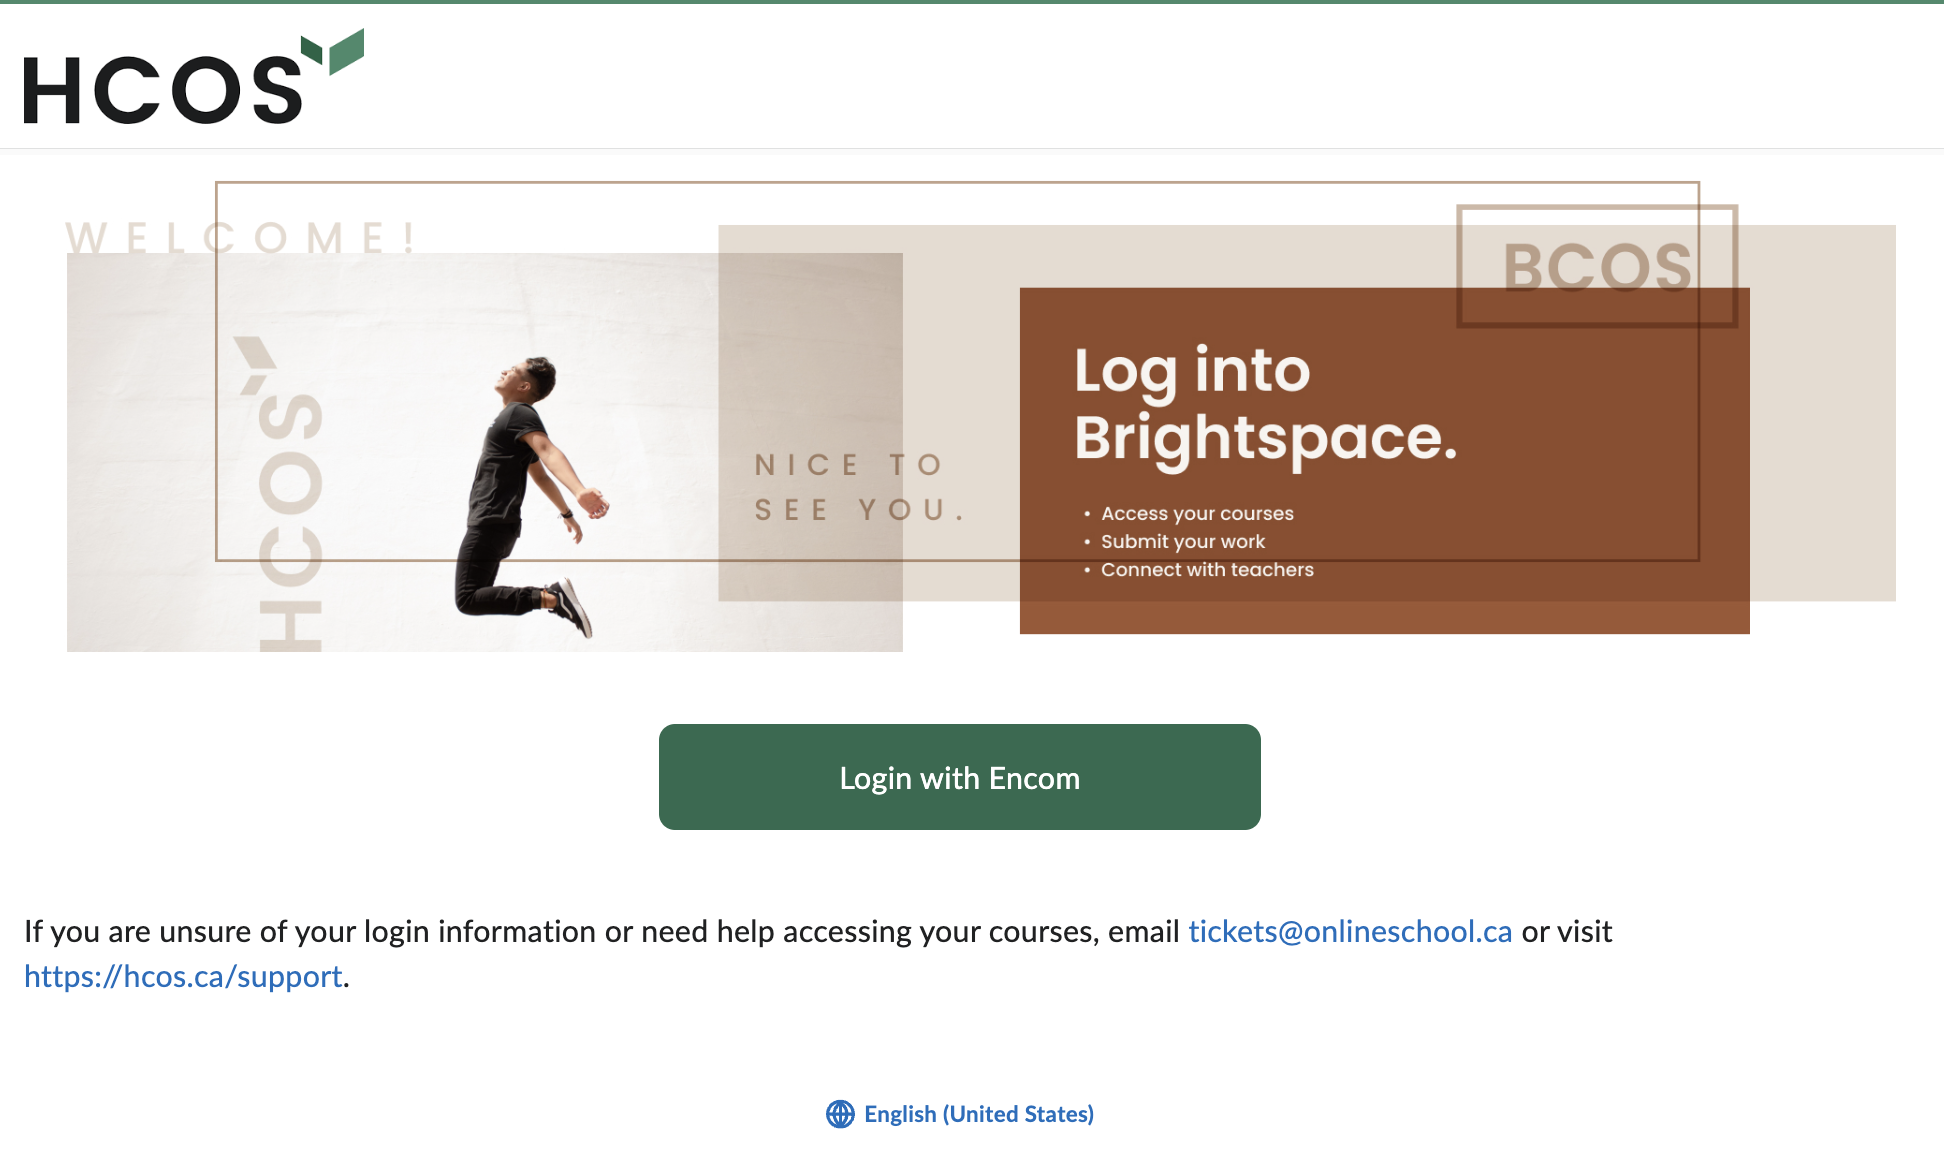
To access your Brightspace account and your course shells, go to the Brightspace Login page at this link:
https://hcos.onlinelearningbc.com/d2l/login. You should see the following page:
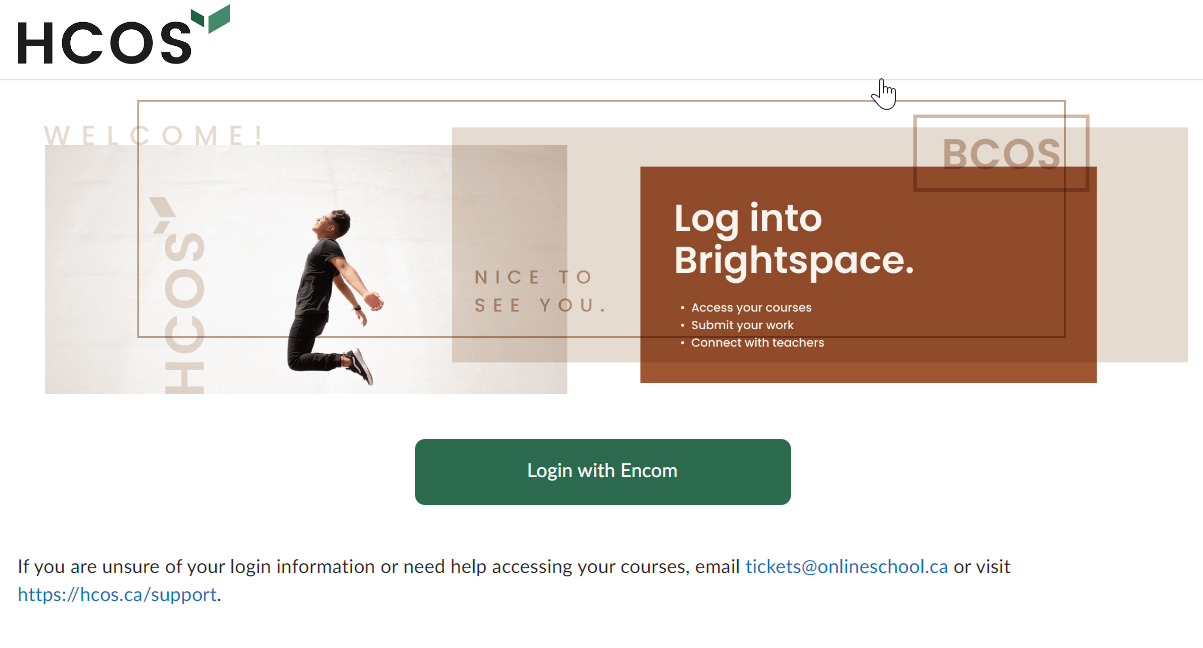
Click on the green Login with Encom button, and when prompted, enter your Encom username and password to bring up your homepage.
-
HCOS Students - Your parents will need to setup your Brightspace account using the instructions found at Setting up a Student Brightspace Account| SOPHIE
-
BCOS Students - Your Encom login information is included in your acceptance letter.
If you are unsure of your login information please email Tech Support and request a reset using the email you signed up with.
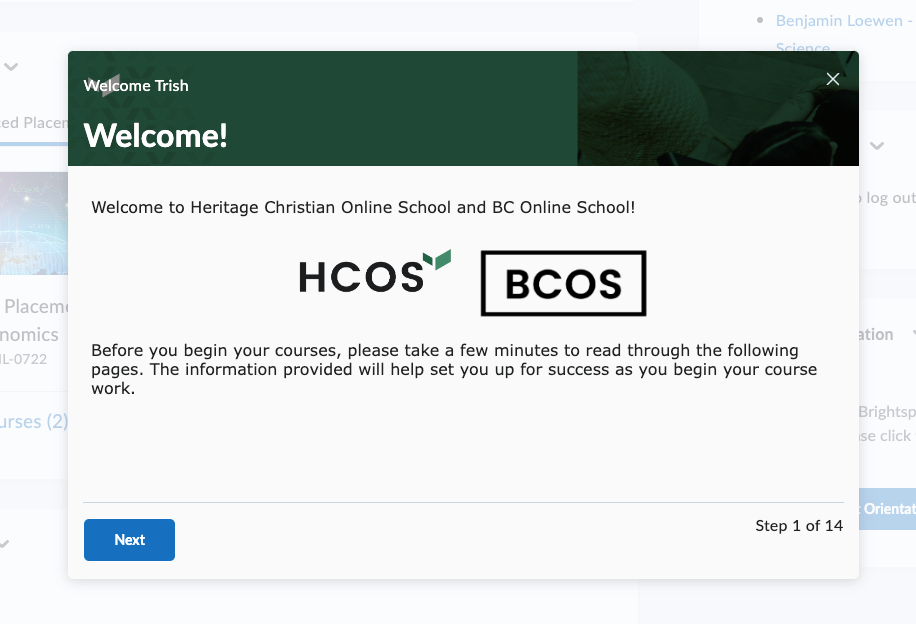
The first time you log in to Brightspace, you will be prompted to complete the Brightspace Orientation module. This informational module provides you with the information, tips and knowledge you will need in order to navigate online courses in Brightspace.
The orientation module can be accessed at any time by finding the orientation widget below the Student Success Centre widget if you need a refresher on any of the topics.
For tackling any additional issues visit Brightspace Troubleshooting | SOPHIE.
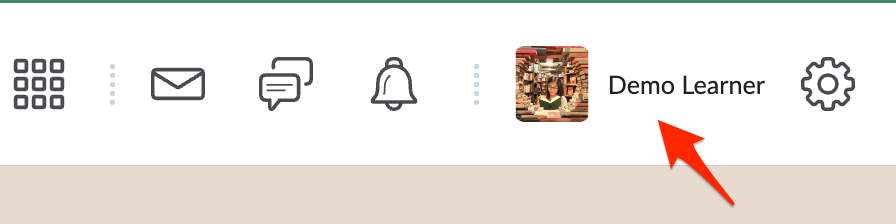
Message, Subscription and Update Alerts
At the top of your Brightspace login you will see five different icons located next to your profile image and name.

There are two icons in addition to the alerts:


The three icons that are related to alerts are listed below. Anytime that an alert is present it will be represented by an orange dot.


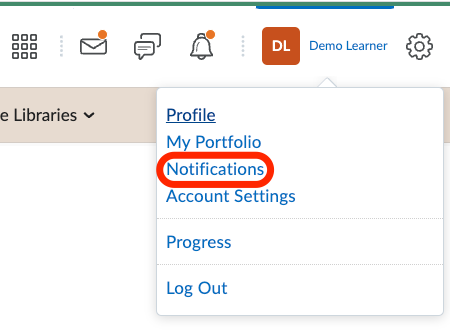
To change your notification settings:
-
At the top right, click on your user name or profile picture.
-
Select ‘Notifications’ from the pop up window.
Once into the notifications tab, there are instructions on how to download the Pulse App which connects to your Brightspace account. Additionally, you can update contact methods, both email and mobile.
There are a few settings that you have the ability to choose from.
4. Under ‘Summary of Activity’ you have the ability to receive a summary of activity for each of your different courses. The options are never, daily or weekly.

5. There are different ‘Instant Notifications’ that you have the ability to select from. As a student, you might want to select notifications to do with the following either as a SMS (text message) or email:
-
-
- Activity Feed - new comments from others on a post
- Activity Feed - new posts created by others
- Announcements - announcement updated
- Announcements - new announcement available
- Assignments - assigned feedback released
- This will notify you when your teacher has given you feedback on any of your submitted work.
- Discussions - mentioned in a discussion post or thread
- Discussions - new port in a forum, topic, or thread that i subscribed to in instant notifications
- Grades - grade item released
- Grades - grade item updated
-
We suggest leaving off the different Content items unless you want to know every time a typo or small addition is made to your courses :)
6. Under customize notifications, you have the ability to choose whether or not you’d like the grade value of your assignments sent when receiving feedback.

The second option may be chosen if you’ve enrolled in courses that haven’t yet started, such as synchronous course options.
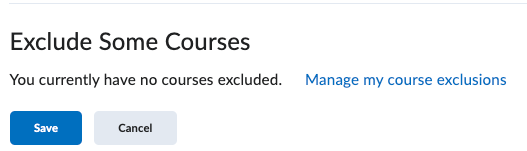
7. Lastly, the ‘Exclude some Courses’ section. If there are courses that you are enrolled in but don’t want to receive notifications for, this is where you would list those under the ‘Manage my course exclusions.’
8. Remember to click ‘Save’ before leaving this page.
Navigating the Course Homepage
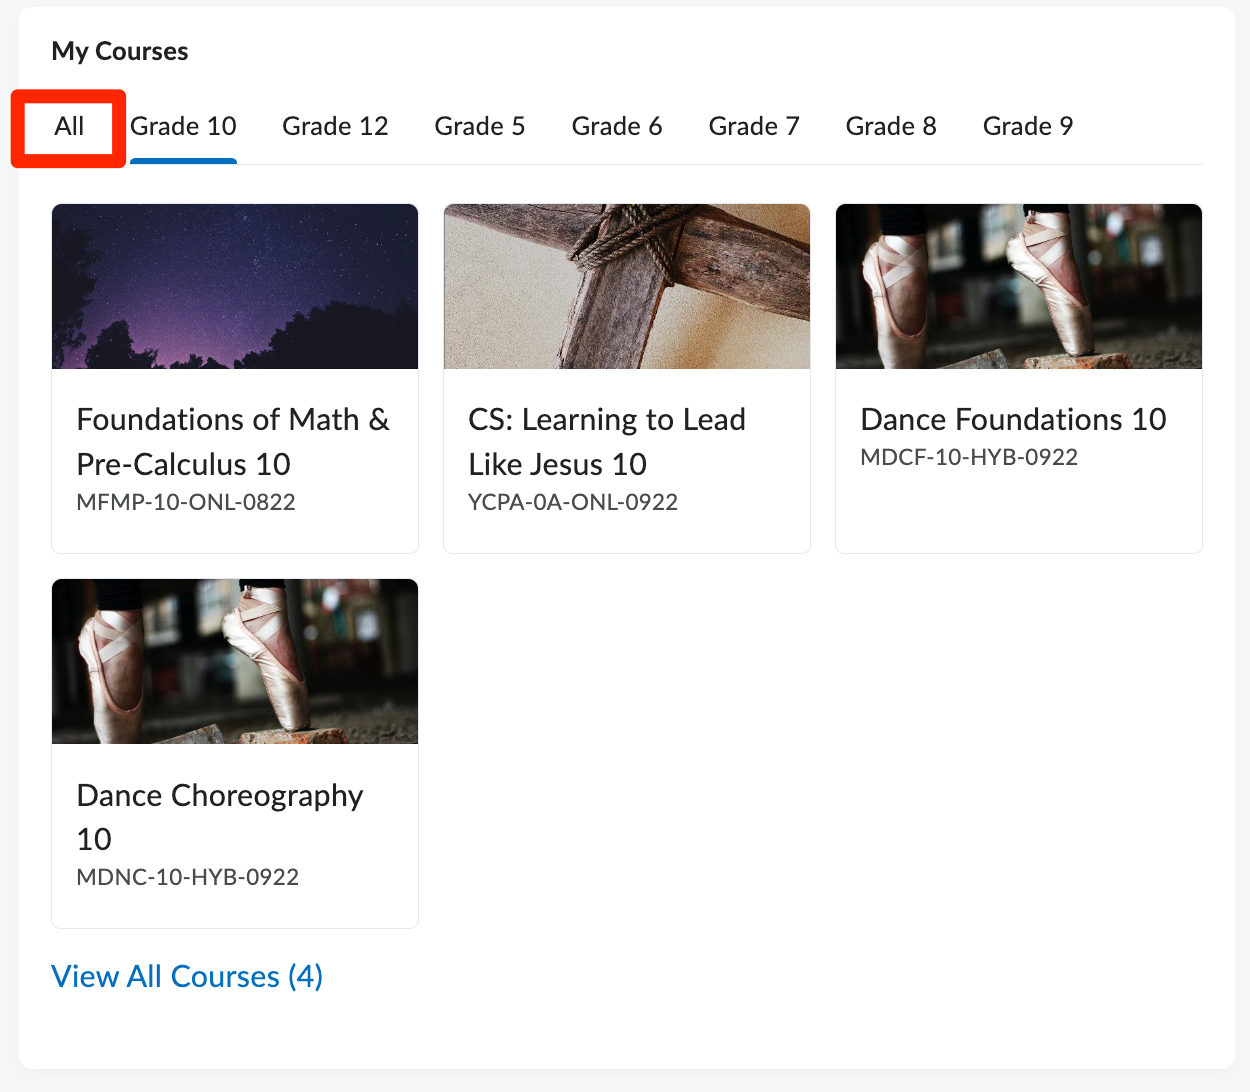
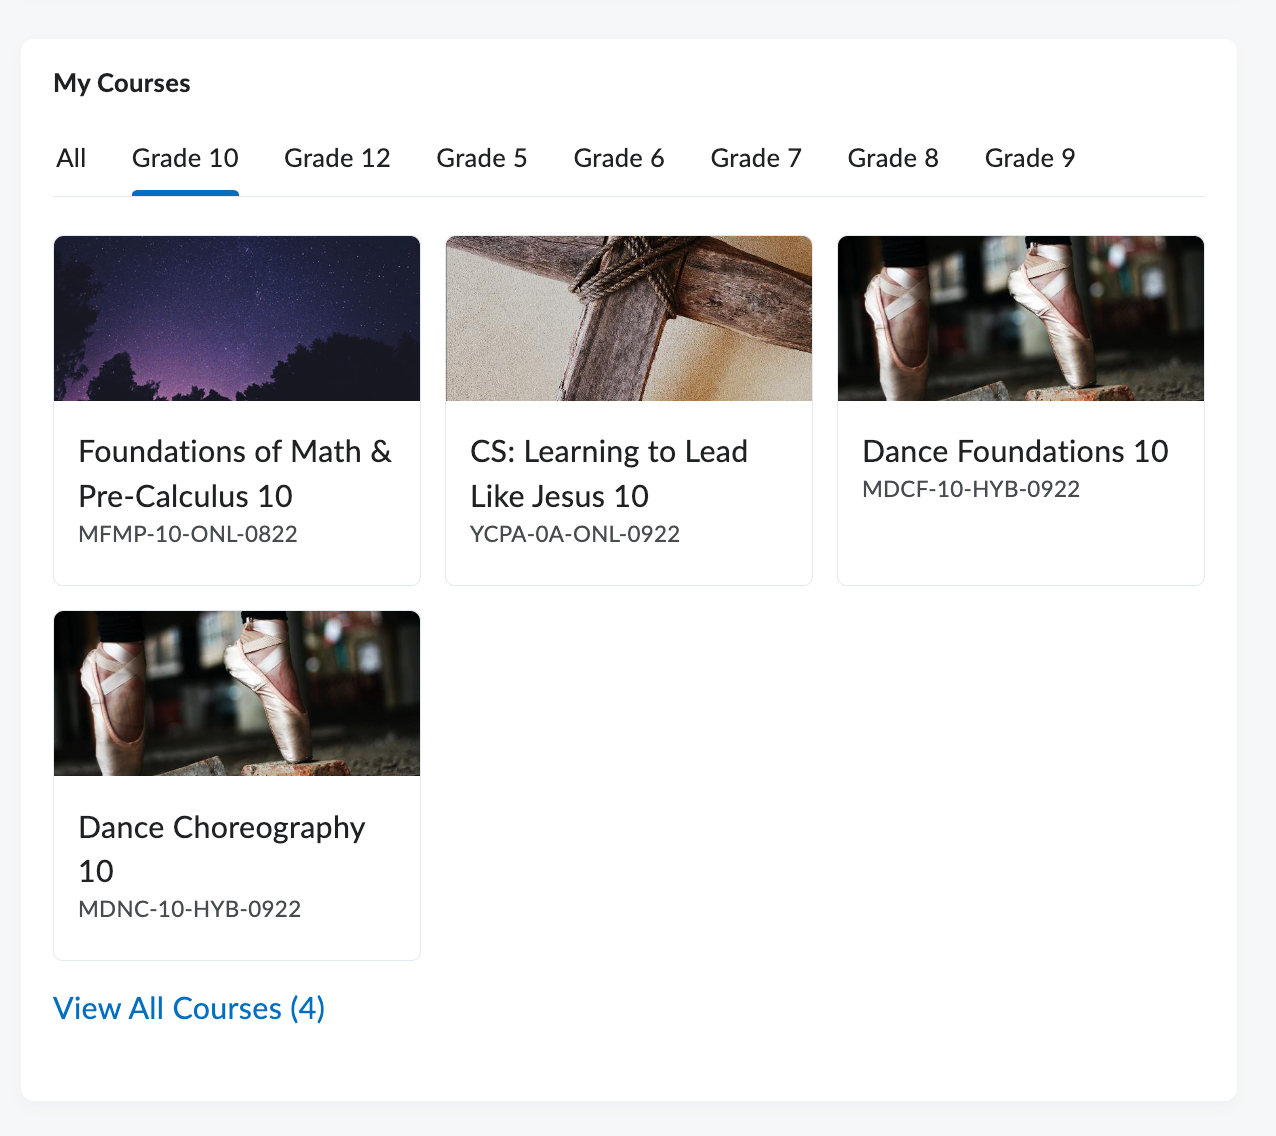
Once logged into Brightspace, to access your course(s) click on one of the tiles located in the My Courses Widget. If you cannot see all your courses, make sure you have selected All.
Once you have entered the course of your choice you will see a navigation bar and options to select on the course homepage.
At the top you will see the navigation bar. In grades 10 through 12, it will appear like:

And in grades 5 through 9, it will appear like this:

While it may look different, the buttons and links represent the same information.


On the course homepage you have:


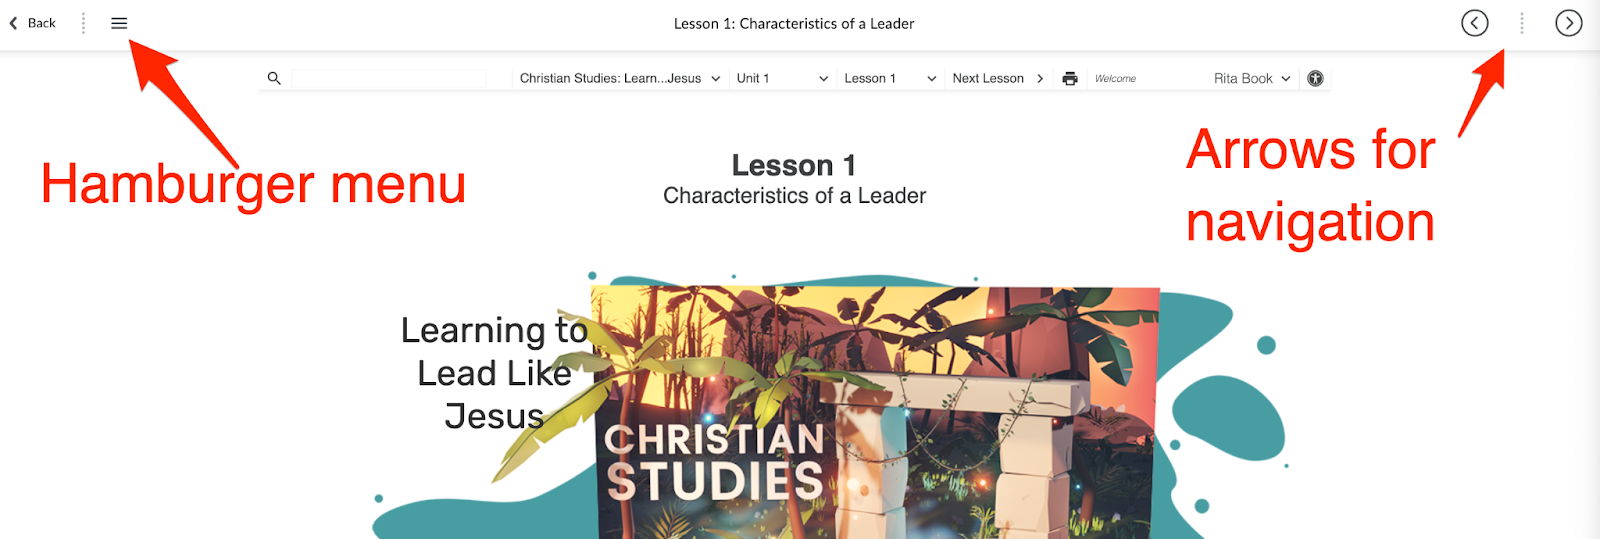
Once you have clicked on a tile in Brightspace you will be taken to a view that displays only the content of your course. To navigate through, you may have to click a ‘hamburger menu’ in the top right corner to see the different components of the unit. Alternatively, you can use the arrows on the right hand side to navigate forwards and backwards. The ‘< Back” button will return you to the course homepage.
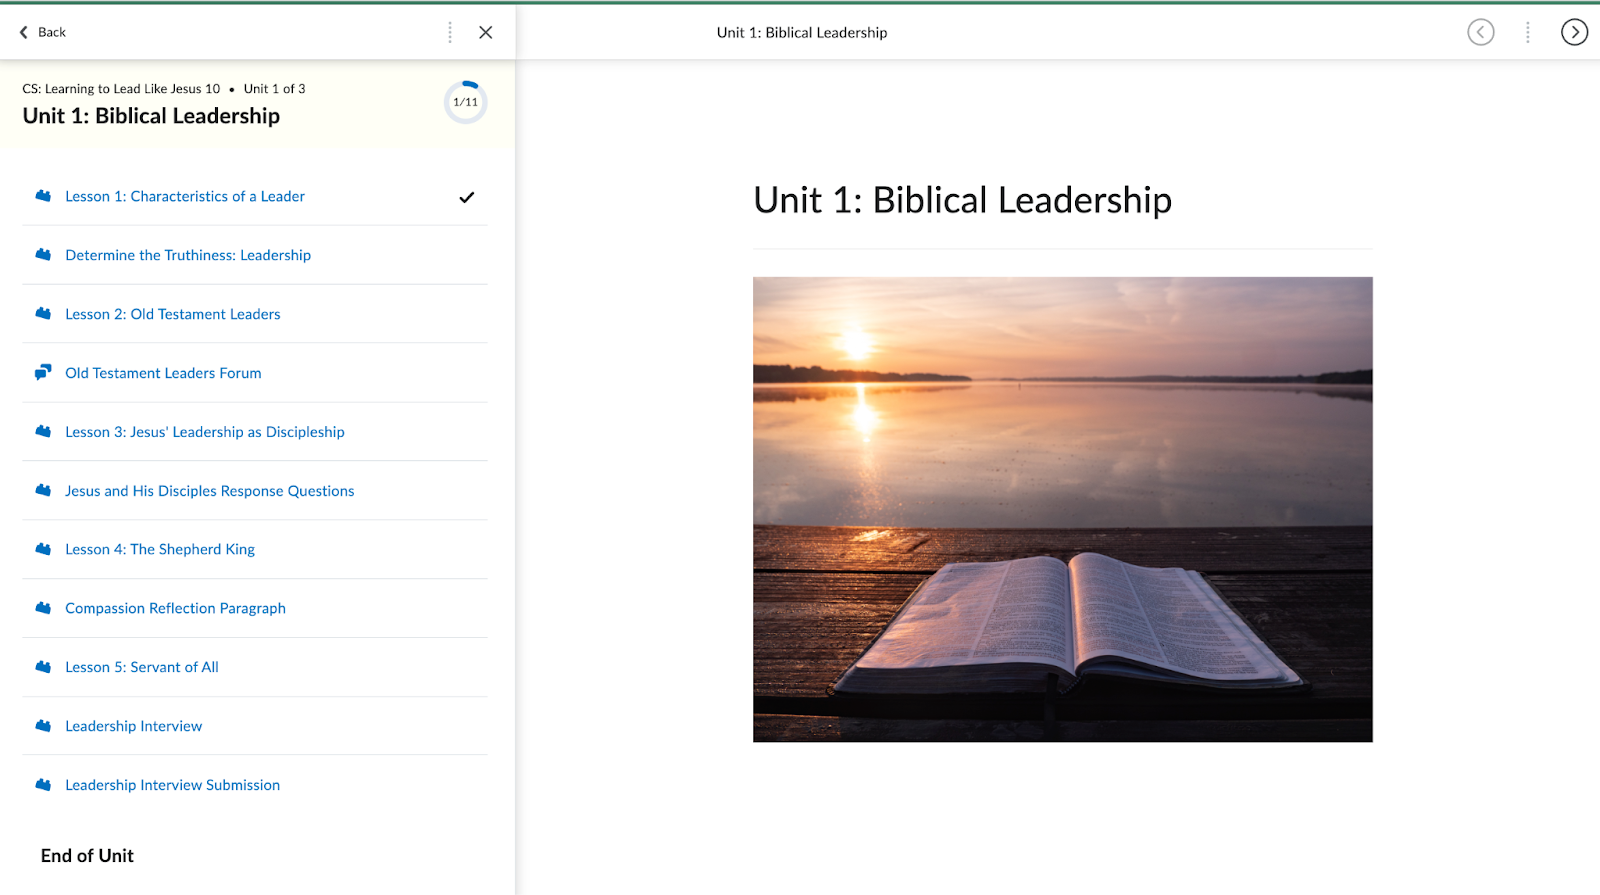
Once you adjust the menu, you will see additional navigation options:
Navigating the Landing Page in Brightspace
Brightspace is the Learning Management System (LMS) used by HCOS to offer a wide variety of courses including online (asynchronous and synchronous), hybrid, Community Connections + and even some individualized offerings.
While course experiences may be different depending on what offerings you are enrolled in, the general user experience is the same.
If it is your first time logging in, you will be prompted to walk through the Online Orientation. A pop-up window will appear and you will be instructed to read through the material provided.

Once you have logged in and completed the Online Orientation, you will be taken to the landing page. On the landing page you will see a few different categories of information:

In addition to the modules you see upon logging in, there are additional resources available to you through the navigation bar.


The additional icons by your username are for Messages and Profile. To find more information about those please visit these pages:
Parent and Guardian Access to Brightspace
We believe that at home learning requires engaged parents and guardians. Brightspace provides a Parent Portal to access announcements, grades, feedback and upcoming assignments for each of course their students are enrolled in.
See more about what is available to parents with Brightspace:
To log into your parent account, please visit https://hcos.onlinelearningbc.com and use your Encom username and password.
Parent Town Hall Q&A
Student Brightspace Access
If you log into Brightspace and cannot see your courses, please ensure you are logged in with the student Encom credentials, not the guardian Encom credentials. The username should be the student's FirstnameLastname.
Brightspace is a required part of any online or hybrid course. In addition, some individualized teachers use Brightspace as a way to track submissions and documents. The instructions below will walk you through setting up your student's Brightspace account for the first time and how to login to Brightspace. You can also watch this short tutorial video:
Setting Up A Student Account
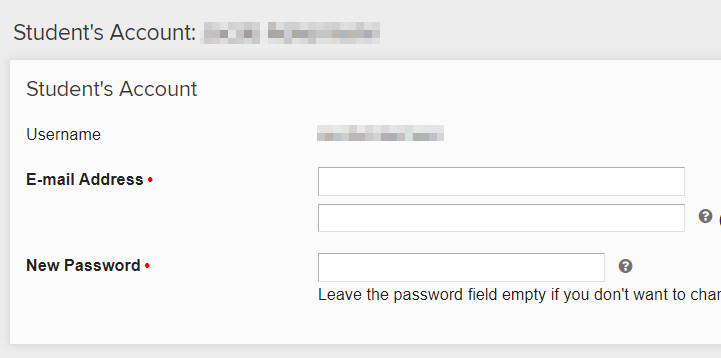
If this is the first time your student has taken a Brightspace course please follow the steps below to create a password for them.
Login to your Parent account in Encom and click on the Student's Account button. |
|
If you do not see Student's Account you can access your student's profile by clicking Student Lists (1) in the upper menu and select Upcoming Students (2) on the left |
|
|
On the Student Account page you will find your student's You can also specify the email address that grading notification and emails from the teacher should be sent to. |
|
You can also check which courses you are enrolled in within Brightspace by clicking the blue LMS Diagnostics button. This page only shows the courses your student is enrolled/completed through Brightspace. All courses can be seen on the student's course list page. |
|


Accessing Brightspace
| Navigate to HCOS' Homepage. In the top right you will see an @HCOS section. Click there. |  |
| Scroll down to the Quick Access section. Click on Login under Brightspace. | 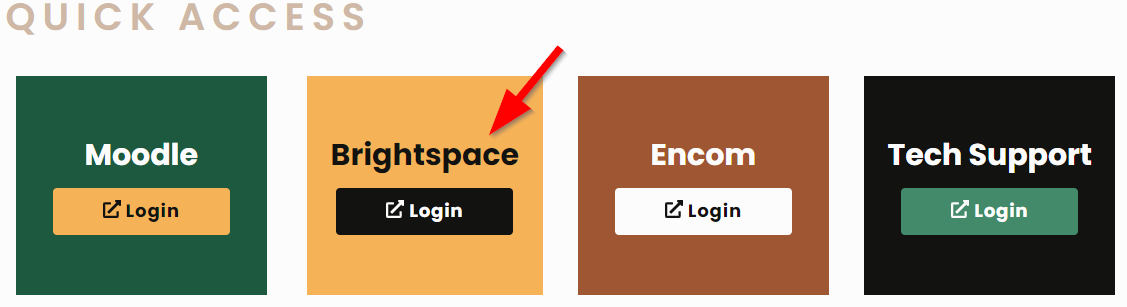 |
|
Once here, we suggest bookmarking the login page for future access. If it's your first time logging into Brightspace you will be required to complete the online orientation. This is a short module of information for all users about the software and procedures required to complete an online course. Once the orientation is completed, your courses will show on the Brightspace homepage. |
|

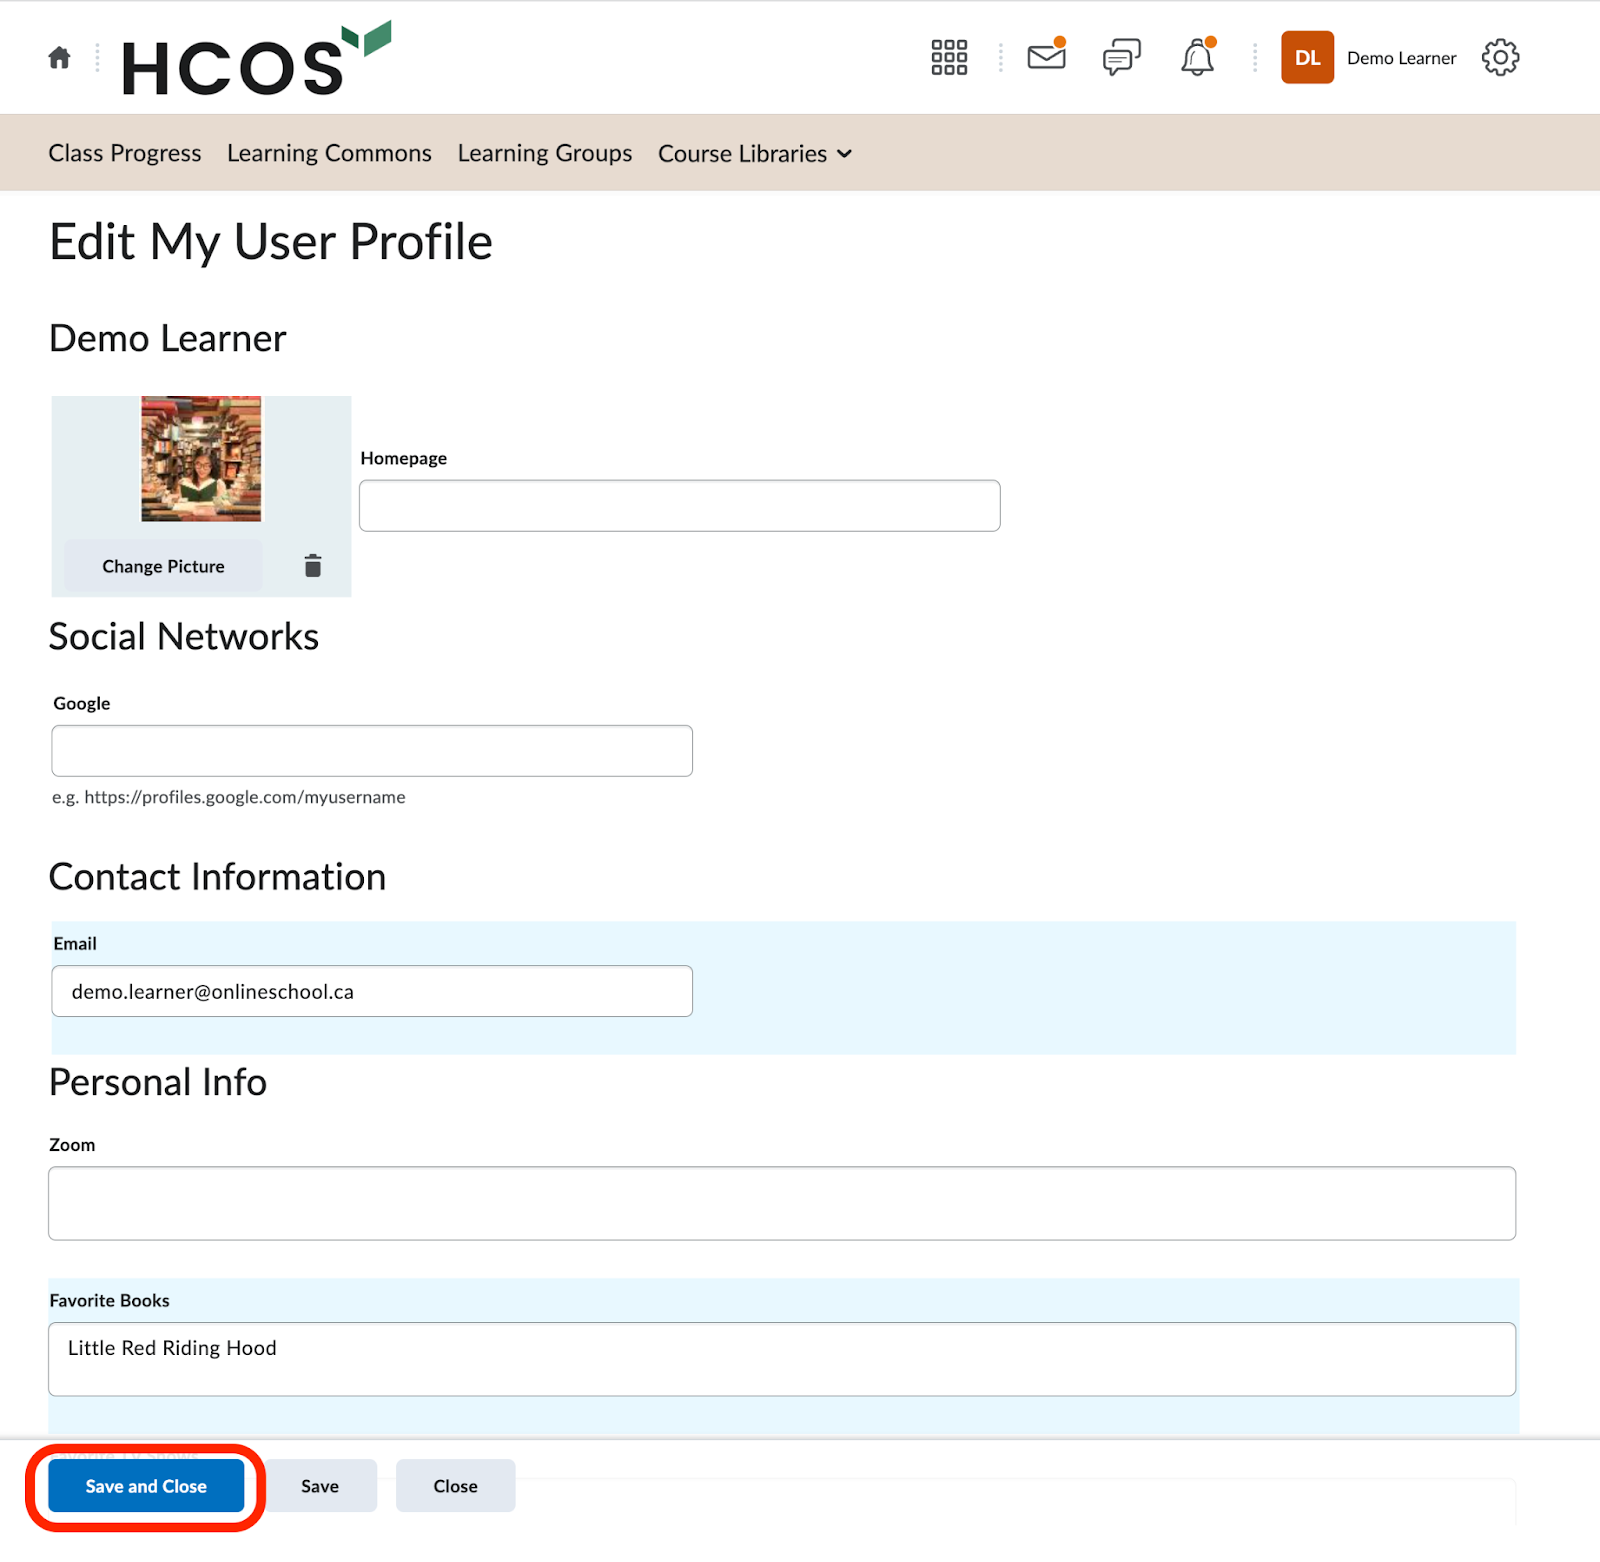
Setting Up your Brightspace Profile
To set up your profile within Brightspace:
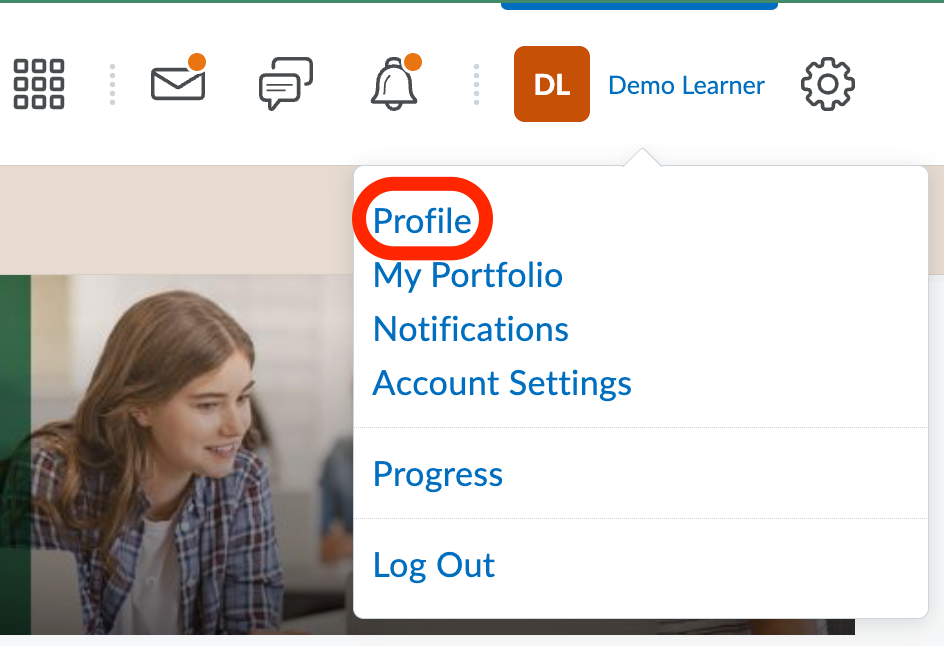
-
Once logged in, at the top right, click on your initials
-
Click ‘Profile’

Here you can update:
-
Profile picture
-
Images must be less than 1MB in size
-
Remember that this image will be seen by your teachers and other students, please choose a respectful one that represents you. Your teachers appreciate seeing your face. If you are uncomfortable providing a picture, that is ok. Any pictures with inappropriate images or content will be removed.
-
Contact Information
-
This will make your email address public to other users within Brightspace. Teachers have access to your email address if you choose to not put it in this box.
-
Personal Information
-
If you’d like for others to get to know you a bit, feel free to include some personal tidbits - favorite movies, favorite quotes etc. This is not required.
-
Once you have finished editing your profile. Remember to click ‘Save and Close’
Setting up a Student Brightspace Account
If you log into Brightspace and cannot see your courses, please ensure you are logged in with the student Encom credentials, not the guardian Encom credentials. The username should be the student's FirstnameLastname.
Brightspace is a required part of any online or hybrid course. In addition, some individualized teachers use Brightspace as a way to track submissions and documents. The instructions below will walk you through setting up your student's Brightspace account for the first time and how to login to Brightspace. You can also watch this short tutorial video:
Setting Up A Student Account
If this is the first time your student has taken a Brightspace course please follow the steps below to create a password for them.
Login to your Parent account in Encom and click on the Student's Account button. |
|
If you do not see Student's Account you can access your student's profile by clicking Student Lists (1) in the upper menu and select Upcoming Students (2) on the left |
|
|
On the Student Account page you will find your student's You can also specify the email address that grading notification and emails from the teacher should be sent to. |
|
You can also check which courses you are enrolled in within Brightspace by clicking the blue LMS Diagnostics button. This page only shows the courses your student is enrolled/completed through Brightspace. All courses can be seen on the student's course list page. |
|
Accessing Brightspace
| Navigate to HCOS' Homepage. In the top right you will see an @HCOS section. Click there. | |
| Scroll down to the Quick Access section. Click on Login under Brightspace. | |
|
Once here, we suggest bookmarking the login page for future access. If it's your first time logging into Brightspace you will be required to complete the online orientation. This is a short module of information for all users about the software and procedures required to complete an online course. Once the orientation is completed, your courses will show on the Brightspace homepage. |
|
Viewing Student Feedback in Brightspace and StudyForge
There are different avenues for students to view their feedback on work submitted to their courses within Brightspace. Below we discuss the different ways to access feedback on different assignment types within Brightspace and StudyForge. Before we get to those particulars, students receive email notifications when their submissions have been assessed by their teacher:
For Brightspace related assessments, student receive the following email notification:

For StudyForge related assessments, students receive the following email notification:
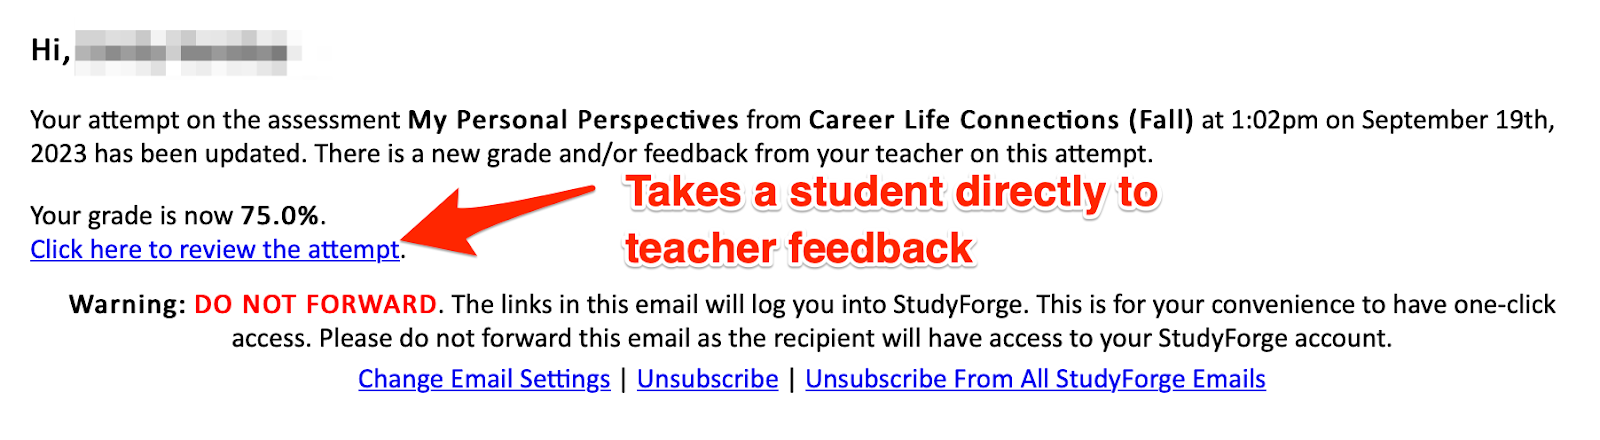
The email notifications are the simplest way for students to directly access their feedback whether in Brightspace or in StudyForge. Additionally, students can access feedback through different methods in both platforms.
Brightspace Assignment Submissions
If work is submitted through a Brightspace hand-in box, denoted by the icon of of a piece of paper in a tray:

Students can access their feedback in three different ways.
-
Through the direct hand in box:
By clicking on the hand-in box, students will be taken to a page that shows their submission, as well as the teacher feedback and the proficiency mark or grade given. -
Through the grades summary:
- Start by clicking Grades in the navigation bar of the course:
- Students will be taken to a page that outlines all the activities of the course as well as the feedback teachers have given on those activities:
- Start by clicking Grades in the navigation bar of the course:
- To see teacher feedback on rubrics, navigate to assignments via the Assignments tab on the course navigation bar.

- Click the specific assignment for which you wish to see feedback on.

- Here you will see all feedback on the assignment hand in, including rubrics that are built into Brightspace.
- Click the specific assignment for which you wish to see feedback on.


Brightspace Quizzes
Brightspace Quizzes are denoted by the blue box with a question mark icon:

Like assignments, there are two different ways to see the feedback provided to students on Brightspace quizzes.
Students will only see feedback on auto-graded quizzes if teachers have set up the quiz to provide automated feedback.
-
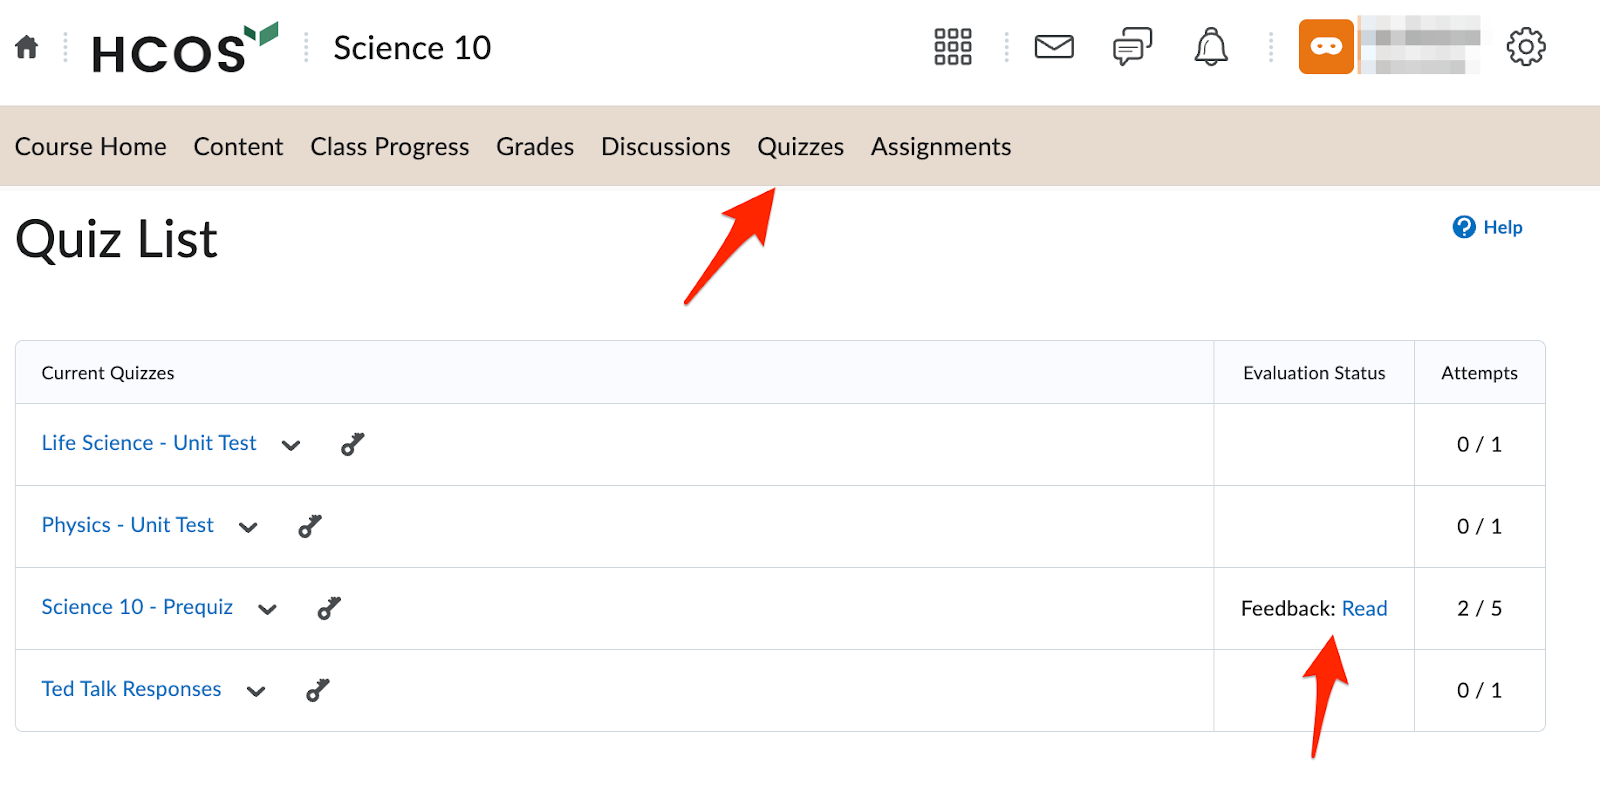
Through the quizzes summary:
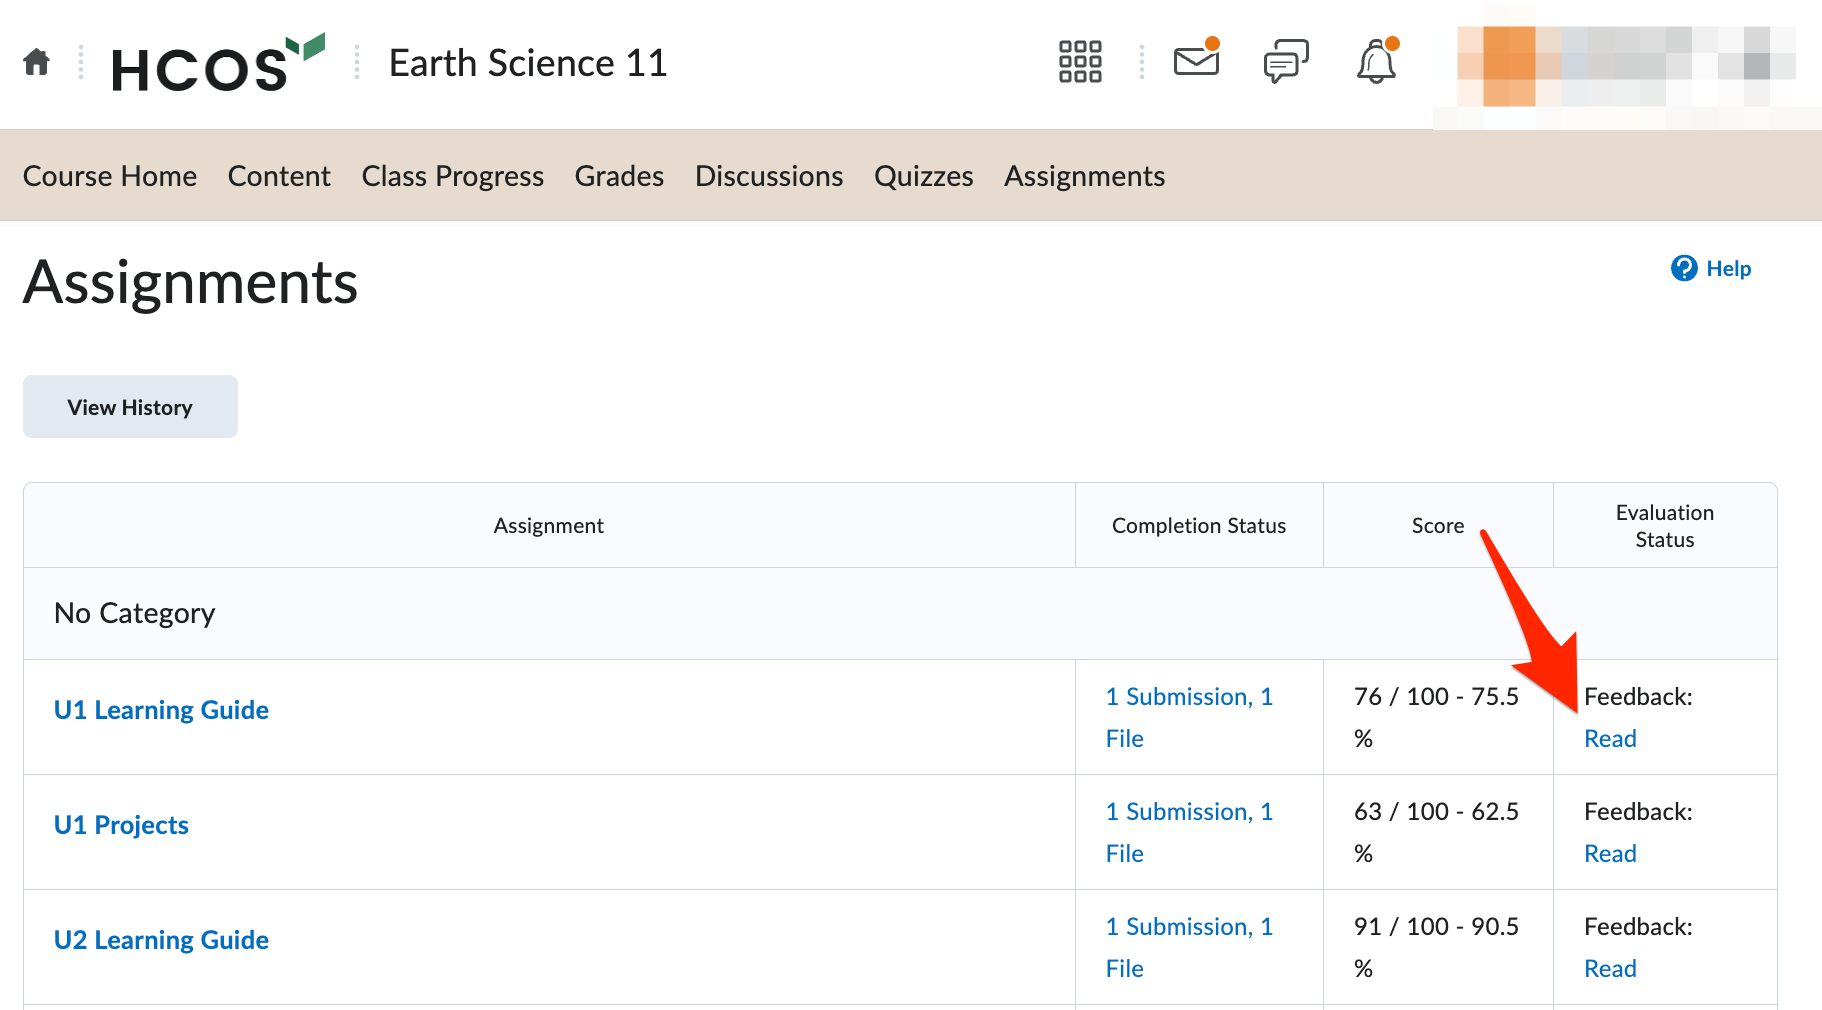
- Click the Quizzes tab in the course navigation bar.
-
You will be taken to a page that summarizes all the quizzes in the course. Click the Feedback: (Un)Read associated with the quiz you wish to review.
-
Through the grades summary:
-
Click the Grades tab in the course navigation bar.
- You will be taken to your grades overview which includes all the assessment activities within the course. Feedback for quizzes is shown within this list.
-


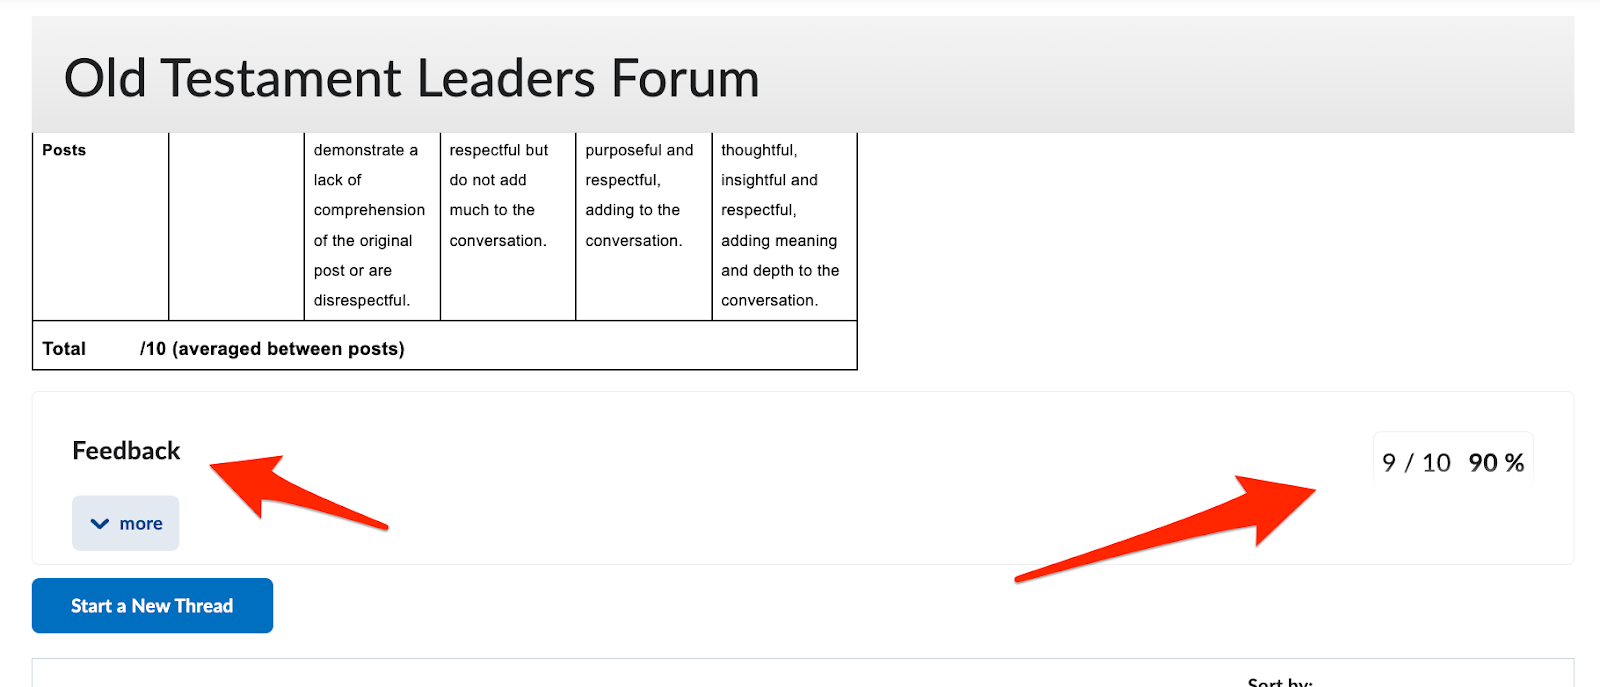
Brightspace Discussions
Also known as Forums, Brightspace denotes a discussion as a chat bubble icon:

There are two ways students can view the feedback on their discussion posts:
Note that depending on the purpose of the discussion, teachers may only provide a grade based on the rubric and leave the discussion aspect for the students. You may or may not see anecdotal feedback here. Please feel free to follow up with your teacher if you have questions.
-
Through the discussion post itself:
-
Navigate to the discussion in the course.
- Scroll below the discussion instructions to the section of feedback.
-
-
Through the grades summary:
- Navigate to the summary by clicking Grades in the course navigation bar:
- Scroll to the discussion line within your grade summary for feedback:
- Navigate to the summary by clicking Grades in the course navigation bar:

StudyForge Assessments (Quizzes or Assignments)
StudyForge assessment items are denoted by the puzzle block icon in course content (along with StudyForge lessons):
There are multiple ways to view the feedback to StudyForge assessment items:
-
Through the item itself.
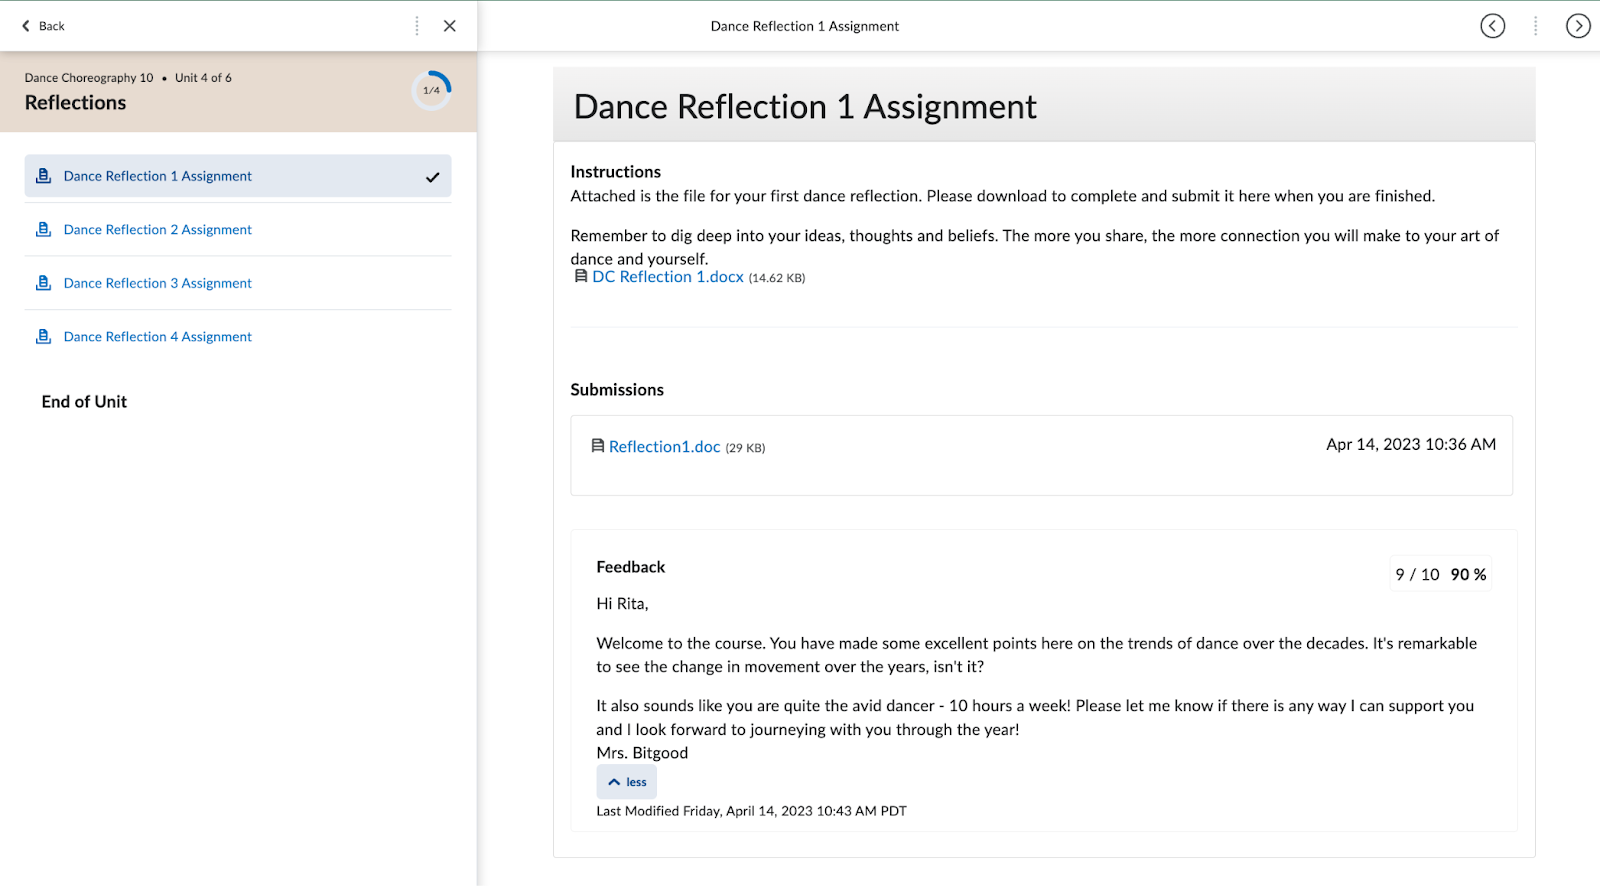
- Navigate to the assessment item by locating it within the course content. Click the link to be directed to StudyForge.
- You will immediately see your teacher’s overall feedback:
- In the above image, click the Review link beside the attempt that you wish to review further. You will be taken to a more detailed breakdown of feedback. Some assessments give teachers the opportunity to respond in different ways to student work.
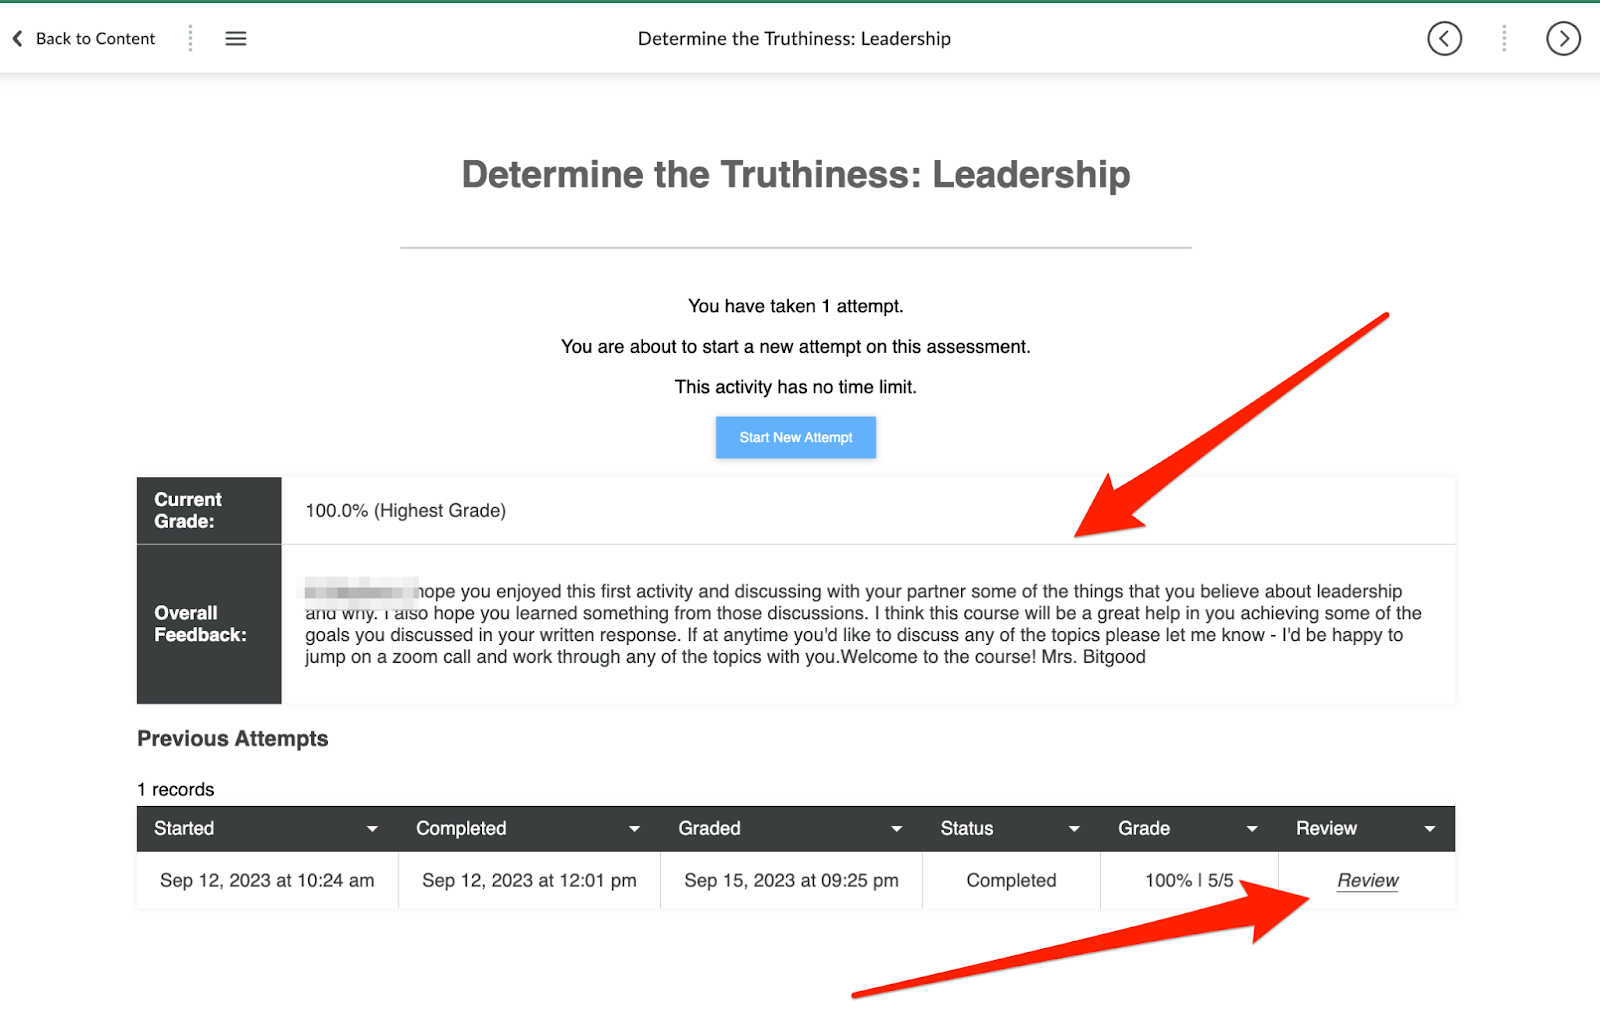
Please note, teachers will always use the overall feedback box and may choose to not add additional feedback details within the assessments. If you have any questions about the feedback given, please feel free to connect with your course teacher.
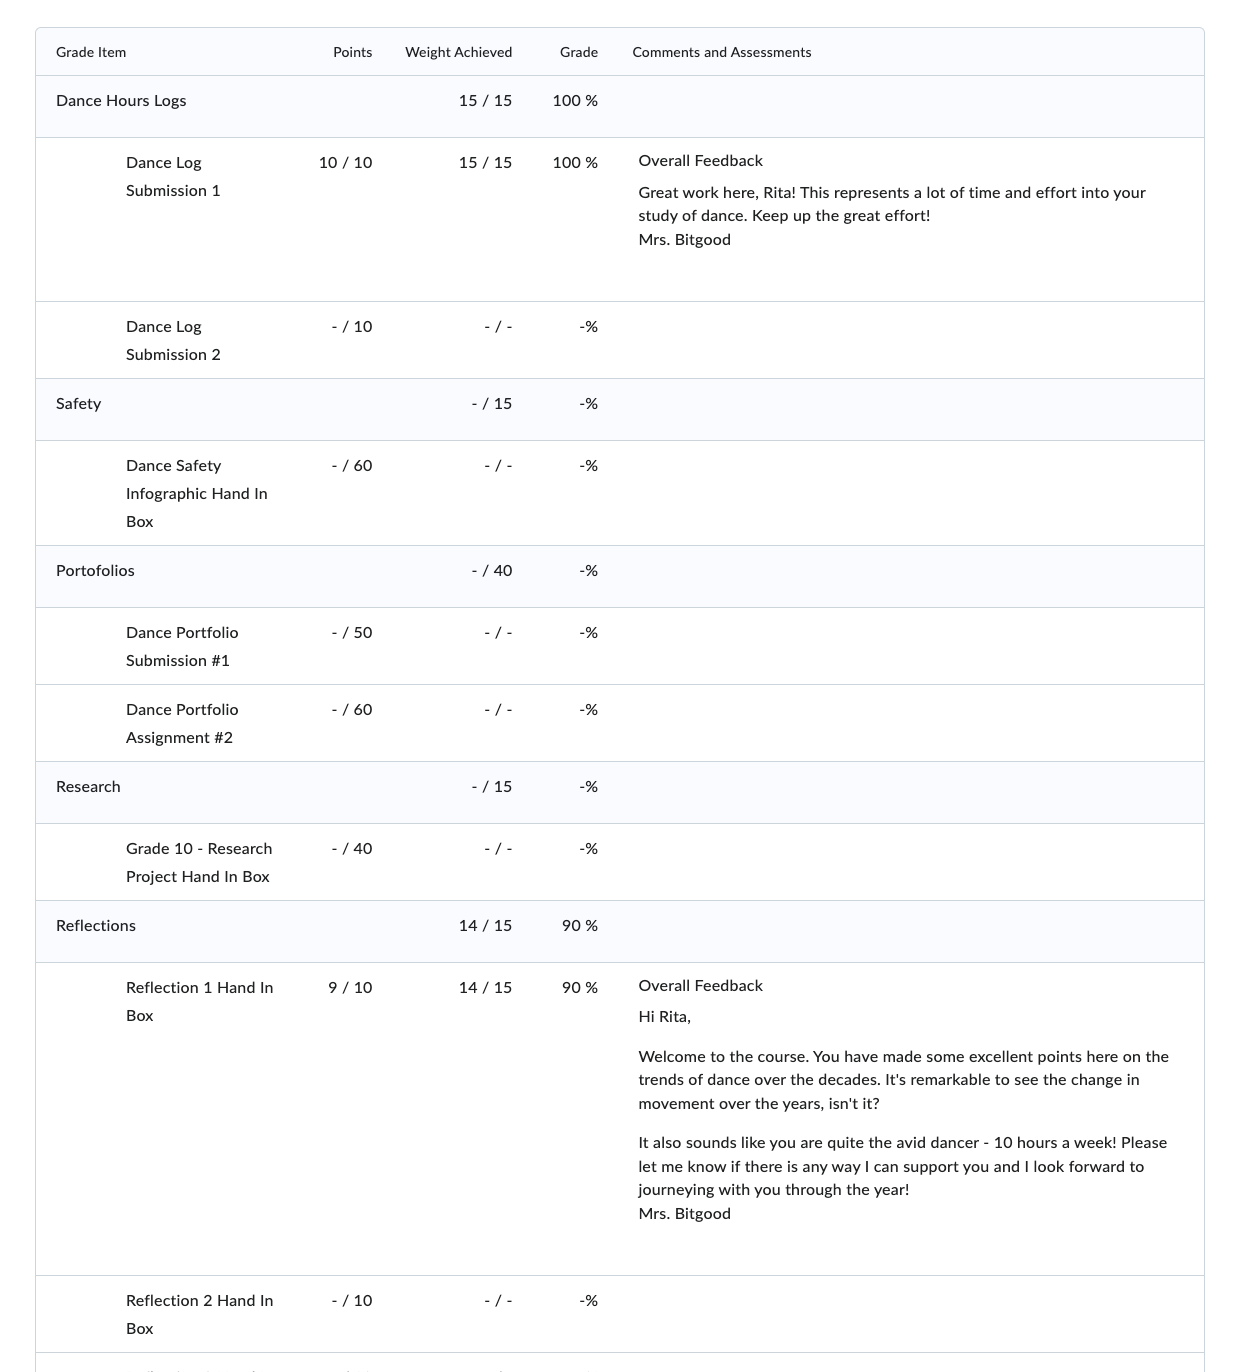
2. Through the grades summary:
-
- Click the Grades link in the course navigation bar:
- Feedback that is on the overall feedback page in StudyForge is connected with the Brightspace gradebook. This feedback is viewable on the Grades page:
- Click the Grades link in the course navigation bar:


Parent Guide: Supporting your child in Online Classes
As parents, you are the bridge between home and school. Your role is vital in helping your child navigate the digital landscape of HCOS and ensure they stay on track. This guide is designed to equip you with the "how-to" for Brightspace so you can confidently check-in on your child's progress in Brightspace.
Getting Started
Firstly, when wanting to check your child's progress ensure you are logged into the correct account. Student progress must be viewed through Student credentials. Instructions on how to access Brightspace can be found here: Student Brightspace Access
-
Password Setup: If a parent doesn't have the password, they can set/reset it via their Parent Encom Account -> Student’s Account button.
-
Note: Updates in Encom can take up to 10 minutes to sync with Brightspace.
-
Navigating the Landing Page
Once logged in, here are the key widgets on their homepage:
-
My Courses: Shortcuts to every active class.
-
HCOS Announcements: Crucial school-wide updates.
-
Student Success Centre: Where they can book an EA for extra help.
-
Progress (Top Nav Bar): The "birds-eye view" of all enrolled courses.
Tracking Progress: What to Look For
1. The Pacing & Progress Tool
This is the best way to see if your child is "on schedule."
-
Where to find it: Inside a specific course, click Pacing & Progress Tool in the navigation bar.

-
What to check: Look at the Progress Wheel. Is it green (ahead/on time) or red (behind)?
-
Suggested Due Dates: Compare these to the current date.
-
Tip: If the student is falling behind, help the parent use the "Bulk Edit" or "Course End Date" (pencil icon) to recalibrate the schedule to something more manageable.
2. Accessing the Gradebook
For a detailed look at achievement and teacher feedback:
-
Enter the specific course from the My Courses widget.
-
Click Grades in the tan navigation bar at the top.
-
Review: Look for the Overall Grade and individual Comments.
-
Encouragement: Point out specific positive feedback from the teacher to build the student's confidence!
Quick Troubleshooting for Families
-
"I can't see my courses!" Check that they aren't logged into the Guardian Encom account. You must use the Student credentials.
-
"My child hasn’t set up their Pacing and Progress Tool, how do I do this?" They can follow instructions found here: Pacing & Progress Tool